Gentlemen,
I am excited to announce a new AAR prepared for the PBEM Quatre Bras scenario using version 4.08. This thrilling battle was fought against the formidable Marshal Ed Blackburn, who masterfully commanded the Allied forces, while I took command of the French troops.
The clash was nothing short of epic, culminating in a dramatic draw. Both sides fiercely contested both flanks and the control of the crossroads, which ultimately remained in Allied hands as night descended upon the battlefield.
I applaud Marshal Blackburn for his exceptional stoicism and unwavering composure in the face of the French grand assault. His flawless management of reserves and skillful deployment of divisions successfully pushed back the French army despite initial setbacks, ultimately allowing the recapture of the crossroads.
Enjoy the battle report, and feel free to share your thoughts and feedback!
___________________________________________________
The Battle of Quatre Bras
After Action Report and Version 4.08 Tactical Review Foreword
 In a "conclusion comes first" manner, I would like to say that I have fought many dozens of PBEM (Play By Email) battles since I discovered the Battleground series back in 1998 and this scenario was probably the most enjoyable in my PBEM career. The 4.08 update undoubtedly elevated the experience to the next level.
The battle's fortunes swung back and forth, with multiple failed french attacks, prolonged firefights, and operational maneuvers to secure favourable positions. The engagement remained thrilling throughout the entire 30 turns. Notably, the casualties were at historical levels typical for Napoleonic engagements.
Below, you will find a description of the engagement. This is followed by a discussion on the impact that 4.08 has on tactics, focusing on the primary battle formation for infantry and its implications for artillery and cavalry.
What sets the 4.08 update apart from previous versions of the game is the increased reliance on musket firepower doctrine versus melee shock doctrine. This shift adds tactical sophistication, as simply bringing more battalions to the critical point of the battle and engaging in mass melee may no longer be enough. Overall, a lot less reliance on melee was observed, despite that it still remains the ultimate tool for breakthrough and quick turnarounds. However, 4.08 puts a material premium on such behaviour and makes it riskier and more costly.
However, this conclusion is still preliminary and must be considered within the context of a particular scenario with distinct factors such as force mix and terrain. Operational considerations also play a role. For instance, if there is an isolated enemy formation that is badly outnumbered and its commander has neglected to allocate a second echelon, it may be worth absorbing the losses from the enemy volley and pressing ahead with assaulting columns. The payoff will come later as the enemy becomes immobilized, isolated, and eliminated via routing and isolation.
Further PBEM testing is required before concrete conclusions can be made, but I certainly appreciate the progress and how the flow of the game has evolved in version 4.08. Well done, WDS, and thank you for keeping the series alive and continuously improving it.
___________________________________________________
Table of contentsSCENARIO QUATRE BRAS 027_V5
FRENCH OOB
ALLIED OOB
THE INITIAL ENCOUNTER: TURNS 1-13
“NEAR RUN THING”: TURN 13-23
THE RIGHT HOOK: TURNS 24-30
LOSSES
FRENCH LOSSES BY DIVISION
ALLIED LOSSES BY DIVISION
ENEMY ACTIONS EVALUATION
FRIENDLY ACTIONS EVALUATION
INFANTRY IN 4.08
SKIRMISHERS IN 4.08
ARTILLERY IN 4.08
CAVALRY IN 4.08
OPTIONAL RULES IN 4.08
___________________________________________________
Scenario Quatre Bras 027_V5 The scenario picked for this PBEM is from 4.08 WDS Waterloo title: Quatre Bras 027_V5 Who will arrive first?
The scenario briefing:
Ney is present near Quatre-Bras. He has been given the task of taking the vital crossroads there. Ney has been given Reille's II Corps reinforced with cavalry. He also believes he has been promised the assistance of d'Erlon's I Corps. The Allied troops defending Quatre-Bras don't look too numerous.
Ney is hesitant because he knows of Wellington's penchant for masking his army by placing them on the reverse slope. Wellington expects to receive assistance all day from troops who are making the long trek to the battlefield. D'Erlon's French I Corps and additional Allied troops have been set to arrive earlier, but with variable possibilities of showing up.The Quatre Bras scenario features French and Allied armies of close to 40,000 troops each, with an average battalion size of approximately 500-600 and a relatively low ratio of about 2 cannons per 1,000 troops, which is quite low for the Napoleonic Wars, especially in the later period.
The scenario is scheduled to last for 36 turns, although the last 8 are night turns, which cannot be relied on as the game engine imposes heavy penalties on active combat during the night. The arrival of reinforcements is variable, adding to the uncertainty of when and who will arrive, if at all.
House rules used:
1. no simultaneous melee by cavalry and infantry within the same hex
2. no deploying artillery within the obstructed terrain unless there is a road, pike or path within the hex
___________________________________________________
French OOB: 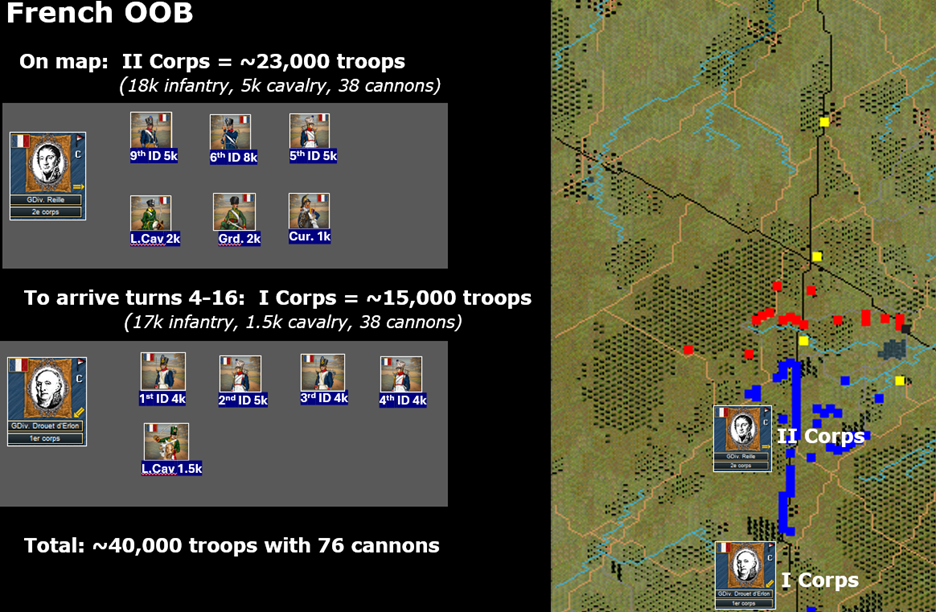
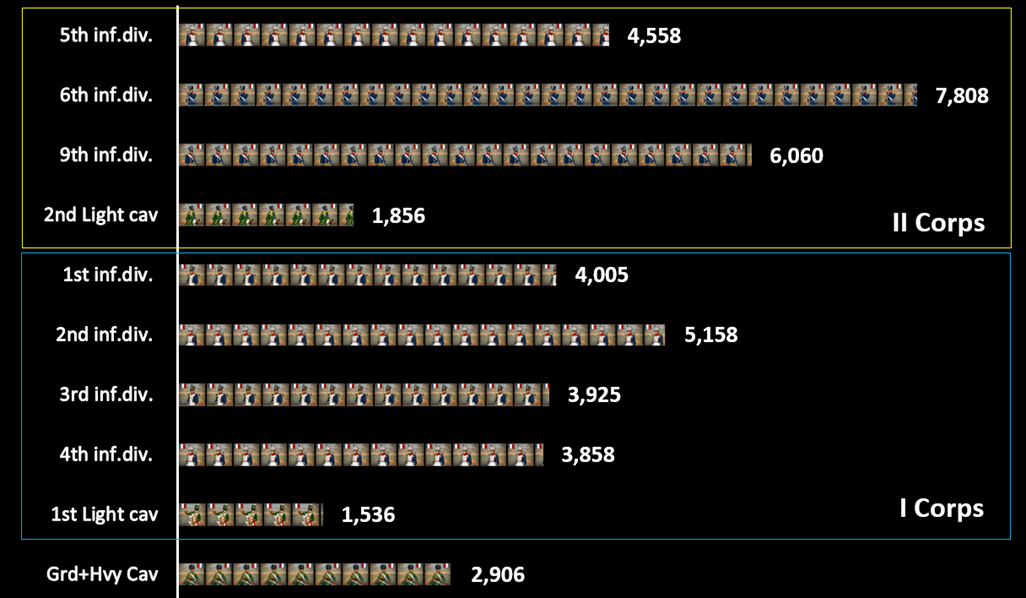
Headcount by division:
___________________________________________________
Allied OOB: 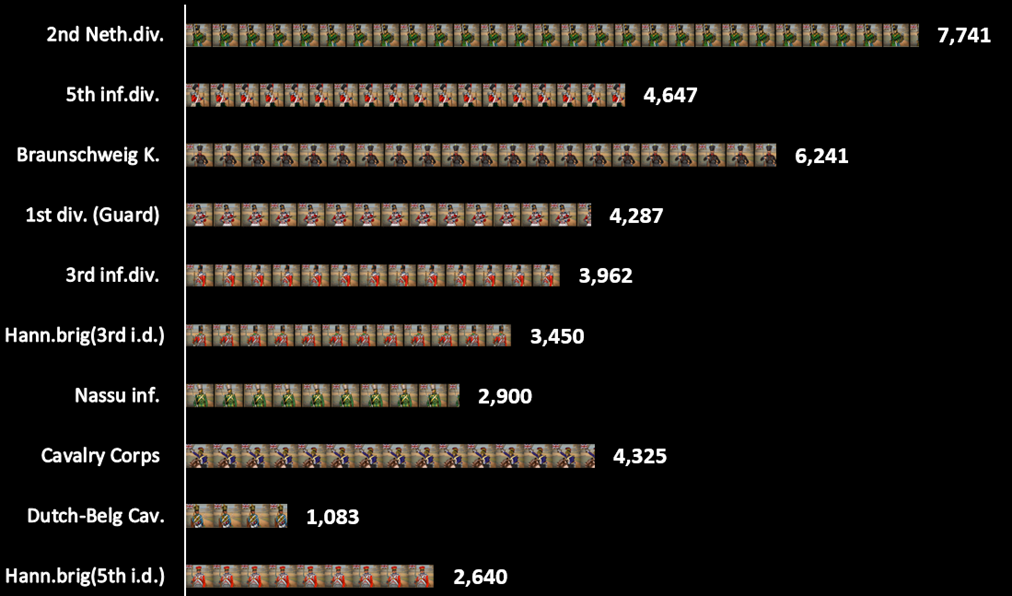
___________________________________________________
The initial encounters: Turns 1-13 Report on the Battle
To His Majesty, Emperor Napoleon,
I have the honour to report the developments and outcome of the recent engagement at Quatre Bras on the 16th of June 1815. The battle commenced with a heated firefight: the II French Corps advancing against the 2nd Dutch Division, successfully pushing them behind the stream.
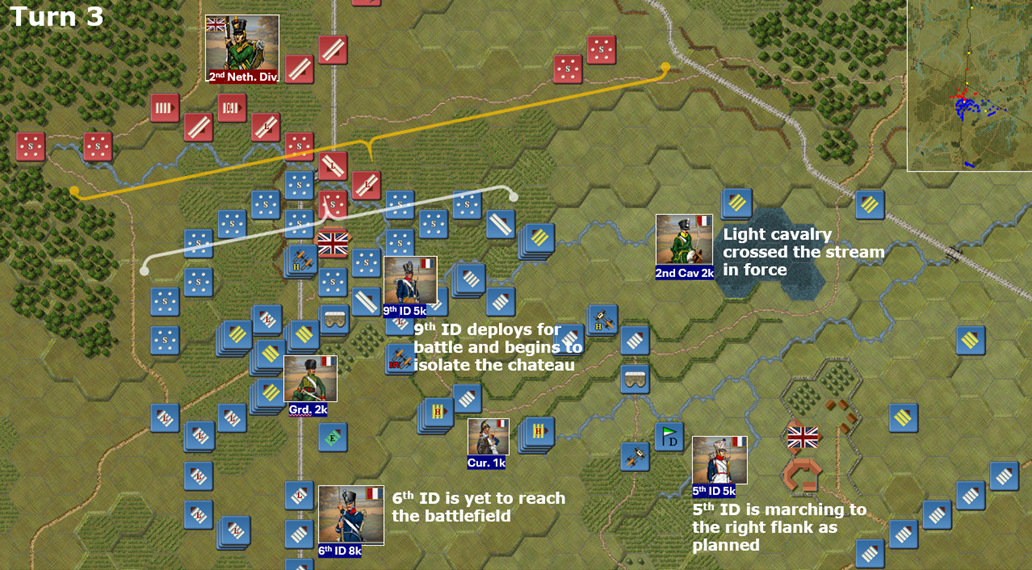
The timely arrival of the Brunswick contingent, however, hindered our efforts to secure the crossroads. I ordered 9th and 6th infantry divisions to push frontally towards Quatra Bras while the 5th French Infantry Division was to deploy on the right in a attempt to turn the left flank of the allied forces.
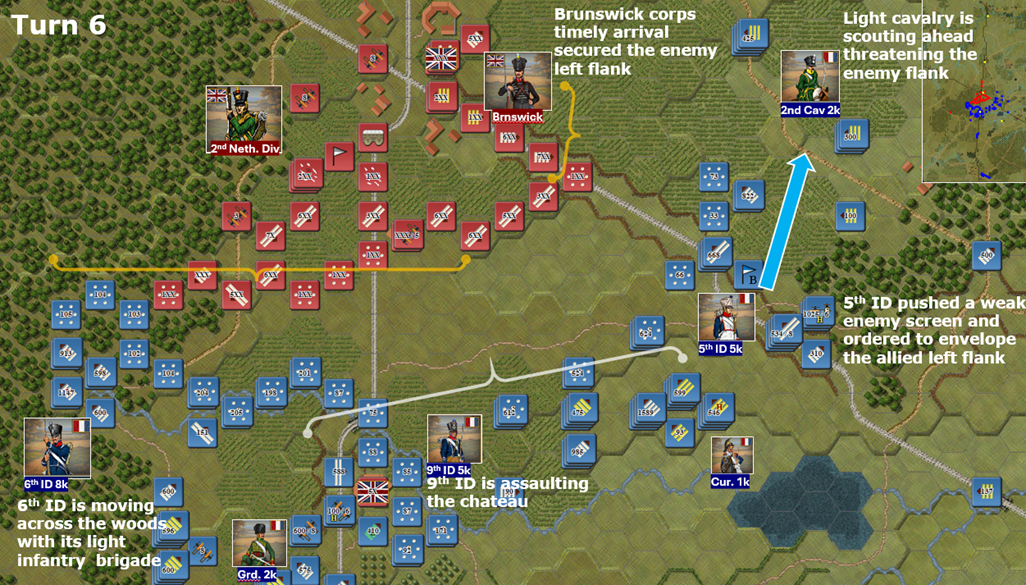
The maneuver by the 5th infantry division was not successful as it was countered by the arrival of the 5th British Infantry Division. Although initially the charges by 2nd Cavalry of the I Corps managed to rout the opposing Brunswick cavalry, disordering the adjacent British infantry formations. Alas, the British line managed to reorder under the musket fire from the 5th French Infantry Division. The enemy line held firm, and the allied defences were bolstered by a skilfully positioned 15-gun battery firing enfilade into the infantry lines of the 5th Infantry Division. Our infantry was forced to retire in confusion:
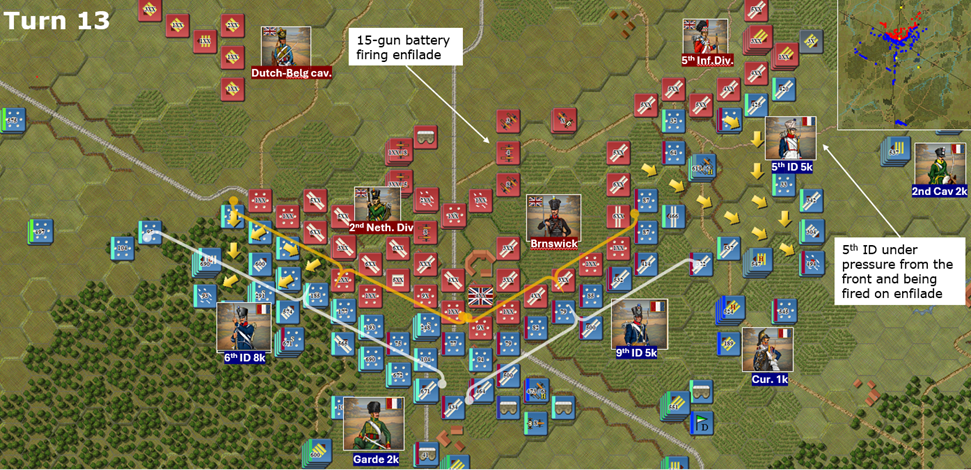
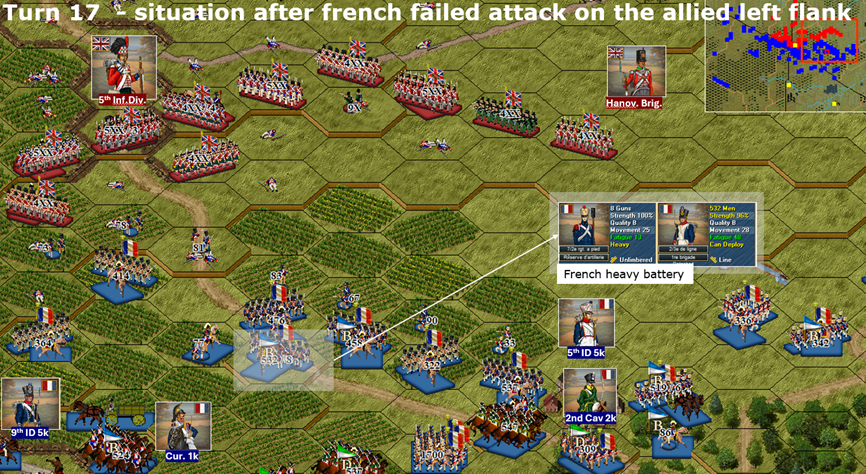
Effectively, the attack on the allied left flank was parried by the timely dispatched British 5th Infantry Division (~4,500 strong) , who were later reinforced by a well-trained Hanoverian brigade (~3,500 strong) from the British 3rd Infantry Division.
The British attempted to follow the shattered infantry of the 5th Infantry Division, but their advance was subsequently halted by our artillery's canister fire. The barrage mowed down several platoons of British infantry, forcing them to retreat behind the reverse slope position
___________________________________________________
“NEAR RUN thing”: turn 13-23In the centre, the II Corps, consisting of the 6th and 9th Infantry Divisions (totalling ~13,000 troops) and Guard Cavalry in reserve, engaged the 2nd Dutch Division and Brunswick contingent.

Musket volleys exchanged at ranges of 200-300 meters continued for over an hour, ultimately pushing the allied forces towards the crossroads. Our advance was reinforced by swarms of skirmishers and 30 cannons supporting the attack.
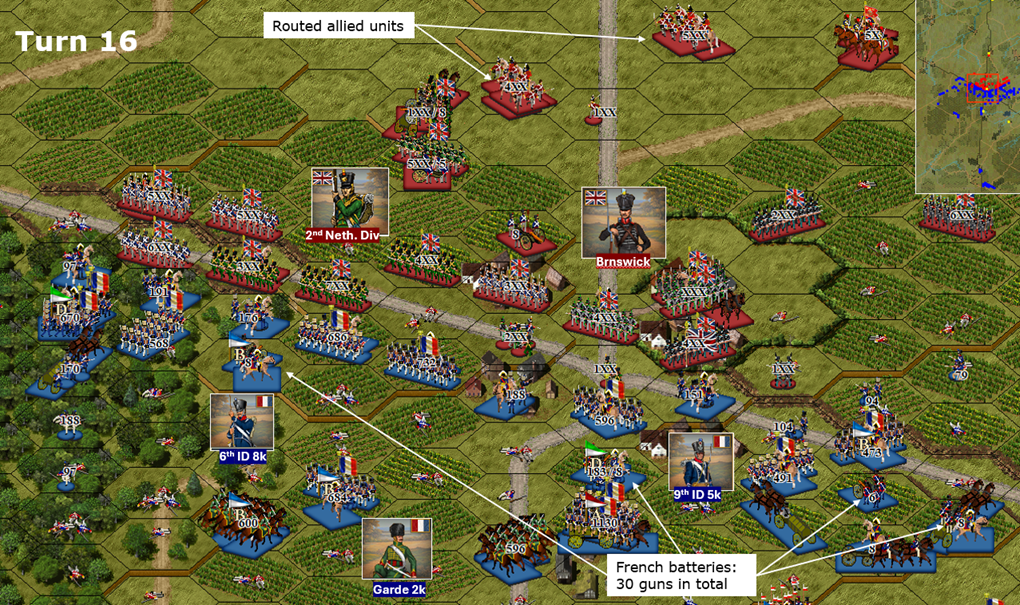
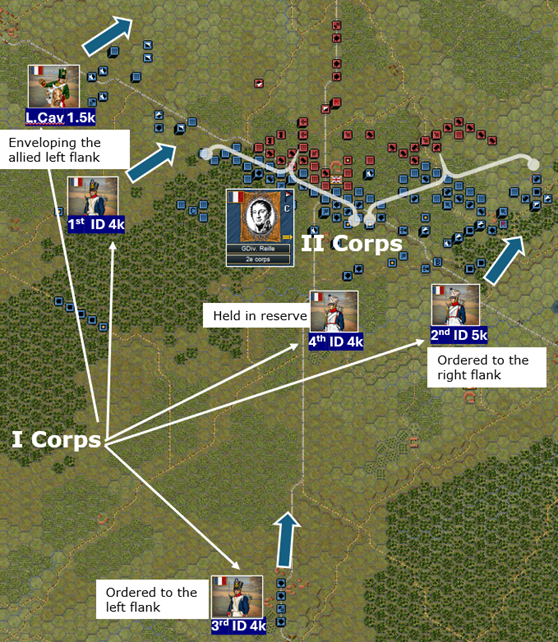
At this moment, elements of the French I Corps under d’Erlon began to arrive on the battlefield. Two infantry divisions and the cavalry division were dispatched to the left flank to extend the allied front and attempt an envelopment. The 2nd Infantry Division of the I Corps was dispatched to the right to support the weary 5th Infantry Division, struggling against the 5th British Infantry Division reinforced by a Hanoverian brigade. The 4th Infantry Division was ordered to the centre to act as a reserve.
Following the heated firefight in the centre in the vicinity of Quatre Bras crossroads and seeing the disorder amongst the allied formations, I ordered a full-scale bayonet assault supported by a Guard cavalry charge. This decisive move allowed us to capture the crossroads, with the Guard Chasseurs penetrating 500 meters into enemy positions, overrunning three allied batteries, numerous wagons, and several infantry battalions. The HQ of the Prince of Orange was nearly captured. Some of the chasseurs also spotted a tall, arrogant-looking gentleman with a hook-like nose just 100 meters from their position. The charge of the Guard Chasseurs and bayonet attacks by the 6th and 9th infantry divisions caused great confusion and disorder in the allied centre.
 [highlighted units are disordered indicating only a few combat ready battalions at the allied centre following the french assault]
 To add to the enemy’s troubles, elements of the French I Corps began to arrive on both flanks of the French I corps and begun threatening the allied right flank to the left of Bossu Woods. The I Corps' light cavalry pushed back the Dutch-Belgian cavalry brigade covering the allied flank.
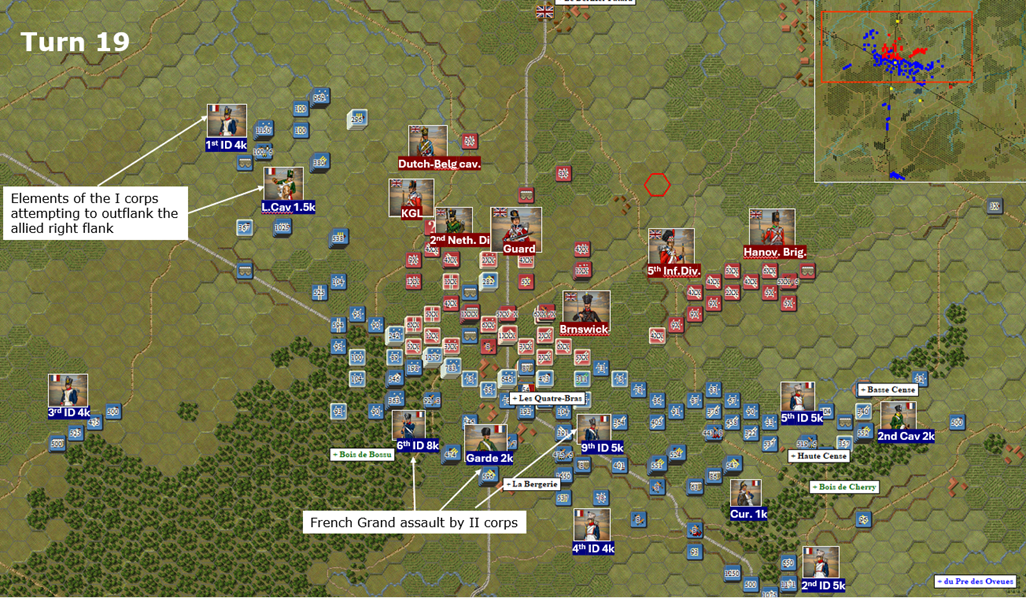
The crossroads and the nearby chateau were in our hands, and
victory seemed imminent. Fresh divisions of the I Corps were recalled to the center to support the final push on the wavering allied centre. On the left flank, elements of the I Corps began engaging the King's German Legion (KGL), turning the enemy flank almost 90 degrees.
Unfortunately, this is when the first elements of the British Guards reached the crossroads, along with a brigade from the British 3rd Infantry Division and with KGL already being in position to cover the allied right. Three squadrons of Your Majesty's brave Chasseurs were surrounded and eliminated by murderous volleys. The British Guards showed remarkable determination and pushed forward despite heavy musket fire. The French infantry of the 6th and 9th Infantry Divisions began to show signs of fatigue, with most battalions reduced to 75-85% of their original strength. A heated firefight ensued with both sides supported by swarms of skirmishers and clashing in point-blank volleys.
On the Allied right flank, two fresh infantry brigades (Nassau and Hanoverian infantry) appeared on the high ground, advancing on the left flank of the French force. This maneuver was supported by artillery firing enfilade on the French 1st Infantry Division engaging the KGL.
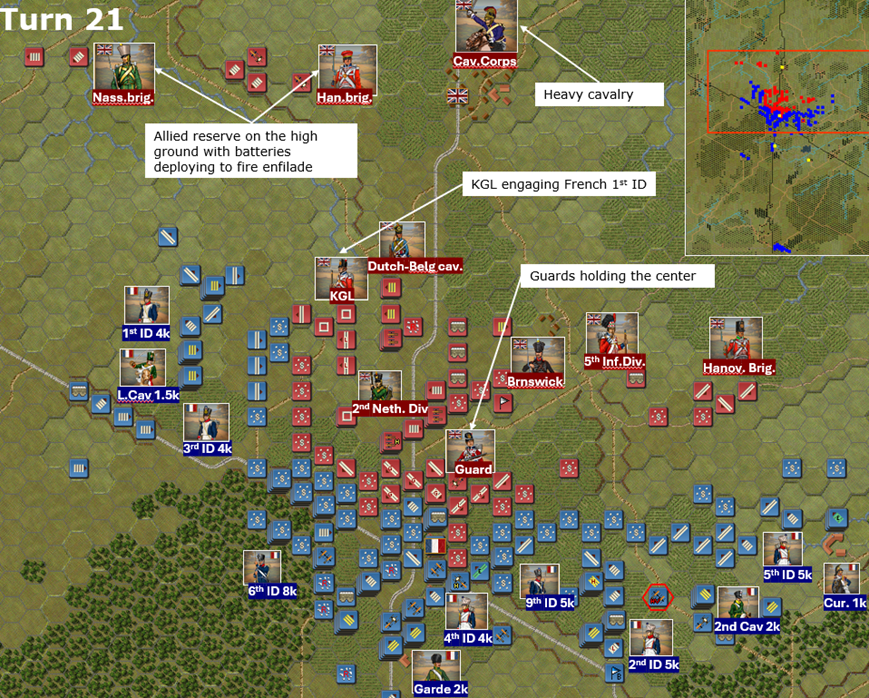
As darkness began to set in, the arrival of British elite heavy cavalry, estimated at 25 squadrons, was spotted in the center. Anticipating the cavalry charges, and fearing that the weakened 6th and 9th Infantry Divisions wouldn't be able to sustain combined pressure from the British Guards and elite heavy cavalry, I ordered a retreat to more favourable defensive positions, relinquishing the crossroads.
Similar order was sent to the I Corps commander operating to the left of Bossu Woods. The retreat was executed with great discipline despite enemy cannon and skirmish fire.
To provide some relief to the French centre and mistakenly believing that most of the British 5th Infantry Division positioned on the allied left was now redeploying to the Allied centre, the French right flank was ordered to attack the Allied left flank. The 5th inf. div. spearheading the attack was supported by a cuirassiers charge, while the newly arrived 2nd Infantry Division of the I Corps following in the second line.
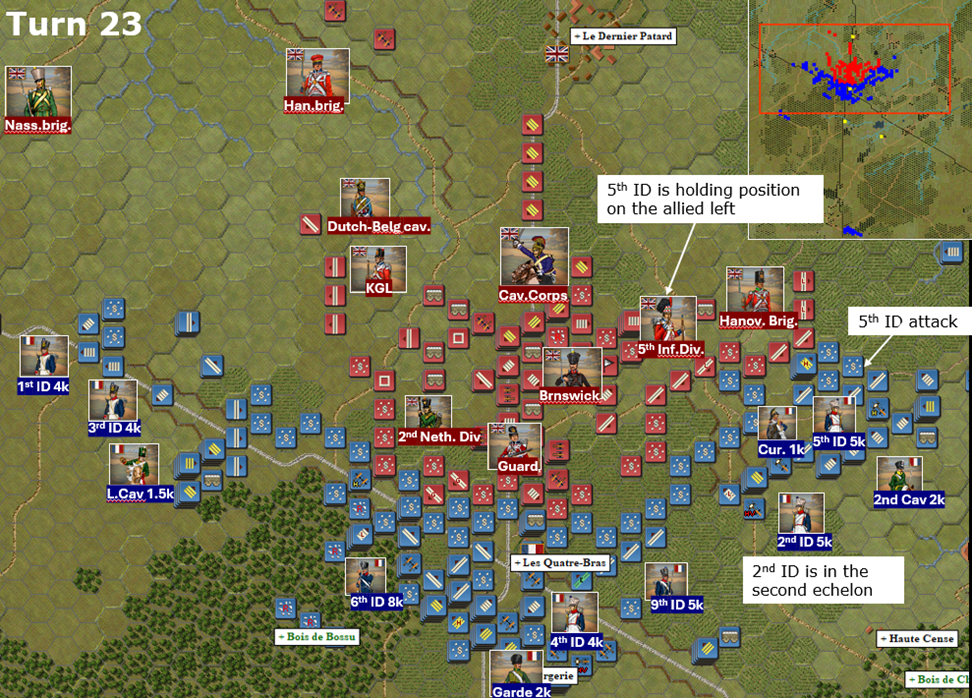
Despite initial success by the cuirassiers and the 5th Infantry Division, the Allied line held firm as 5th British infantry division was found to be in place holding the ground on the allied left. Once again, the French 5th Infantry Division was subjected to enfilade fire from Allied artillery positioned in the center and facing the Allied left. The situation was nearly identical to the previous attack held two hours earlier, and the 5th Infantry Division was forced to engage the enemy at the front while being under heavy enfilade cannon fire.
Exchanging a few musket volleys with the unwavering 5th British Infantry Division and seeing the arrival of the British cavalry reserve, the attack on the Allied left was called off, and the French retreated under Allied skirmish fire.
From the French HQ perspective, the engagement over these three hours looked like a near-run thing for the Allied army. However, the allied commander showed unwavering determination, turning the tables with the precise orchestration of its reserves, skilled deployment of its artillery, and remarkable combat abilities of the British Guards deployed at the critical sector.
The mood at the French HQ shifted from euphoria to grim determination.

___________________________________________________
The Right Hook: Turns 24-30At this stage, visibility was reduced to 200-300 meters. The French center, pushed by the British guards frontally, gave up the crossroads and assumed a defensive positions, retreating to Château Geminacourt taken a few hours earlier.
On the left, the enemy began to assault the French position assumed after the failed envelopment attempt. KGL and Nassau infantry deployed in line and engaged the French line with muskets:
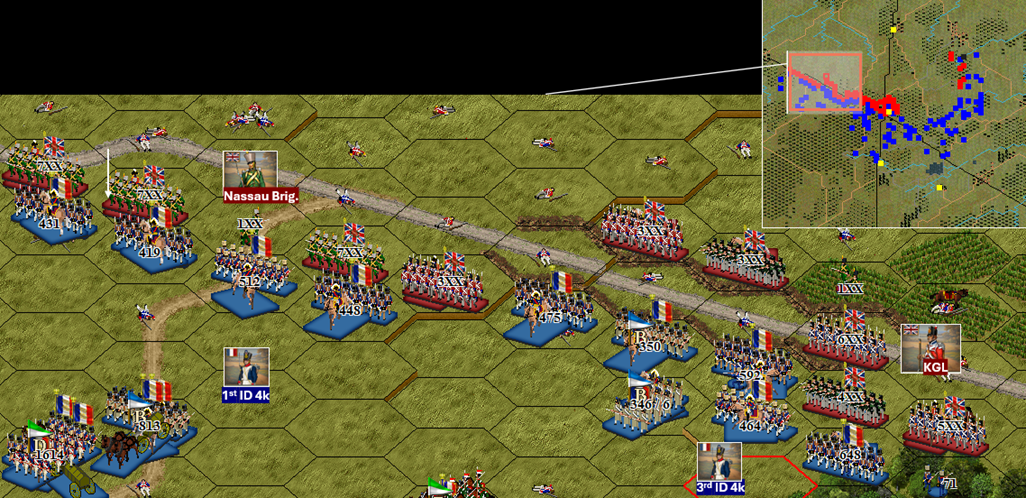
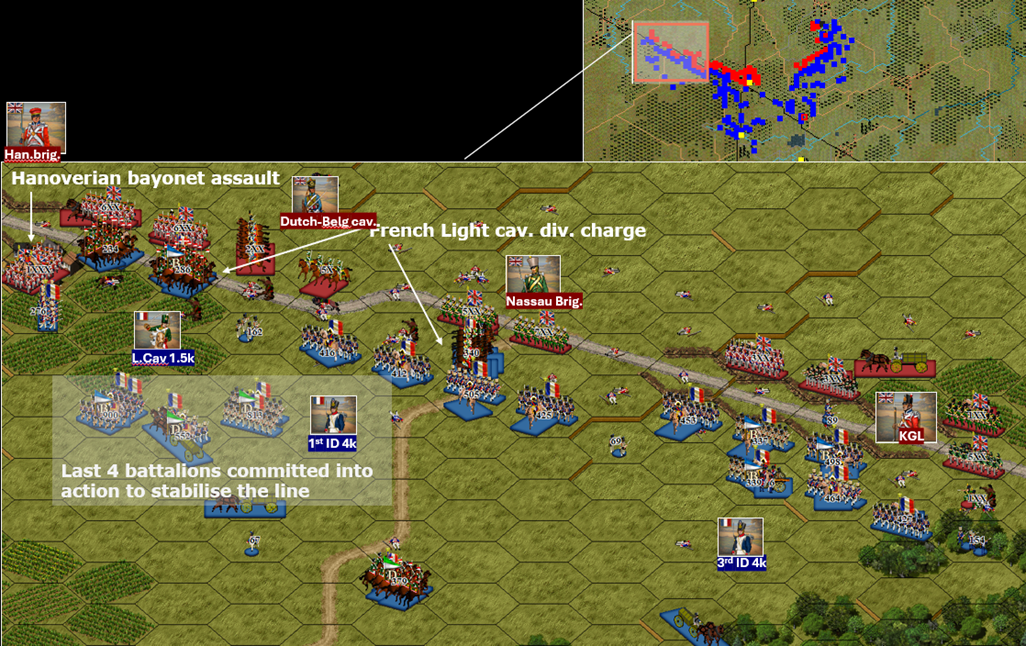
As the engagement progressed, all French units were committed to the last man, and the situation nearly turned into a disaster as there was not a single combat-ready battalion in the second line or in reserve. Finally, the French light cavalry managed to get an advantageous position and almost the entire cavalry division was committed into a series of charges into the flank of the enemy, cutting down many hundreds of Nassau and Hanoverian infantry. As darkness fell, the enemy gave up on attempts to defeat the French left and retreated.
In an attempt to save the day, I envisioned a maneuver to turn the tables in favor of Your Majesty's army. A fresh infantry division of the I Corps, along with all Guard cavalry, were ordered to march from the centre to the French right under the cover of darkness.
The feint is known to the British from their uncivilized gymnastics called boxing. This is where one boxer moves backward as if inviting the opponent to follow, but then suddenly shifts his weight to a flank, delivering a devastating blow to the enemy's jaw. I believe the British call it a hook.
The timing was favourable for such maneuver due to limited visibility so our shift to the right would not be spotted by the enemy. I planned to concentrate close to 4,000 cavalry (including Guard Cavalry, ordered to move to the right flank) and 15,000 infantry, creating an overwhelming superiority over the Allied left, presumably made up of one Hanoverian brigade (~3,000), Brunswick cavalry (less than 1,000 by now), and some elements of the 5th Infantry Division (3,000-4,000), totalling around 8,000 troops. Defeating this Allied force decisively would certainly offset the two previously failed attacks on this flank, the failed envelopment attempt on the Allied right flank, and the loss of the crossroads.
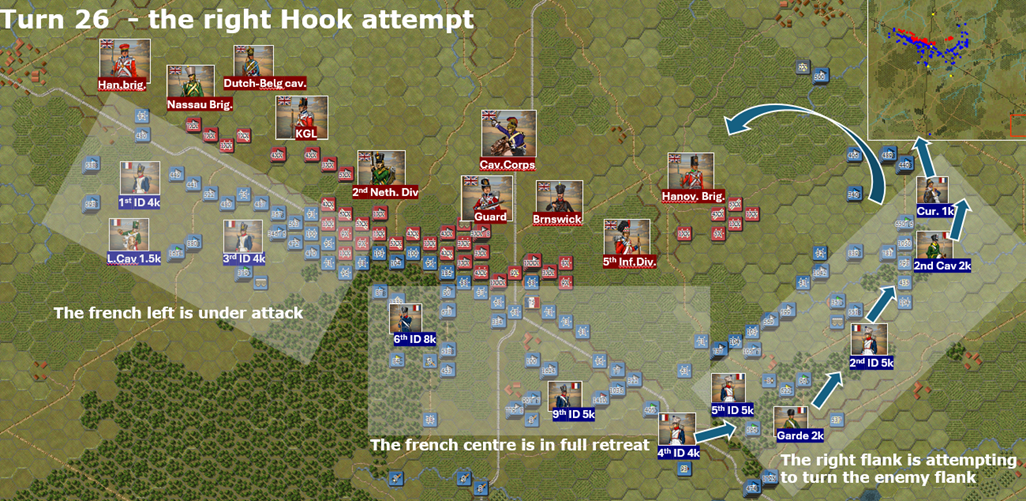
Unfortunately, the maneuver was executed too late in the day. Only one brigade of the fresh I Corps managed to engage the enemy on the far left flank before the confusion of night combat set in. Furthermore, it appears that the Allied command anticipated such maneuver and dispatched the weary Brunswick contingent and a powerful contingent of its fresh heavy cavalry to counter our hook attempt.
Nevertheless, the magnificent charge of the Guard Cavalry, supported by the third attack of the 5th Infantry Division, defeated the Hanoverian brigade opposing them using the weakness created by the bending on the enemy flank. While the combined effort of the cuirassier brigade and 2nd light cavalry engaged the Brunswick contingent, routing it after a brief engagement.
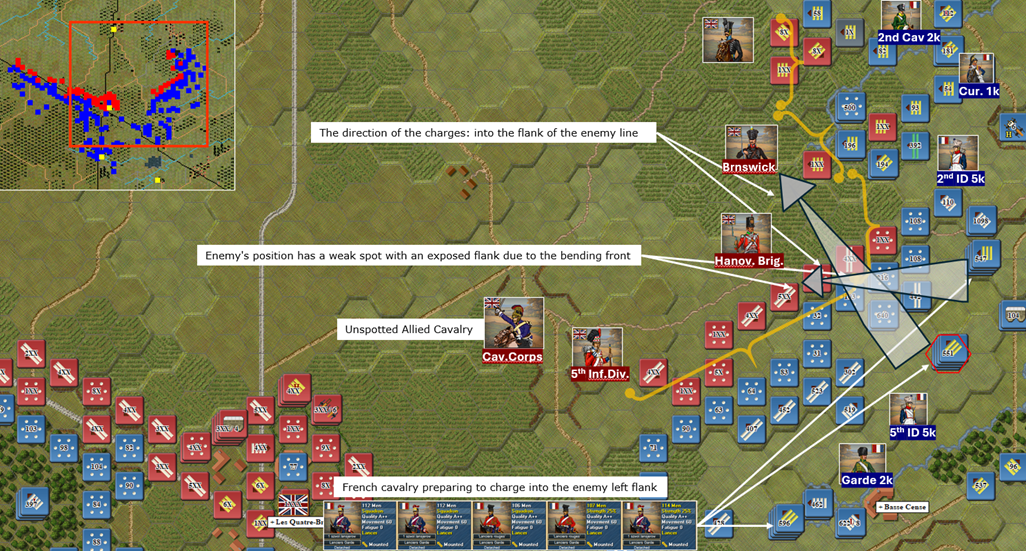
The battle concluded as the allied heavy cavalry arrived on the scene to rescue its left flank and charged into the 5th Infantry Division and 2nd Infantry, cutting down two battalions and routing a few more. The last two turns were made under the cover of darkness, the chaos, disorder and combat chain fails of night combat made it impossible to continue the battle.
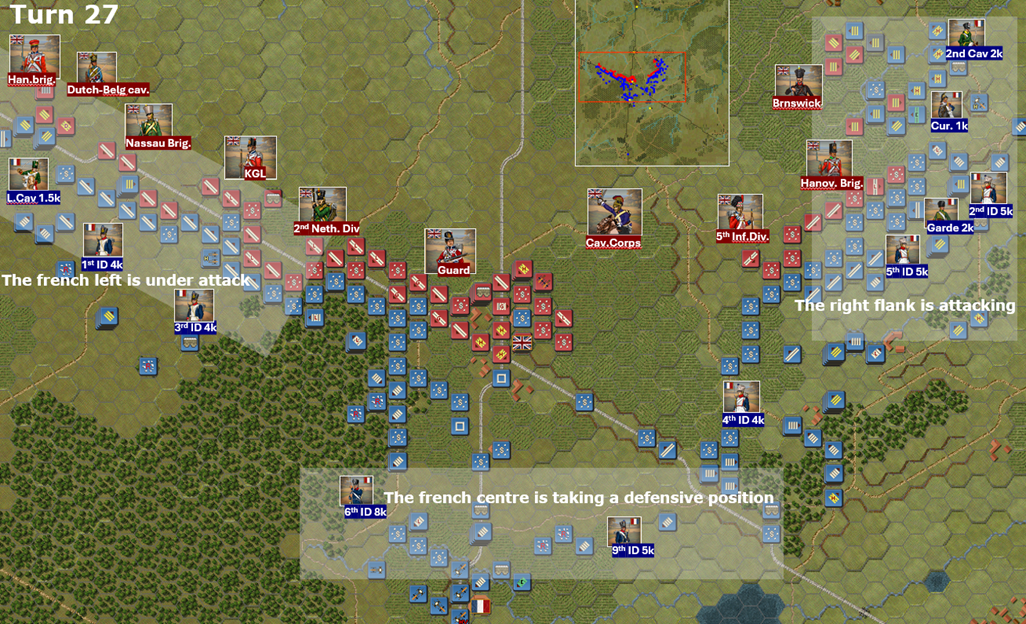
It was already past 11 PM, and disorder and confusion struck both armies. It was over.
The Allied army retained the control of the crossroads and the battle ended as a draw.
___________________________________________________
Losses: 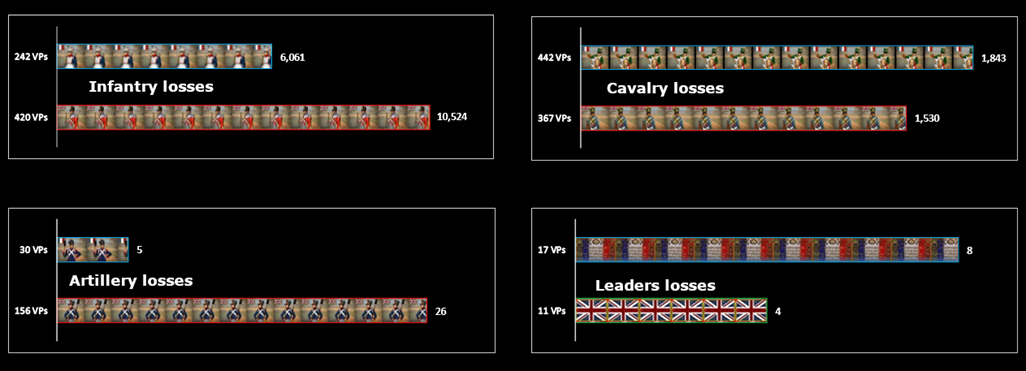
 FRENCH LOSSES BY DIVISION
 The I Corps bore the majority of the losses as all of its divisions were engaged continuously for eight hours. The Guard cavalry covered themselves with glory but paid a heavy price in losses. The II Corps suffered moderate losses as its 2nd and 4th infantry divisions saw limited action wasting most of the time in unproductive marching back and forth.
 ALLIED Losses by division
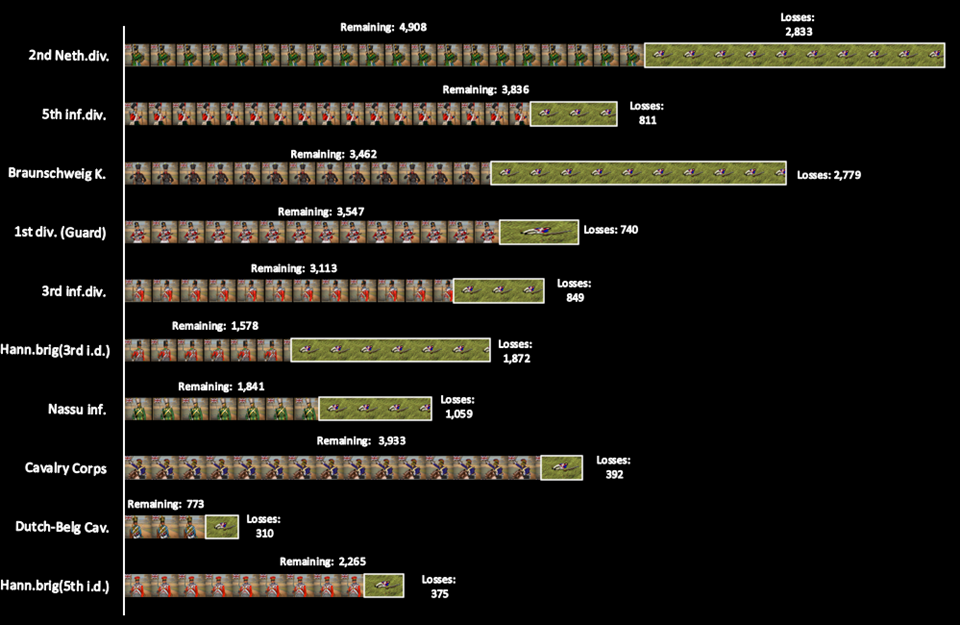
Unsurprisingly, the 2nd Dutch and Brunswick contingent suffered the most, bearing the brunt of the main French assault throughout the entire day. Notably, the Nassau infantry brigade and the Hanoverian brigade from the 3rd Infantry Division were badly mauled by the French cavalry on both flanks in the last hour of the engagement.
___________________________________________________
Enemy Actions evaluation It can be concluded that the enemy HQ displayed cunning operational abilities, shifting reserves just in time to maintain the integrity of the Allied line. The tactical acumen was evident in the deployment of the artillery, which was positioned in the center but fired enfilade into the French formations advancing on the Allied flanks. The superior musketry of the Allied divisions caused significant disruption to our forces, and the Allied commander maximized this strength by consistently deploying his infantry into line formation.
Further evaluation of the battle is suggested to develop an appropriate French response to the enemy's operational and tactical strategies. Establishing a tactical committee reporting directly to Your Majesty is recommended to analyze and counteract the enemy's art of war.
___________________________________________________
Friendly Actions EvaluationOperationally: Although attempts to envelop the enemy flanks failed, they extended the enemy's front, putting extra pressure on the Allied command chain. This also allowed us to maintain sufficient pressure on the enemy center, capturing the crossroads. However, this ultimately proved fruitless with the arrival of elite enemy reinforcements.
Tactically: The French preserved a combined arms approach, deploying numerous skirmishers across the line and using artillery to soften Allied positions in the center before the main bayonet assault. Artillery was also used successfully on the defensive, as seen with the heavy 8-gun battery preventing the British 5th Infantry Division from advancing on the French right when the French 5th Infantry Division was most vulnerable and not in a position to repel the British advance.
Although the French cavalry was present across the entire line, constantly threatening the enemy, the lack of concentration had the opposite effect: isolated charges failed to deal critical damage to the Allied lines despite some Allied battalions and batteries were put out of action for the rest of the engagement. The French HQ rectified this at the final hours of the engagement concentrating most of the cavalry on the right flank under the cover of darkness. The concentration proved decisive only when sufficient numbers were achieved, allowing them to deliver an impactful blow to the Allied left flank.
I await your further orders and stand ready to continue the pursuit or fortify our current position as you deem necessary.
With the utmost respect,
Marshal Ney
___________________________________________________
Infantry in 4.08 For years, there has been a perception among many veteran players of an overreliance on mass melee tactics in the game. Most scholars agree that the musket was the primary weapon of the era, with full-contact bayonet assaults being rare. Such assaults mostly occurred in obstructed terrain where two masses of men faced each other suddenly with limited intention to engage the enemy in hand-to-hand combat. The 4.08 update arguably puts an end to the excessive use of attacking columns, which is no longer justified in many cases.
Musket firepower is now 6 (+20% at range 1), and musket range is now 3, increasing the likelihood of muskets being discharged multiple times during the automated defensive fire phase. These changes contribute to up to +30% increase in firepower for infantry, dramatically raising the risks of attacking enemy infantry line in columns.
Under these settings, attacking columns are statistically suffer more casualties and fatigue compared to the defending line, putting additional risk on the use of melee tactics. To complicate matters further for the attacker, the defending side can deploy multiple infantry battalions adjacent to each other, forming a solid line that further disrupts attacking columns. This defensive deployment is especially effective when playing with flank morale modifier.
During these PBEM battles, it was evident that the defending side often deployed its forces in a solid line, presenting a significant obstacle for the French IIe Corps tasked with capturing the crossroads. In this environment, the natural response for the attacker was to deploy into line formation too to maximize firepower and reduce casualties. Skirmishers were deployed and sent ahead, followed by formed infantry opening fire at the longer ranges of 2-3 hexes and closing to point-blank range as the enemy line accumulated losses and fatigue.
For the defending side, a reasonable response would be to attempt to rotate disordered units of the first line. Disordered infantry formed in line can move backwards 2-3 hexes, depending on the terrain. The second line should be positioned 2-3 hexes back and move forward to replace the disordered formation.
The increased reliance on muskets places extra emphasis on ammunition supply [in this specific scenario, there was an oversupply of wagons for both sides]. For example, the French 6th and 9th French infantry divisions, attacking the crossroads frontally used up all of their divisional ammunition supply. Therefore, I expect to see some units in 4.08 becoming unfit for offensive operations due to ammo shortages. This is an additional factor for players to be aware of. Consequently, the deployment and escort of corps-level wagons will become important consideration.
___________________________________________________
SKIRMISHERS in 4.08 Skirmishers are the biggest beneficiaries of the 4.08 changes in my view. Previously, it was feasible to engage them with columns or maneuver next to enemy skirmish screens, absorbing some of the losses. Now, skirmish fire adds up to material damage. No longer can you easily maneuver in front of enemy skirmish lines in columns, ignoring their fire. This will come at a significant cost: casualties will mount quickly, and fatigue will set in impacting hundreds of men within the battalion. This change emphasizes the importance of deploying into line formation to reduce casualties from enemy skirmishers and to effectively respond with musket fire.
The defensive tactic of deploying in line and covering the line with skirmishers presents a significant obstacle to an attacking force that relies on melee. First, enemy skirmishers must be dealt with before the attackers can engage the defenders' formed infantry.
In response to this challenge, as witnessed in the scenario, the battle often developed as follows:
• The attacking side had to detach skirmishers and deploy them ahead to soften the defensive line and engage enemy skirmishers via melee to disorder them.
• The attacking side then had to deploy formed battalions into line to engage the enemy through the skirmish line from 2-3 hexes.
• This firefight could last 2-3-4 turns before one side became disordered and/or routed. Only then this opened the opportunity to move in with columns to engage the enemy in melee.
With 4.08 in effect, armies lacking sufficient skirmishers may find themselves at a disadvantage and will need to adjust their tactics. The Austrian army is likely to suffer against the French, especially in the early period when there are fewer skirmish formations. The Prussians typically have a sufficient number of light troops in 1813-1815 but will struggle in 1806-1807. The Russian army, with its inferior musketry, is less likely to win musket firefights and will have no choice but to rely on its numerous artillery, wheeling divisional 6-lb artillery forward while being wary of enemy cavalry counterattacks. With patience, the French can disorder and wear down the Russian lines with their numerous and excellent light troops.
___________________________________________________
ARTILLERY in 4.08 "Columns do not break through lines unless with superior artillery”Antoine-Henri Jomini, a Swiss military theorist and general who served in the French and later Russian armies during the Napoleonic Wars.4.08 confirms Jomini's statement and simulates this perfectly as artillery remains the key tool to blast the enemy line prior to an attack. While artillery's overwhelming firepower superiority has been addressed in 4.08 with a material reduction, especially at canister ranges of 1-5 hexes, artillery remains deadly and outguns infantry at any range. Engaging infantry at 1-2 hexes might be too costly in terms of victory points, making the optimal engagement range 3 to 6 hexes.
In the previous version of the game, the artillery's overwhelming firepower forced players to avoid being under artillery fire at all costs. The artillery firepower was unbearable to the point that deploying into line formation and engaging the enemy with muskets under the fire of artillery battery was nearly suicidal, hence players' reliance on columns speed and melee tactics.
n this PBEM, the Allied infantry, formed in line, attempted to stand its ground under artillery fire multiple times. As disorder and casualties gradually mounted, the allied position had to be abandoned. However, it is important to note that, unlike in 4.07, the results are no longer immediate due to the firepower reduction. In one case the Brunswickers held their position under artillery fire for 4-5 turns at the ranges of 400-600 meters, trading casualties for time and awaiting the arrival of the Guards moving towards the crossroads.
On the offensive, artillery remains a powerful tool to break the enemy line and can be moved forward to support the infantry from a range of 3-5 hexes. For instance, in this PBEM an 8-gun battery was positioned right behind a forward battalion, which moved away in the next turn, surprising the enemy with a canister barrage from the range of 2 hexes. This battery was arguably the biggest contributor to the disorder and mounting losses of the enemy's line.
However, under different circumstances and taking scenarios with a higher ratio of guns per 1,000 troops, as seen in the historical battles over 1807-1814 (excluding the Peninsular theatre), artillery's overwhelming firepower could still disrupt the concept of infantry deploying in line. The firepower might be too deadly for infantry to approach in line, thus encouraging to go back to melee tactics.
Further PBEM testing is required to assess this, but it is reasonable to assume that infantry would still struggle to compete with artillery FP in battles like Eylau, Borodino, or Leipzig as these battles had historical ratios of ~6 guns per 1,000 troops and above. If this is the case, it may be suggested to consider further enhancements for 4.09, placing extra premium on using artillery at shorter ranges where it can be directly assaulted by the enemy. This premium could be expressed in victory points, taking the example of the Eckmühl campaign where each French cannon is worth 15 VPs. This would make players think twice before deploying their guns within the enemy's reach.
Historically, the loss of guns was a major disgrace to artillery officers, and their primary concern was the preservation of their pieces (hence no historical positioning in woods, as redeployment under threat would be impossible).
Additionally, further firepower reduction could be considered for short-to-medium ranges. Another 4.08 test game with a -10% firepower modifier (due to muddy weather) revealed that the artillery perceived threat was not any lower with this modifier. Reducing firepower at shorter ranges further may lead to better battle flow, where infantry can maneuver in line and hold positions under artillery fire for extended time, as occurred historically.
___________________________________________________
Cavalry in 4.08 Similar to columns, cavalry is now very fragile against undisordered infantry. The timing of the charge is becoming absolutely critical. The enemy line has to be softened by artillery, skirmishes and formed infantry musket fire before you commit the precious 6 VPs per 25 horsemen (25 infantry are worth only 1 VP) into the frontal charge. Flanking charges observed over this PBEM were the most devastating and impactful with reasonable VPs trade off in favour of the attacker.
The downside is that now undisordered infantry formed in line generally do not mind of being charged frontally, reducing the motivation to form squares. While a large cavalry stack is likely to break through infantry formed in line, the cavalry losses would be devastating, as would be the loss of Victory Points.
In titles where the cavalry charge multiplier is 5 (it is only 3 in Waterloo title) and 25 troopers are worth only 5 VPs (compared to 6 in the Waterloo title), this may present a different value proposition for the cavalry, making the frontal charges potentially justified. Further PBEM testing is required to assess the impact of the cavalry charge multiplier being 5 and the 5 VPs loss per 25 cavalrymen. Perhaps there is standardisation opportunity for future updates so cavalry can receive the same VPs costs and Charge multipliers across all titles.
___________________________________________________
OPTIONAL RULES in 4.08 Rout limiting OFF – there is enough said about this one and to me there is a consensus that if you are after the most authentic historical experience this rule should be off. In version 4.08, this is even more relevant. The rational behaviour in defence is to deploy infantry in a solid line, with battalions adjacent to each other, creating a formidable wall of lead. Without preliminary artillery bombardment and softening by longer-range musket volleys and/or skirmishers, such a formation is extremely difficult to penetrate with attacking columns and extremely costly/difficult to overrun with cavalry. It appears that such a formation has no weakness, especially if it is packed with artillery and positioned in obstructed terrain or behind earthworks. Disabling Rout Limiting is critical to introduce some risk to this formation and to add fluidity to the battles. In warfare, nothing should be guaranteed, and the morale die roll factor is the key to this unpredictability.
Flank morale modifier ON - This rule, when enabled, offsets Rout Limiting OFF to some degree and supports the attacking side when advancing in a solid echelon in line formation. Therefore, it is suggested to keep it on to encourage the attacker to deploy into line for battle.
Line movement restriction OFF – It is suggested to disable this rule to encourage historical behavior of engaging the enemy in line and to prevent abusive mass melee tactics. The 10% disorder probability for C-rated units statistically guarantees that a division advancing in line would have two of its battalions falling into disorder: assuming 8 battalions per division moving in line for 3 hexes = 24 hexes to be covered each at 10% probability of failure = 2.4 battalions failing to advance due to disorder. This is too harsh and would encourage rational behaviour to avoid lines and to use columns, turning the battle into a melee massacre. Hence, it is suggested to keep Line Movement Restriction OFF.
Movement threat ON – with Line Movement Restriction being OFF, Movement Threat serves as the offsetting factor, introducing the possibility that a formation may fail while on the move. It also effectively differentiates and highlights the quality of veteran units, who are able to perform complex maneuvers in front of the enemy and under pressure.
