The Battle of Salamanca——After Action Report
 In order to save time, the report is mainly translated by AI. If there are any errors, please kindly understand.
After reading Alex's two AARs published on the NWC Forum and the WDS website, the idea of recording a battle in detail has been lingering in my mind. This AAR summarizes my recently concluded Battle of Salamanca with my group friend RST7, which took place on June 22, 1812 (gaming period from October 17, 2024, to December 28, 2024). I also hope it can provide some valuable examples, experiences, and ideas for those who are just getting started. However, I must clarify that I only began engaging with John Tiller's Napoleonic Battles series in September 2023. Therefore, my combat skills and advanced command techniques are still very rudimentary and clumsy. Readers will surely find many areas where better ideas and techniques could be applied.
This battle, which lasted for two months, is one of the most exciting ones I have ever played. I must extend my highest respect to my French opponent, RST7. His clever use of terrain, rational deployment of troops, and tenacious psychological resilience brought a thrilling contest to this battle. Wellington's Allied forces had to pay a much higher price than in historical reality to achieve results that were only comparable to historical outcomes.
Table of Contents
1.Scenario Introduction
2.Overview of Both Armies Before the Battle
3.Pre-Battle Plans and Deployment
4.Phase One: From Reconnaissance to Full Contact – Turns 1–10
5.Phase Two: The Struggle for the Great Arapil Hill – Turns 11–19
6.Phase Three: Thunderous Counterattack – Turns 20–24
7.Phase Four: The Bitter Pursuit – Turns 25–37
8.Post-Battle Casualty Statistics
9.Conclusion
Scenario Introduction
Date: July 22, 1812
Scenario Size: Medium
Location: Western Spain, Salamanca
Scope: From Salamanca to Garcia Hernandez
Briefing: Observing the enemy baggage train retreating towards Ciudad Rodrigo, Marmont was unable to detect additional troops concealed in dead ground and assumed that the British 7th Division was merely a rearguard. He decided to send his main force to outflank this "rearguard" and cut off it's retreat. Wellington responded by concentrating his troops behind the 7th Division ready to take advantage of any mistake the French general might make. As visibility improved, both sides recognized the tactical significance of the Greater and Lesser Arapils and made a dash to secure them.
 Overview of Both Armies Before the Battle
The Anglo-Portuguese Army led by Arthur Wellesley

Wellington's Allied Army consisted of the 1st, 3rd, 4th, 5th, 6th, and 7th Infantry Divisions, the Light Infantry Division, Portuguese independent brigades commanded by Brigadier Generals Bradford and Pack, the 1st Cavalry Division, and the Reserve Artillery. In the above force statistics, the strength of each division is represented by the height of the corresponding colored bars, with the gradient color blocks in each bar representing the strength of individual infantry brigades/cavalry regiments within each division. It is worth noting that, in addition to the 1st Division, each infantry division was augmented by a Portuguese brigade of about 2,000 men. The Portuguese would become an indispensable backbone of this force.
Since the Spanish troops participating in the battle were not under Wellington's command, the 3rd Spanish Infantry Division and the Spanish Hussar Brigade are not included in the British OOB (Order of Battle) in the diagram. However, I have included them in the force statistics on the right side.
In terms of artillery, each British infantry/cavalry division had six divisional guns. The divisional artillery of the 1st, 3rd, and 4th Divisions consisted of five 9-pounder infantry guns and one heavy howitzer; the 5th and 6th Divisions had five 6-pounder infantry guns and one light howitzer; the 7th Division, Light Infantry Division, and 1st Cavalry Division each had five 6-pounder cavalry guns and one light cavalry howitzer. The 3rd Spanish Infantry Division had four 6-pounder infantry guns, and the Hussar Brigade had two 4-pounder cavalry guns.
Given the diverse composition of Wellington's army, which included staunch Portuguese allies, the King's German Legion (KGL), Brunswick Oels regiments far from home, and French émigrés (the Chasseurs Britanniques battalion of the 2nd Brigade of the 7th Division), I took an interest in conducting a rough statistical analysis of its composition, which is attached below:

Armée de Portugal led by Auguste de Marmont

Unlike the British divisions which typically consisted of 3 to 4 brigades, each French division under Marmont's Armée de Portugal usually comprised only two brigades.
In terms of artillery, except for a few divisions, the French divisional artillery generally consisted of six guns. It is worth noting that the French light artillery was mostly outdated and underpowered 4-pounder guns.
Regarding the French forces in Spain, I will quote a passage from the designer's notes: '
In a sense, the most straightforward and uniform army was the French army, a product of the centralized military system with the human resources conscripted by the empire. The Peninsula (except for the few months in late 1808 and early 1809 when Napoleon condescended to take personal command) was a secondary theater of war, and thus the resources allocated to it often matched its status... The infantry and light infantry in blue uniforms, along with the dragoons and chasseurs in green, constituted the main body of the French forces in the Peninsula, occasionally augmented by foreign units or splendidly attired light cavalry regiments that added a touch of color to the army. Therefore, the French forces commonly seen in these games were mostly solid and homogeneous, but rarely had any standout elements.'
Below is the comparison table of the two armies' strengths before the battle, as well as the army quality statistics table based on infantry battalions/cavalry regiments/artillery pieces:


As can be seen from the table above, the British army had a numerical and qualitative edge over the French army, whether in terms of total strength (even excluding the low-quality Spanish troops) or overall quality. This was bad news for the French commander. Among the 34 C-quality (i.e., average-quality) infantry battalions, the majority were Portuguese, while the British infantry battalions possessed higher B (good) or even A (excellent) quality. In addition, two A+ (elite) quality Guards battalions were serving in the 1st Division. This is not surprising, as the Duke of Wellington's army had by this time received the primary support from London. In contrast, the French army, though composed of Spanish veterans, was essentially a secondary theater force of the empire, as evidenced by the large number of 4-pounder guns still in service. The vast majority of the line infantry battalions were homogeneous with average quality, with an additional 16 good-quality light infantry battalions. In the subsequent battle, readers will see that even such an apparently mediocre but versatile force is not to be underestimated when used wisely.
However, the British did not receive the additional 20% bonus when attacking in column formation, as was the case with other armies. This was to reflect the historical British preference for line tactics. On the typical Spanish fragmented battlefield of Salamanca, which was divided by streams, woods, and hills, readers will see how this was disadvantageous to Wellington's forces.
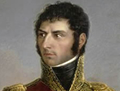
 On the eve of the Battle of Salamanca, Wellington departed from the farmhouse where he had been staying temporarily.
Pre-Battle Plans and Deployment

The above map shows the deployment of our forces before the Battle of Salamanca. The 7th Division, William Anson's brigade of the 4th Division, and Pack's Portuguese brigade formed the Allied forward line. The remainder of the 4th Division was on standby at Los Arapiles, while the other divisions assembled further to the north. In terms of terrain, the only place where a rapid and decisive attack could be launched was the corridor between the two patches of woods on the southern line, which would become my chosen main battlefield.
The initial deployment of the Allied forces was as follows: The 7th Division, 4th Division, and Pack's brigade occupied the line from Pelagarcia to Arapil Chico and Los Arapiles. The Light Division moved eastward through the forest paths to infiltrate the French rear hub, the town of Calvarrasa de Arriba. If they encountered organized French forces, they were to delay and harass them. The 6th Division would serve as a reserve for the 7th Division and the Light Division. The Bradford Brigade, the 1st, 3rd, and 5th Divisions, the reserve artillery, and the majority of the 1st Cavalry Division would assemble along the main road to the south. The Spanish division and the Hussar Brigade would act as a reserve between the 7th Division and William Anson's brigade of the 4th Division.

On the southern battlefield, the most critical points are undoubtedly the Arapil Chico (Little Arapil Hill) and Arapil Grande (Great Arapil Hill). Any offensive or defensive maneuver requires control of these two heights. Arapil Chico is currently under the control of William Anson's brigade, but Arapil Grande is held by the French 8th Division's 118th and 119th Regiments. Therefore, our primary objective is to seize Arapil Grande at the right moment. By examining historical photographs of the battlefield, we can understand why these two heights are so crucial.
 Arapil Grande(Left)and Arapil Chico(Right)
Phase One: From Reconnaissance to Full Contact – Turns 1–10

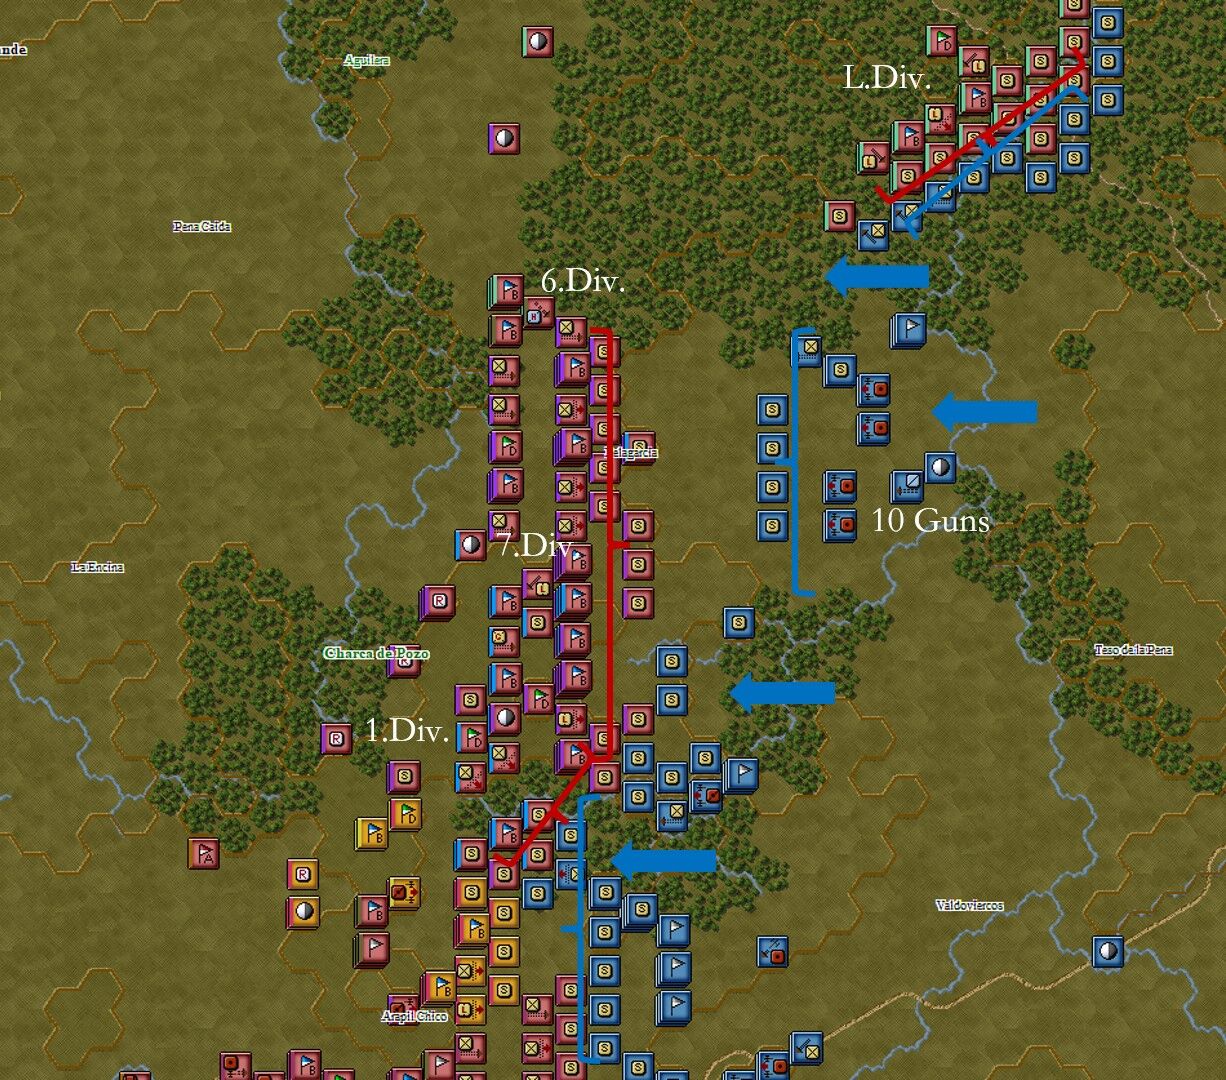
In the initial phase of the encounter on the southern front, the 4th Division and Pack's Brigade formed a defensive line relying on Arapil Chico. A brigade of the French 8th Division occupied Arapil Grande, setting up four cannons to bombard the British forces. Both sides confronted each other in the depression between the two hills. Clearly, they too had realized the importance of this location.

While the French had not yet consolidated their position on Arapil Grande, two brigades of the 4th Division would launch an attack from west to east against the French flank, which was weakly defended. The Bradford Brigade would serve as their reserve. Two light dragoon brigades were positioned behind the front line of the 4th Division and Pack's Brigade, ready to launch a coordinated attack after the flank assault had disrupted the French forces. Since the six divisional guns of the 4th Division were used to reinforce the line on Arapil Chico, this flank attack received no artillery support, and the stream also precluded the possibility of cavalry support.

At the same time, the French appeared to be preparing an attack on the center of the battlefield against the lines of the 7th Division and the Spanish Division. They had assembled around 10 ~ 20 guns and approximately 3 ~ 6 divisions, and traces of French dragoon regiments were observed on the road.
To ensure the security of this part of the line, the elite 1st Division was dispatched to the center to serve as a reserve for the 7th Division and the Spanish Division.

At 3:40 in the afternoon, the 4th Division and Bradford's Portuguese Brigade successfully forced the outnumbered French on the west side of the stream to retreat. The defensive line on Arapil Grande gradually became twisted and deformed, creating a salient that the British could focus their attack on to seize this crucial high ground.
In the center of the battlefield, the French troops assembled in the woods to launch an attack. The cazadores of Castile and several British skirmishers were quickly driven back and routed by the French light infantry, who were battle-hardened and numerically superior. The 5th Division was hastening to relieve the low-quality Spanish troops.

The British assault on Arapil Grande in this battle can serve as a case study for attacking a key enemy defensive position. As advocated in the NWC Forum manual, a main attack should involve the coordinated effort of infantry, cavalry, and artillery, and possess either a numerical or firepower superiority over the defenders.
If Pack's Portuguese soldiers were to launch a direct frontal assault on the well-defended heights held by the French 8th Division, the casualties would undoubtedly be substantial. Key defensive positions like these are often excellent artillery sites, where close-range canister fire can inflict incalculable losses.
Therefore, I first ordered two brigades of the 4th Division to outflank and press against the undermanned 8th Division's flank line, gradually creating a dangerous salient. I also selected an artillery position at an appropriate distance to provide firepower support for the assault. In this case, the 6-pounder cavalry guns of the 1st Cavalry Division provided the artillery support. Of course, it is also possible to take a risk by placing the artillery closer or advancing with the infantry, which could bring greater benefits.
Behind the infantry line preparing for the frontal assault were the 3rd and 4th Dragoons and the 5th Guard Dragoons, who were positioned behind a ridge. Although these units were called dragoons, they were actually classified as heavy cavalry. Their role was to immediately charge from the rear if the French 118th and 119th Regiments showed signs of disorder or retreat, or if the salient became overly distorted under pressure. They also served as a reserve to counterattack if the French cavalry launched a countercharge. If the French infantry attempted to form squares, the artillery and infantry line could deliver concentrated fire, demonstrating the power of combined arms. In such a situation, the French on Arapil Grande would either have to receive sufficient reinforcements to bolster their defenses or begin preparations for a rearguard withdrawal.


In the northern part of the battlefield, the light infantry conducting infiltration missions began to encounter scattered French sappers. Despite their small numbers, the skirmishes in the woods often required the attackers to have at least 3 to 4 times the number of troops to gain an advantage. These sappers temporarily held up the advance of the British light infantry.
Phase Two: The Struggle for the Great Arapil Hill – Turns 11–19
After half an hour of intense firing and advancing, the French began to withdraw from Arapil Grande in an orderly manner. The soldiers of the 118th Regiment, relying on the hillside, fired back at the Portuguese soldiers, buying time for their comrades to retreat. This was a difficult fight for the Portuguese, as most of the bullets fired uphill would either overshoot their targets or hit the ground before reaching them. After two volleys from the French, the Portuguese 1st and 16th Regiments (2nd Battalion) became disordered. As the routed soldiers retreated, they also disrupted the 3rd Dragoon Regiment and the 5th Guard Dragoon Regiment, which had been preparing to charge. Only the 4th Dragoon Regiment remained in good order.
Nevertheless, Brigadier General J.G. Marquis de Marcant, the commander of the dragoon brigade, still ordered the 4th Dragoon Regiment to charge the French rearguard on the hill. In reality, Marcant was killed in a decisive dragoon charge at the Battle of Salamanca.

The French had already been thrown into disorder in the earlier fighting. The charge of the 4th Dragoon Regiment effortlessly broke through the 1st Battalion of the 118th Regiment. After the red-coated dragoons crested the hill, they did not pause but immediately launched a flank charge against the 2nd Battalion of the 120th Regiment and the 1st Battalion of the 122nd Regiment on the reverse slope, sweeping across the French defensive line from north to south.

In the post-battle analysis, it was clear that the routed soldiers of the 118th, 120th, and 122nd Regiments had caused a general disorder among the French troops on other parts of the line, with almost the entire 8th Division falling into retreat. However, under the rallying efforts of Marmont and the division commander of the 8th Division, General Bonnet, many soldiers regained their order.
The 4th Dragoon Regiment also suffered over 90 casualties in this charge. The French casualties were approximately 2.5 times that number.

While the struggle for Arapil Grande was ongoing, the 5th Division had successfully taken over the positions of the Spanish Division. However, the French had assembled more than ten guns in front of the 5th Division, temporarily halting its advance. The 3rd Division and the reserve artillery were arriving as the main reserve force, ready to launch a heavy punch from west to east.
In the center, the French 1st and 5th Divisions advanced under cover of the woods to avoid British artillery fire, while more than ten guns were assembled for the assault on the heights held by the British 7th Division. To avoid the French artillery, most of the 7th Division took cover behind the ridge, leaving only a few skirmishers forward to keep an eye on the French movements.

After driving off the British skirmishers and cazadores of Castile from the woods, the French 88th and 82nd Regiments finally made contact with the defensive line of the British 7th Division. However, I had already made ample preparations here. The 5th Battalion of the 88th Regiment and the 2nd Battalion of the 82nd Regiment launched a fierce assault on the Chasseurs Britanniques battalion, composed of French émigrés, forcing these traitors to give up their position, but failing to cause them to rout.

By half past four in the afternoon, the British had fully taken control of Arapil Grande. The line of the 4th and 5th Divisions and the two Portuguese independent brigades had formed a straight line running from north to south. However, the French did not lose their order but retreated slowly and steadily. The 1st Cavalry Division and the King's German Legion artillery of the 4th Division were working hard to haul their guns to the top of the hill to bombard the retreating French forces.
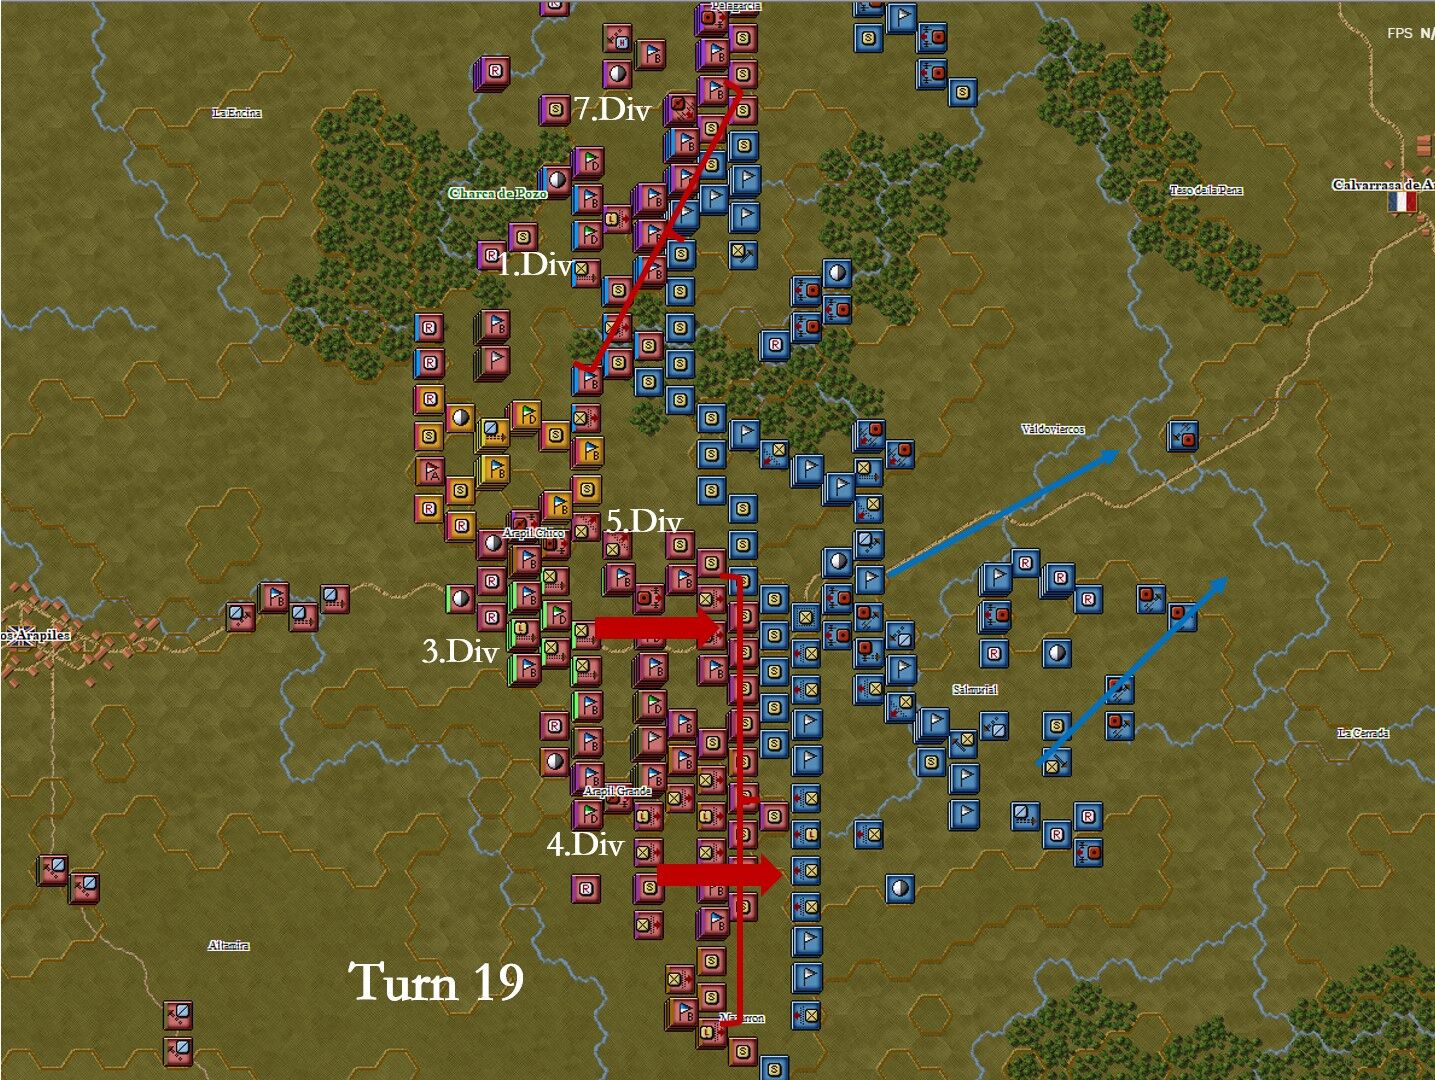
By Turn 19, a bizarre counterclockwise situation had emerged on the battlefield: the British main force on the southern front was constantly pushing the French eastward, while the French on the northern front were trying to push the British westward. Despite having a significant numerical advantage on the southern front, the British found it difficult to achieve a breakthrough. My opponent had clearly realized that victory was unattainable here and had therefore set up multiple artillery positions in advance to delay the British advance.

The position of the 7th Division also came under concentrated assault by two French divisions. The 1st and 2nd Light Infantry Battalions of the King's German Legion were forced back by the 4th Battalion of the French 66th Regiment and the 2nd Battalion of the 15th Regiment, causing a distortion in the defensive line. However, the French, choosing to attack from the woods to avoid artillery fire, left their attacking flank exposed, thus laying the groundwork for a British counterattack.

Phase Three: Thunderous Counterattack – Turns 20–24


The counterattack began with the successive charges of the 1st and 2nd Dragoon Regiments of the King's German Legion, led by Bock. The elite reserve forces of the 1st Division, including the 1st Battalion of the Coldstream Guards and the 1st Battalion of the 3rd Guards, along with the second-line troops of the 7th Division, drove the protruding French forces back into the woods. Two French battalions were surrounded because they could not retreat in time. The offensive of the French 1st and 5th Divisions was completely halted here.

In the northernmost sector, the French 2nd and 4th Divisions finally managed to break through the delaying tactics of the British skirmishers in the woods and approached the defensive line of the British 6th Division, while driving the Light Division towards the northwest. However, the overall situation was already beyond redemption. The two French divisions had been entangled with the British skirmishers in the woods for too long. Even if they could break through the well-prepared 6th Division and Light Division, it would not change the overall situation on the battlefield.

In the southern sector, facing the gradually solidifying French lines, I recklessly ordered the 1st and 2nd Castilian Lancers Regiments to charge the French forces head-on. Although they successfully broke through two French battalions and created a gap, the hussars suffered heavy losses and had to retreat to the rear to regroup under the cover of infantry.

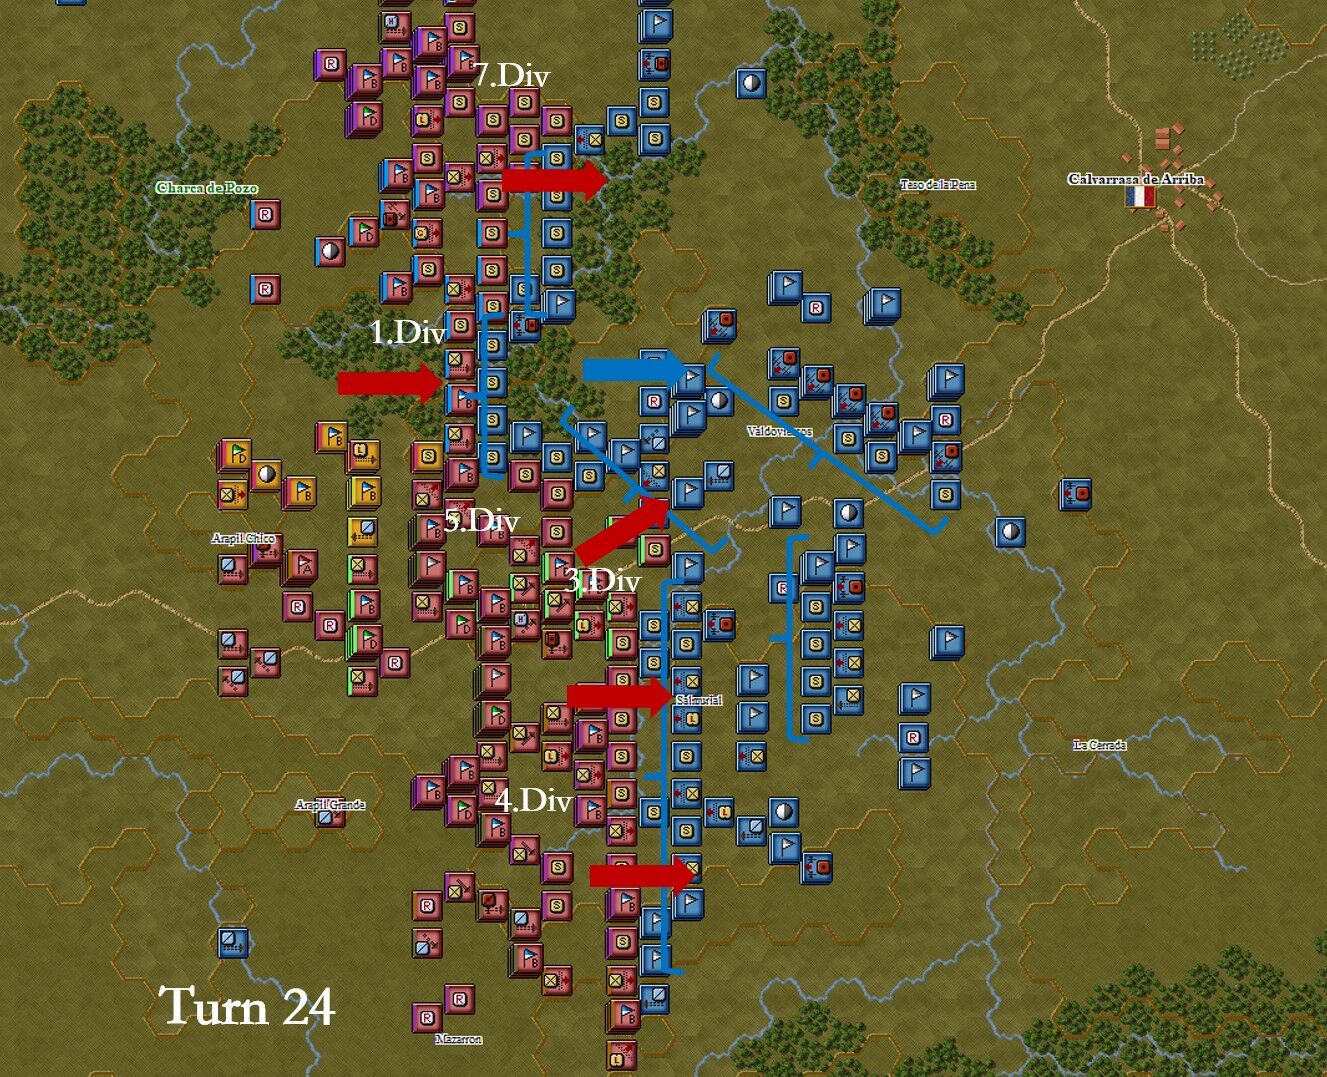
By six o'clock in the evening, that is, the 24th turn, apart from continuing to drive away skirmishers at the northernmost end, my opponent had already given up the idea of attacking and turned to an orderly withdrawal, which had actually begun a long time ago on the southern front. As can be seen from the map, the French had prepared several layers of defensive lines to organize the British breakthrough—especially assembling a large artillery position consisting of nearly twenty guns. The 5th Division, responsible for the offensive in this direction, suffered heavy losses under the fire of the French line infantry and artillery, with casualties rising rapidly. Under these circumstances, I ordered the last reserve, the 3rd Division, to replace the 5th Division and continue the attack, the 4th Division to outflank and threaten the flank from the southern front, and the 1st Division and the just-rested 7th Division to jointly launch an offensive to drive away the French forces in the central forest salient.
Phase Four: The Bitter Pursuit – Turns 25–37
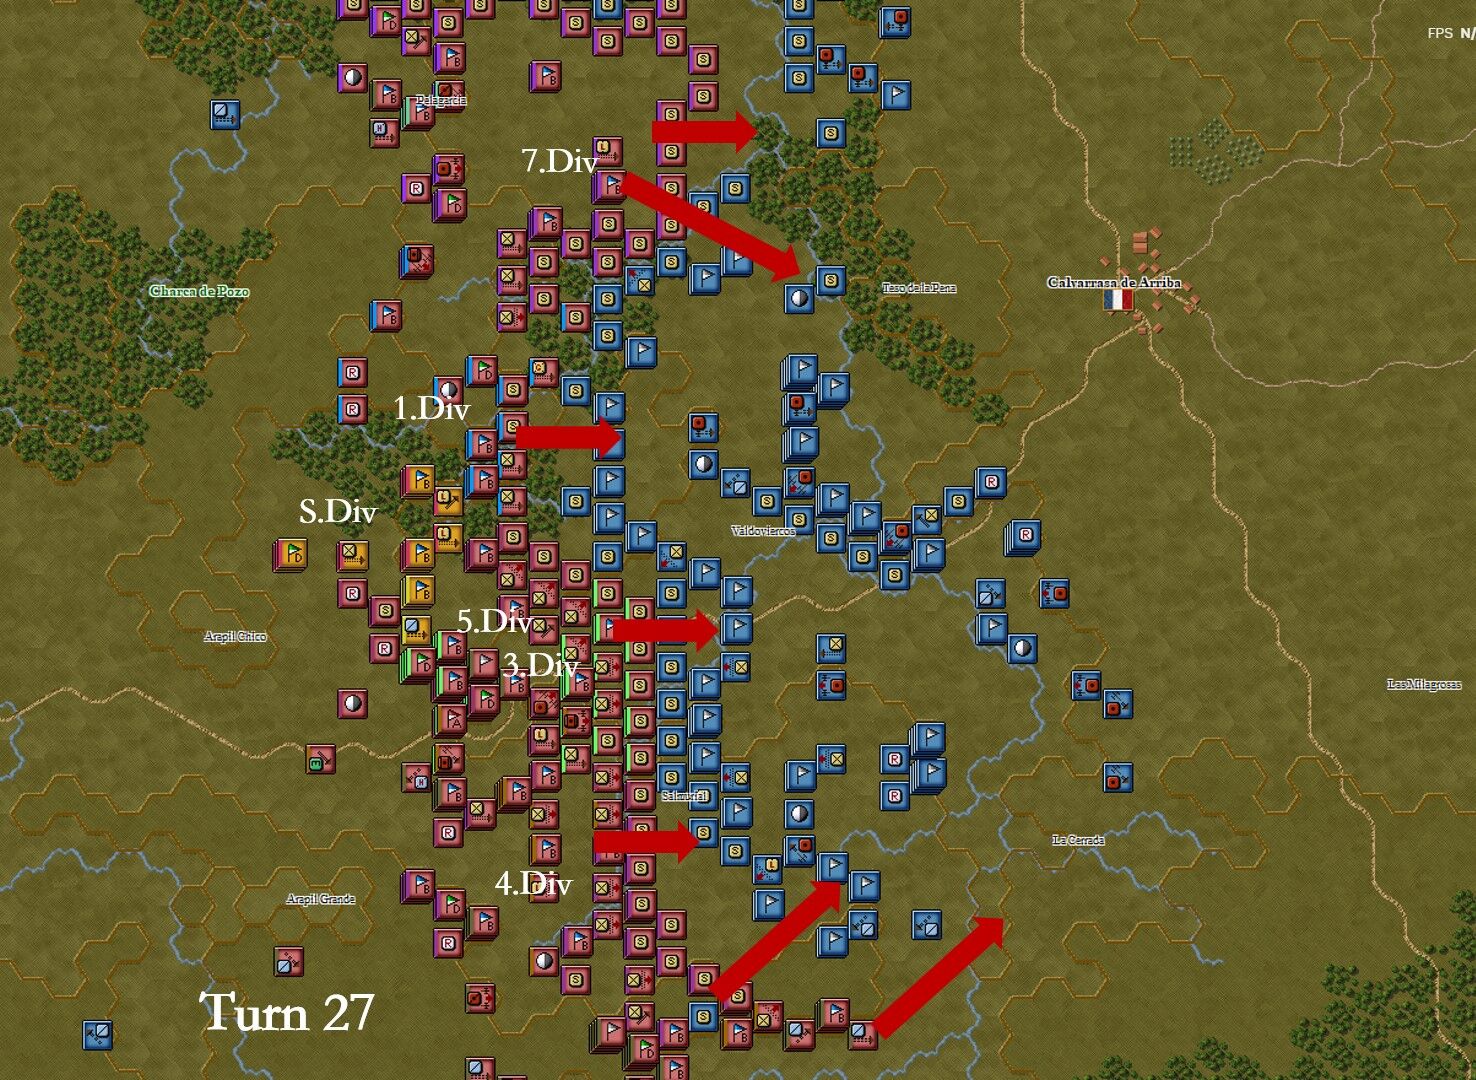
As the French army began its overall retreat, the British forces launched a full-scale offensive. The Light Division and the 6th Division, on the northern front, kept an eye on the French 2nd and 4th Divisions and maintained the defensive line. The remaining five divisions and two independent brigades launched a comprehensive attack: the 7th Division and the 1st Division were to break through the flank defenses of the French artillery position from north to south, which was held by the severely battered French 1st Division. The 3rd and 5th Divisions applied pressure to the rear guard of the French 3rd and 6th Divisions from the front. The 4th Division and the two independent brigades threatened the French 7th Division on the southern flank from south to north and cut off the retreat route from the south. The Spanish Division served as the general reserve.

The threat to the flank forced the French to abandon their artillery position and begin to withdraw. However, due to the crisscrossing streams, the British cavalry was unable to pursue effectively, so the infantry had to follow the retreating French forces. The numerous skirmishers in the rear guard caused considerable trouble for the pursuing British troops.
The bitter pursuit ultimately came to an end as night completely enveloped the battlefield.
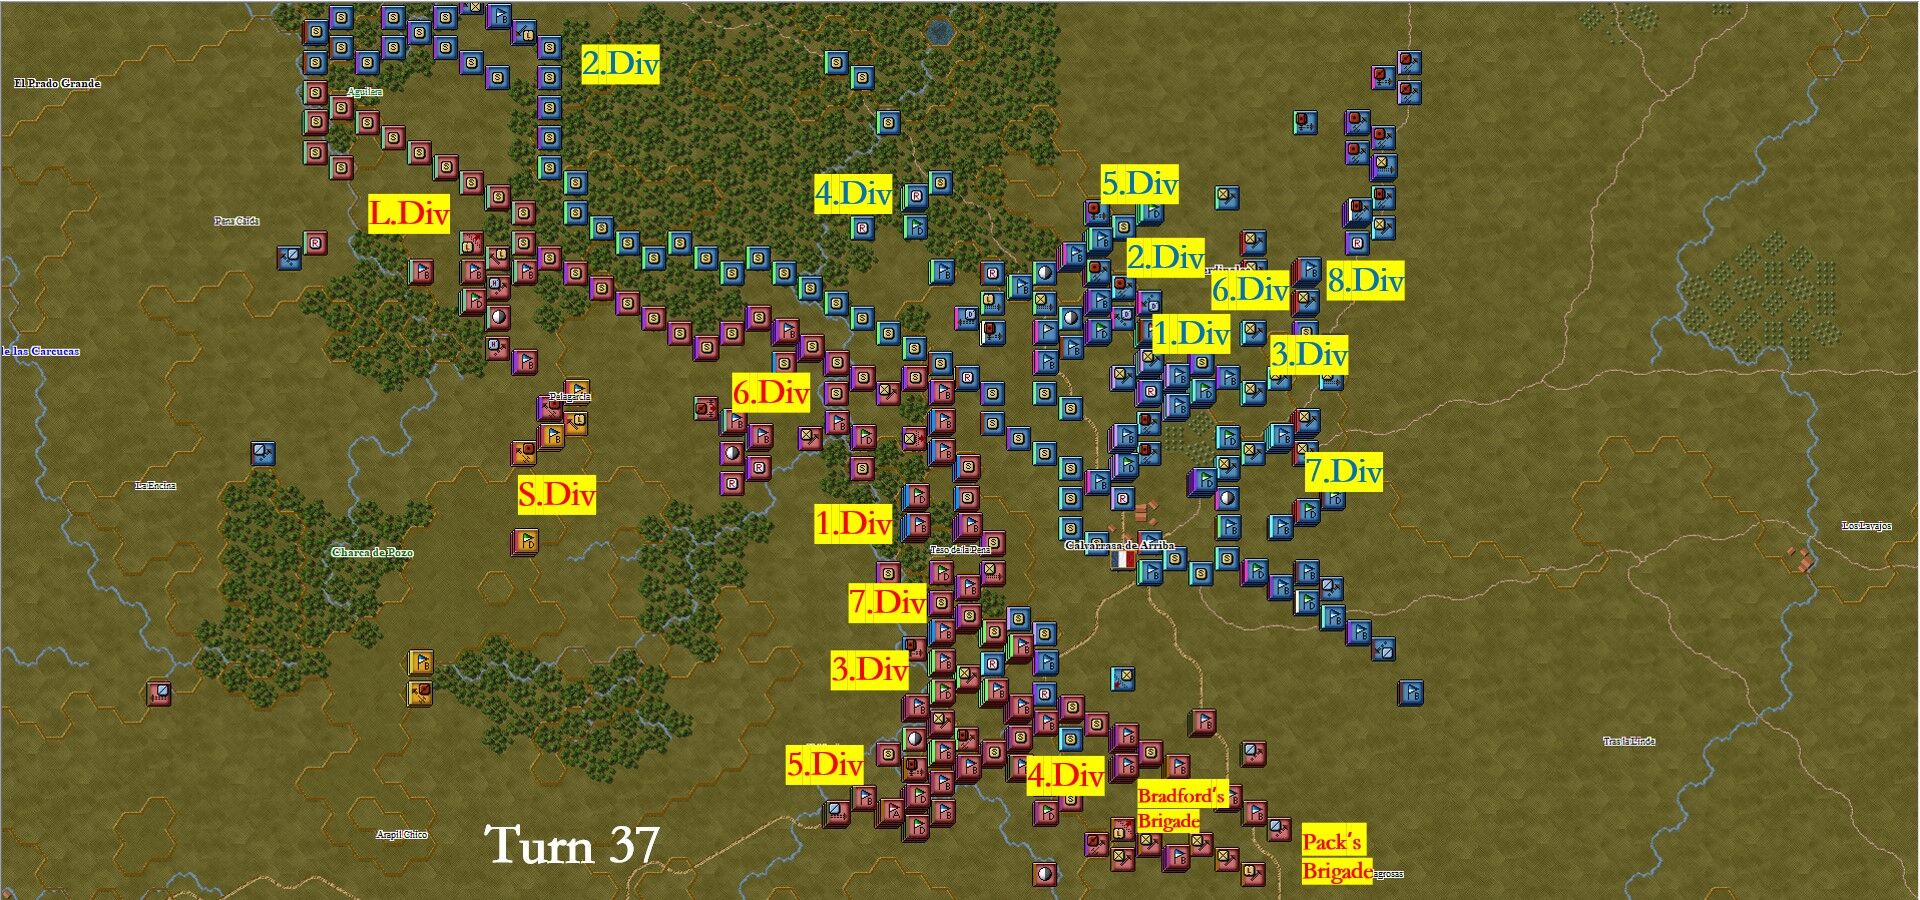
The situation at eight o'clock in the evening when the battle ended
Post-Battle Casualty Statistics
The battle ended with a minor defeat for the French forces. The casualties for both sides are as follows:

The casualties for each unit of the British and French armies are as follows, with the purple blocks indicating the proportion of casualties:
Anglo-Portuguese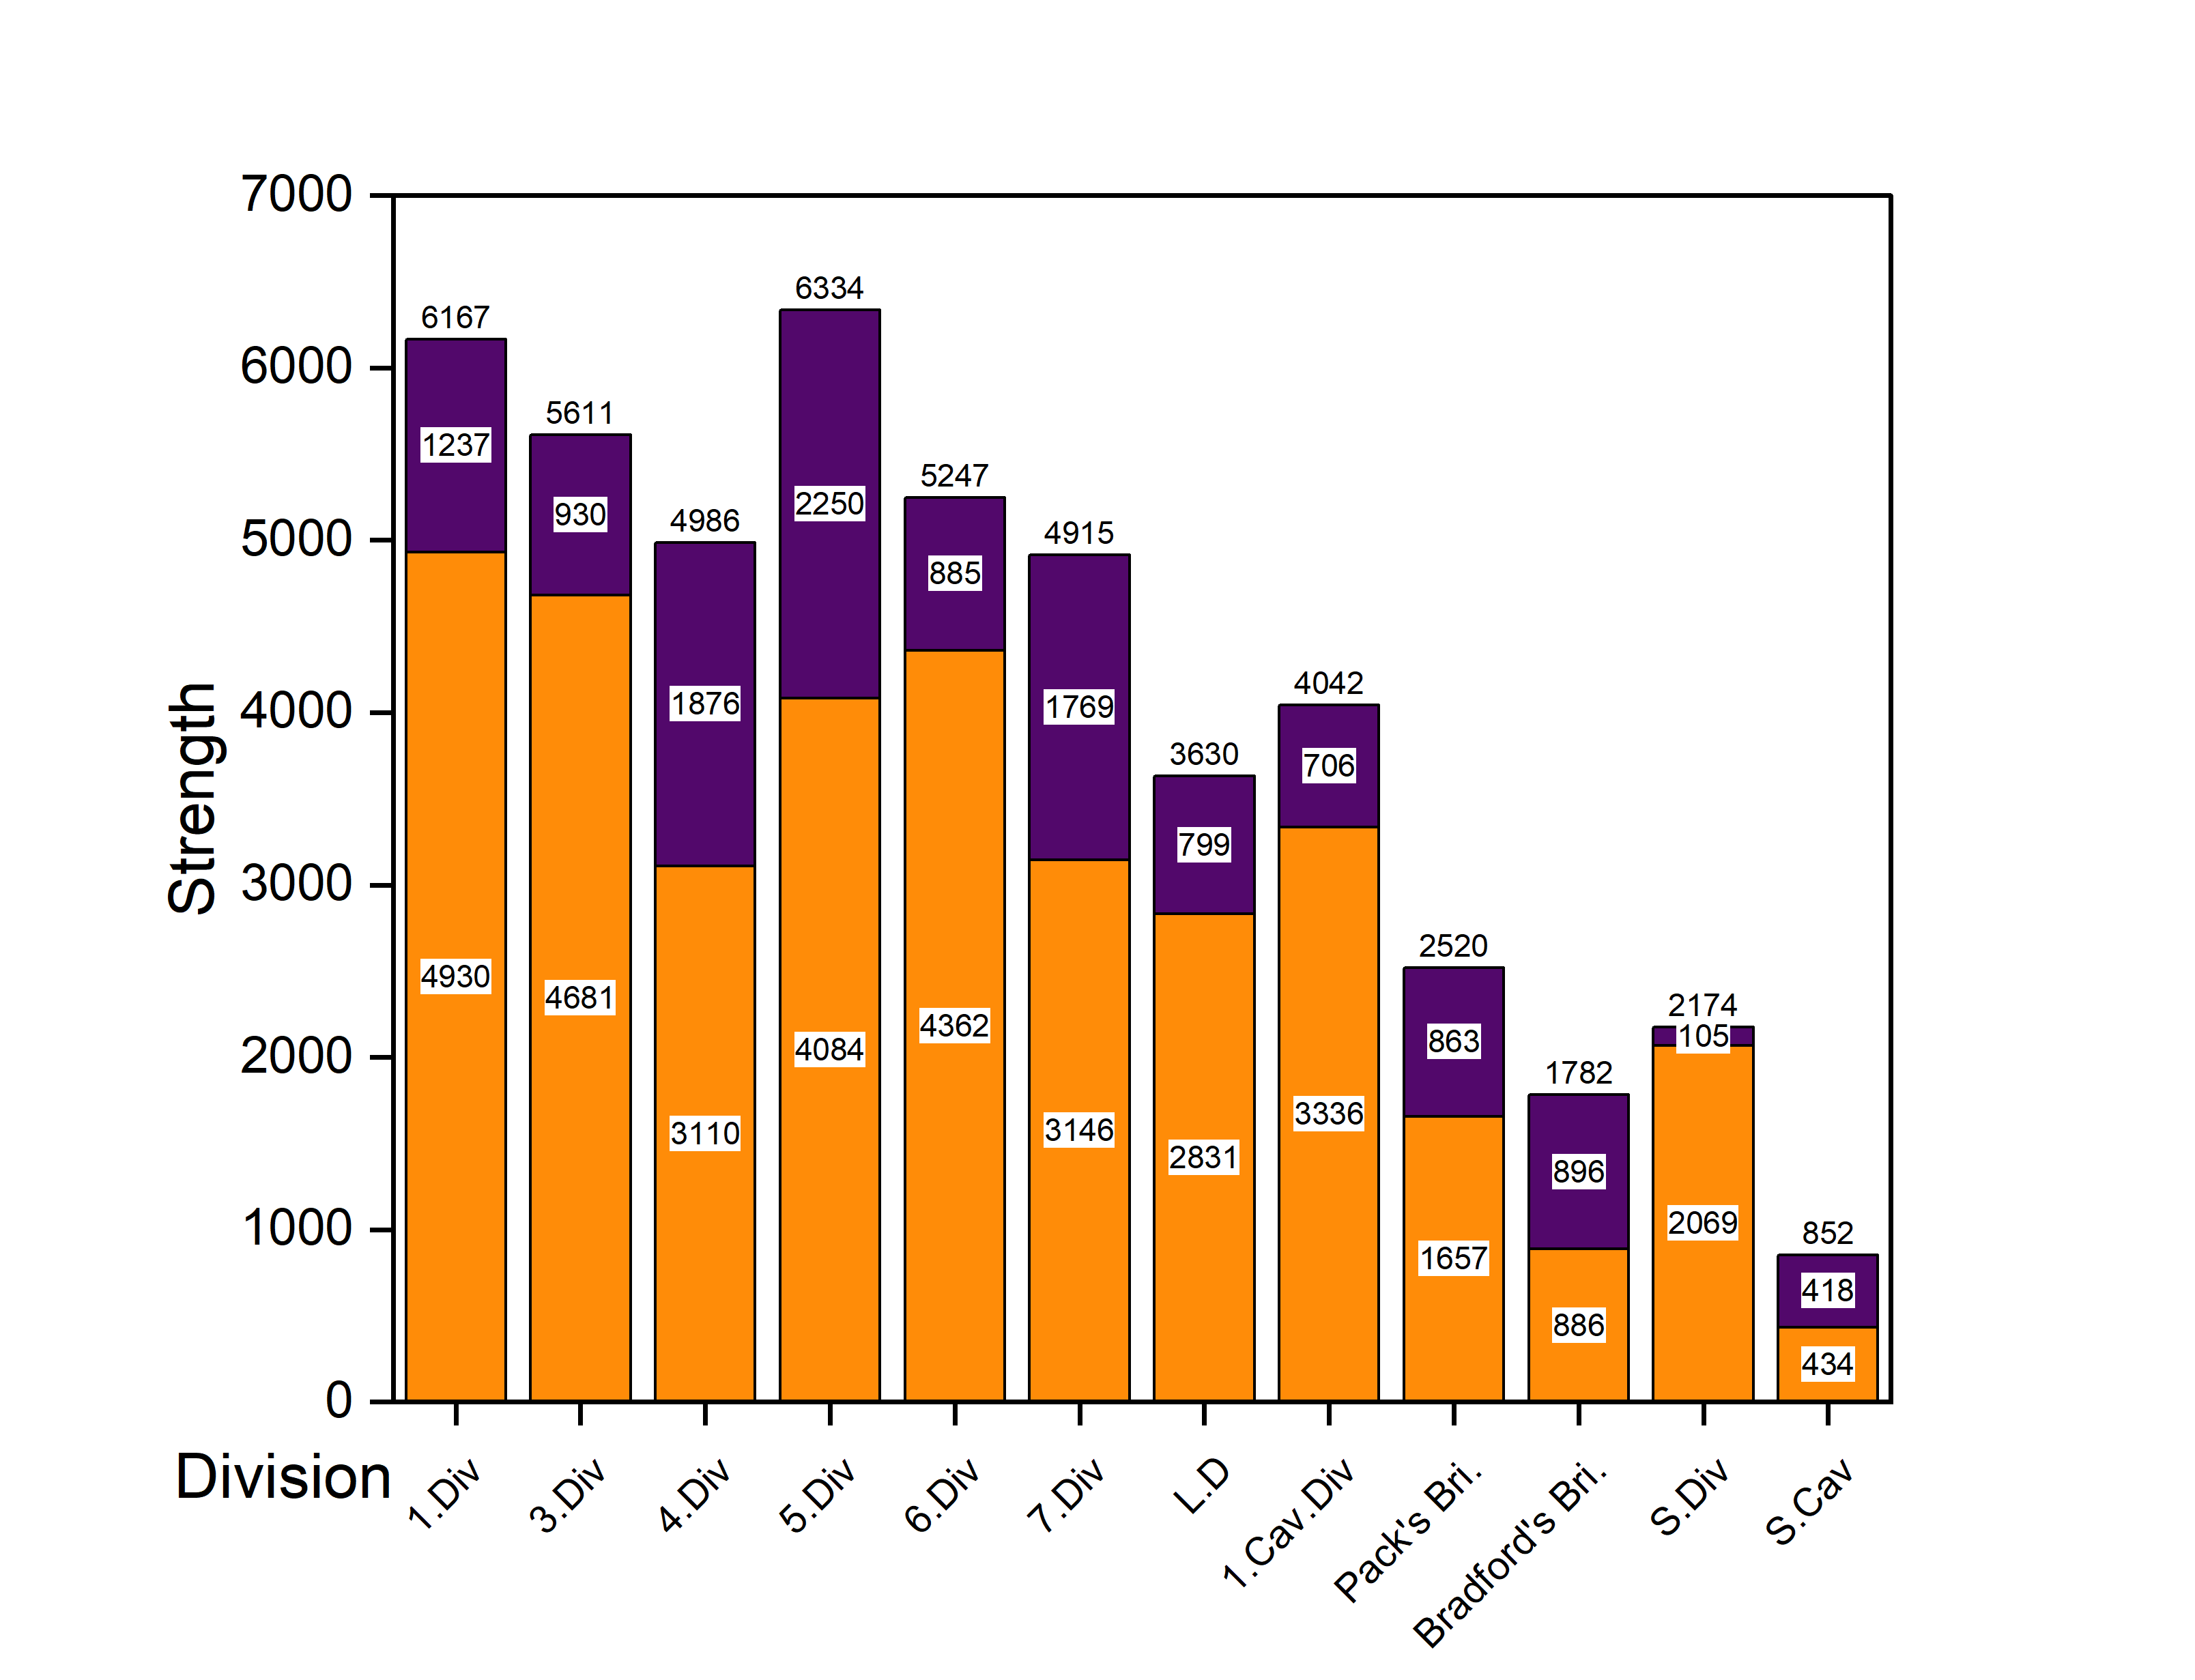
In the British forces, the 5th Division, which was responsible for the frontal assault on the defensive lines and artillery positions of the French 3rd and 6th Divisions, suffered losses amounting to nearly one-third of its strength during the frontal breakthrough and pursuit. The 4th and 7th Divisions, which also sustained significant damage, were the units tasked with attacking the Great Arapil Hill and facing the charges of the French 1st and 5th Divisions, respectively.
By the end of the battle, the majority of British infantry battalions and light dragoon regiments were still in good fighting condition, with their combat fatigue levels relatively low. Approximately 30% of the battalions and several heavy dragoon regiments and Castilian Hussar regiments that had been involved in the charges had entered a state of moderate fatigue. This suggests that the overall combat style may have been somewhat conservative.
French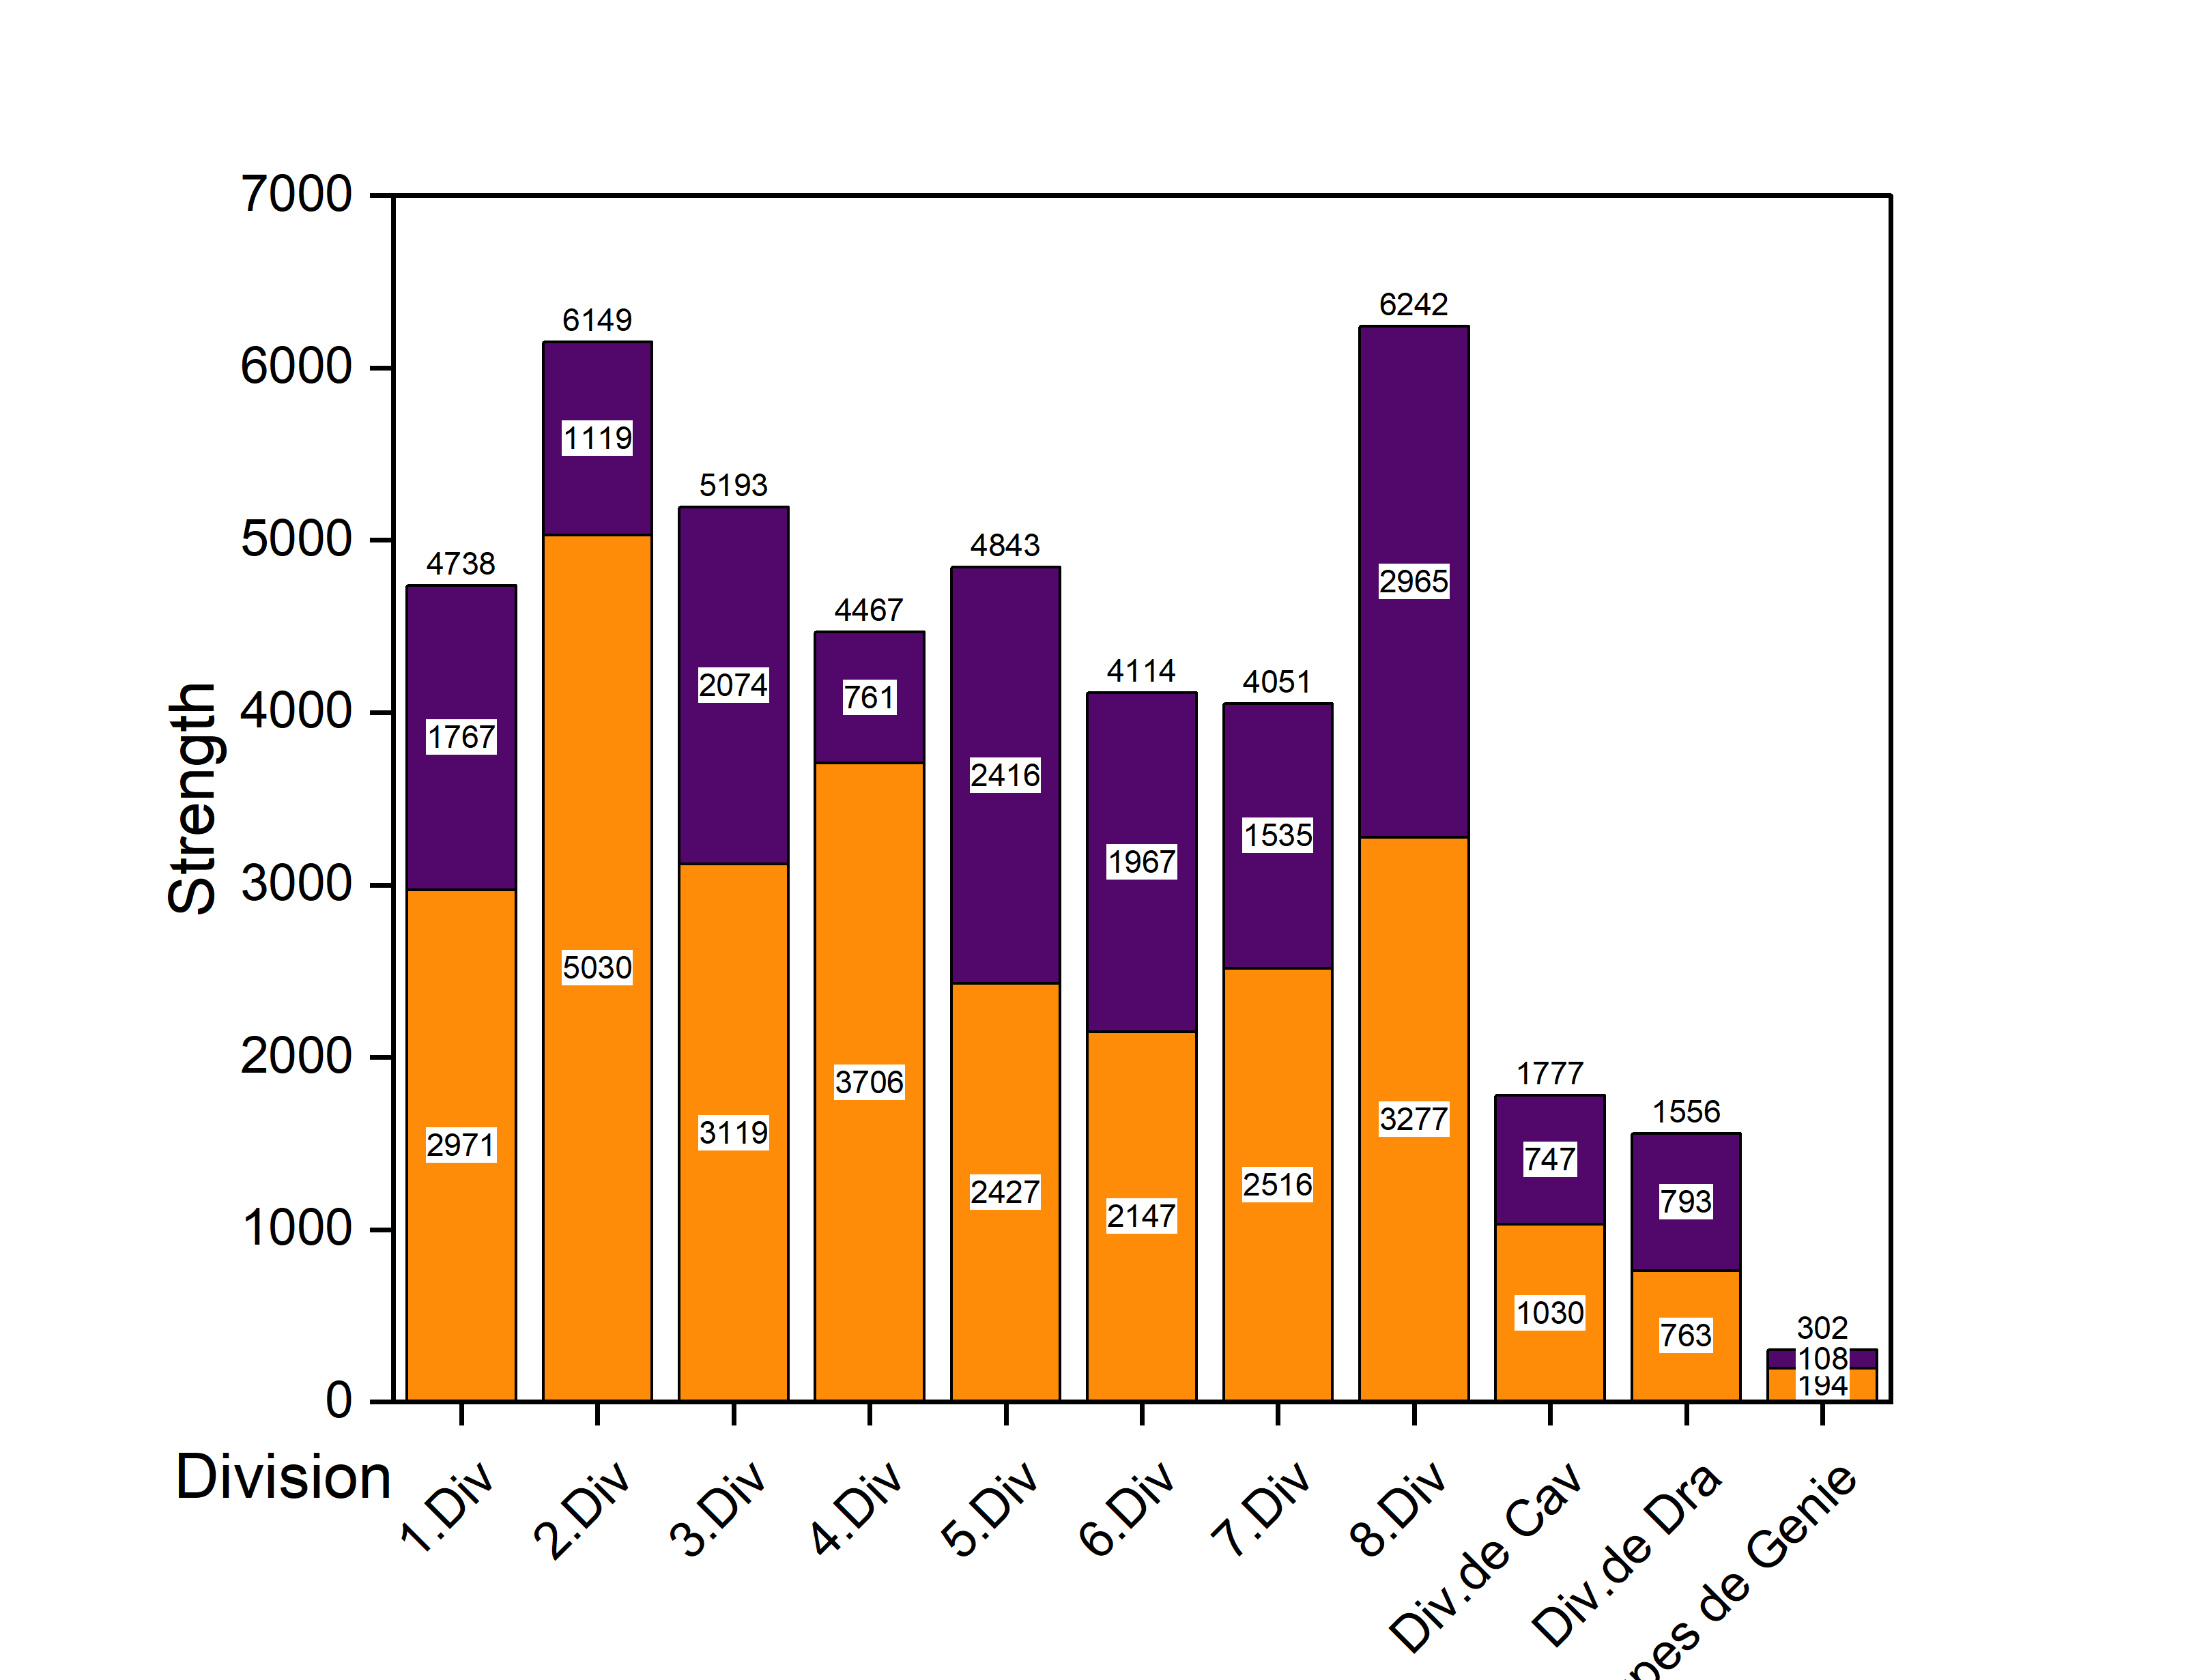
Apart from the 2nd and 4th Divisions, which were engaged in skirmishes with the British light infantry on the northern front, all other French divisions suffered heavy blows from the British forces. The French 5th Division, which was counterattacked by the British 1st Division and the German Hussars, the 6th Division, which faced the charges of the British 5th and 3rd Divisions on the southern front, and the 8th Division, which was severely battered by the British 4th Division and the Guard Hussars near the Great Arapil Hill and almost entirely routed, all had casualty rates approaching 50%. Most of the French battalions that fled the battlefield were already in a state of moderate or severe combat fatigue, and it can be said that the Portuguese Corps would find it difficult to regain combat effectiveness for a long time. However, my opponent managed to salvage the majority of the artillery, which was of considerable importance.

Conclusion
The outcome of this battle must have been unacceptable for the Duke of Wellington. Compared to the historical results (with the Anglo-Portuguese forces suffering about 5.2k casualties and the French about 14k), the Anglo-Portuguese forces paid too high a price.
Perhaps there was a slight miscalculation in the initial strategic assessment, but my opponent RST7 made the right decision in time to salvage the situation. They used the streams and high ground to inflict casualties and delay the British advance, covering the retreat of the main force. The deep rear guard established by the French in this battle is certainly worth learning from. Looking back at the fighting on the southern front, the French were often able to set up sufficiently strong artillery positions on the second line in time, or gather enough guns to make the enemy stop in their tracks. The French used skirmishers and artillery to block the British advance. Restricted by the terrain, the British cavalry could not charge the French on the other side of the stream, which meant the advancing infantry had to wait for the artillery to move forward and set up again, while continuing to exchange fire with the French infantry.
Strategically, although I managed to assemble more troops than the French on the southern front, my overly cautious approach prevented me from breaking through the French rear guard line, allowing the French main force to retreat successfully. Also, during the pursuit, what if I had not focused the 1st and 7th Divisions on the artillery position, but instead continued to attack eastward, threatening the key French withdrawal hub of Calvarrasa de Arriba? I believe those who try this scenario again will make wiser choices than I did.
I myself am also quite inexperienced in handling British forces. Since the British do not advocate the method of column charges, there is no bonus Buff when charging in column, which makes me more inclined to have the troops form a horizontal line to shoot and repel the enemy. However, this leaves the troops lacking sufficient mobility—especially in the broken terrain of Spain.
Thank you to all who read to the end. I hope this After Action Report can provide some meaningful value to those who read it.

Nappy!