Battle of Chickamauga, Sept. 19th & 20th, 1863 Home
HPS Chickamauga: Scenario 039 and 040
85 Turns
USA 55,582 – CSA 57,983
Chickamauga National Battlefield – Sunrise in Dyer Field at Hex (111, 184)
(Historical, 85 Turns) In early September 1863, Union General Rosecrans consolidated his forces scattered in Tennessee and Georgia and forced Confederate General Bragg’s army out of Chattanooga, heading south. The Union troops followed it. Bragg was determined to reoccupy Chattanooga and decided to meet a part of Rosecrans’s army, defeat them, and then move back into the city. On the 17th he headed north, intending to meet and beat the XXI Army Corps. As Bragg marched north on the 18th, his cavalry and infantry fought with Union cavalry and mounted infantry which were armed with Spencer repeating rifles. Fighting began in earnest on the morning of the 19th, and Bragg’s men hammered but did not break the Union line. Unbeknownest to Rosecrans, Confederate Lt. General Longstreet arrived from Virginia to bolster Bragg's army, and for the first time, the Union army was outnumbered in a western battle. It's 9am on the 19th of September, the 10th Confederate cavalry regiment has just been decimated by running into the 10th Indiana. With these shots, the Battle of Chickamauga begins.
A Note on Average Quality (AQ) Used Below:
The calculation used to determine this is simple. An “A” regiment would receive five points, a “B” regiment four points and so on down to one point for an “E” and zero points for an “F.” You can then add up the numerical totals for a brigade and divide the total number by the number of regiments to get the Average Quality. For example – a brigade of five regiments with two “B’s” and three “C’s” would have a total of seventeen points (4+4+3+3+3=17), this number is then divided by the number of regiments (17/5=3.4) to get the Average Quality of 3.4 out of 5 for that brigade.
General Notes on the Forces:
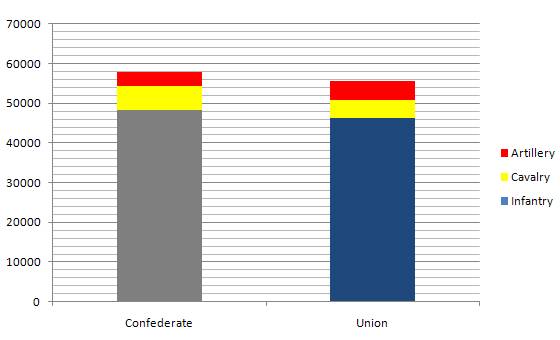
Confederates: 48,352 infantrymen, 3,500 artillerymen (140 cannon), and 6,041 cavalrymen = 57,983
Union: 46,164 infantrymen, 4,800 artillerymen (192 cannon), and 4,618 cavalrymen = 55,582
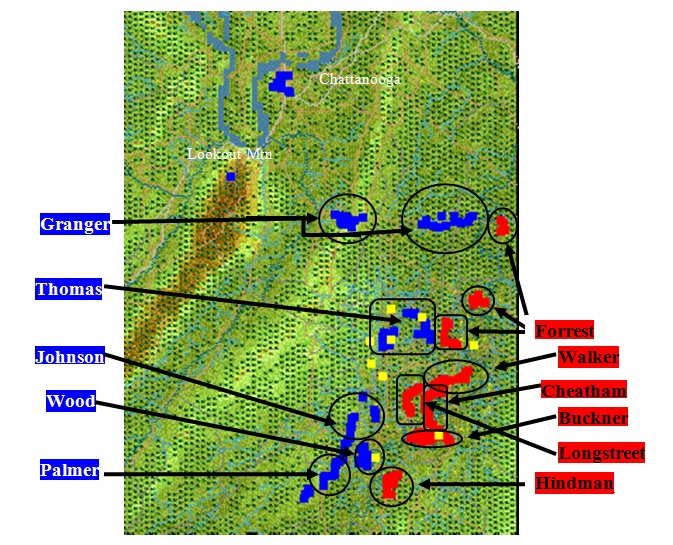
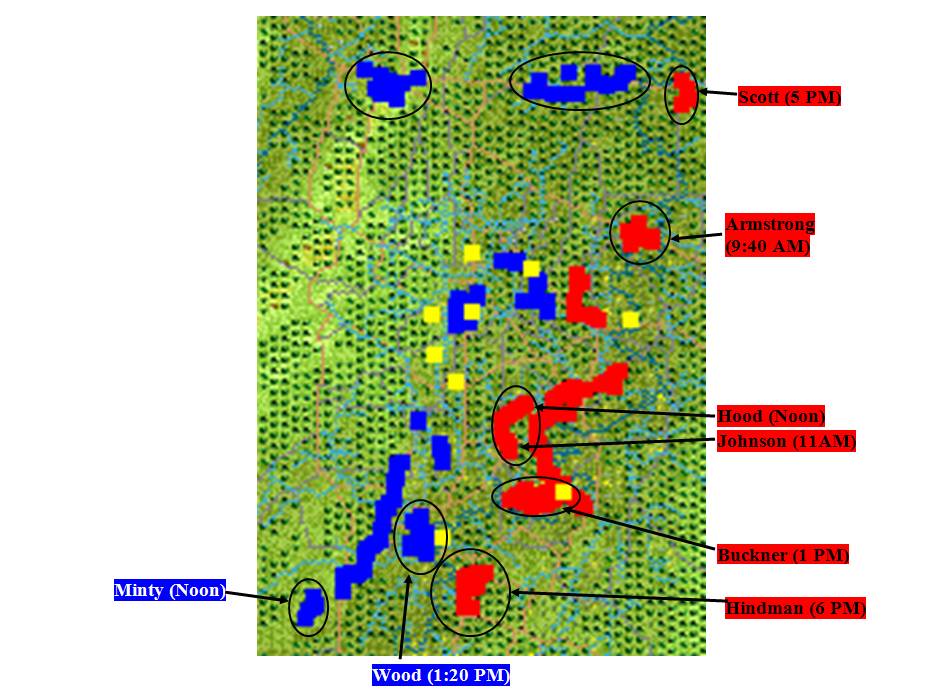
Starting Locations on the Map
The map below shows the proximity of all of the major starting forces on the field.
Reinforcements by Time, Numbers, and Location
Knowing where your enemy is coming from is often critical in any scenario and this should never be overlooked. It may not seem “fair” to have such information at your fingertips but I always assume they know when my men are coming, so I should know when theirs are.
Confederate Reinforcements
The Confederates will be reinforced by three divisions during the battle. Two of these divisions will begin to arrive at the same time. Breckinridge’s Division with 3,881 men will arrive by Hex (118, 249) beginning at 12:20 PM on the first day. Cleburne’s larger division of 5,436 men will begin to arrive at the same time by the Hex at (129, 249). The final division to arrive is McLaws’s Division which arrives at 11 PM by the Hex at (179, 181) with 2,822 men. Following McLaws’s Division is Gist’s Brigade with 1,400 men of Walker’s Corps. Combined the Confederates receive just over 13,500 men during the course of the battle. This accounts for about 23% of the entire Confederate Army during the battle.
Union Reinforcements
The Union army will be reinforced by five divisions during the battle. The earliest will be at 9 AM and 10 AM with Reynolds’s and Davis’s divisions at Hex (93, 249) with around 6,143 men. Van Cleve will arrive next with his division of 4,450 men at the same Hex as Reynolds and Davis at 12:40 PM. Sheridan’s 4,497 men follow behind Van Cleve at 2 PM. The final Union division will arrive at Hex (0,249) at 2:40 PM. Negley’s 4,688 men will then begin a long trek along the southern edge of the board to the trail at Hex (18, 249). From here they can follow the trail all the way to the Dry Valley Road. With luck the infantry should reach that road (assuming they do not march at night) by about 8 AM on the 20th. Rosecrans will receive around 19,500 men during the battle – roughly 35% of the Union total force.
Notes on the Battlefield
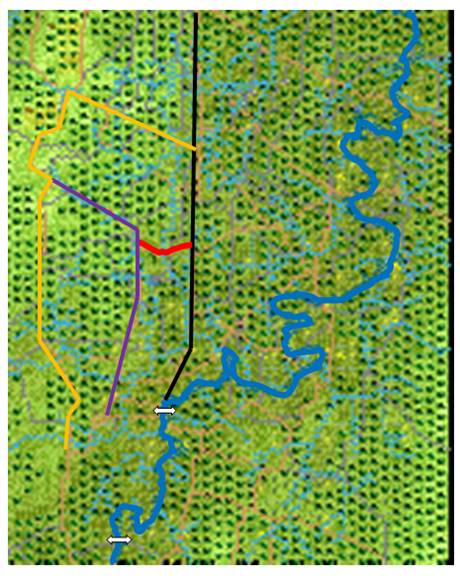
The Battlefield of Chickamauga has two main features that every player should be well aware of when fighting on this battlefield. The first is the La Fayette Road which divides the historical battlefield in two (east and west). It runs from the area around Cloud Church in the north to Lee and Gordon’s Mill to the south. This is the main road that connects Thomas’s flank with the rest of the army on the first day of battle. For the Union player the holding of this road is a critical factor on the first day of battle as the army begins to consolidate [The La Fayette Road is marked in black on the map]. The other main feature of the battlefield is the Chickamauga Creek that runs along the eastern side of the board and divides the Confederate Army. The large Confederate force west of the creek should ensure that no massive rout will occur – but the moving of reinforcements over a handful of fords and bridges is always a challenge. [Chickamauga Creek is marked on the map by the heavy blue line]. The extreme left flank of the Confederate Army is held by Hindman’s Division opposite Lee and Gordon’s Mill. There is another crossing south of this that also bears watching in case of any Union maneuver to sweep around the Confederate flank [these two crossing are marked by white arrows on the map]. One of the most important areas of the field is the Dyer Road which connects the Dry Valley Road to the La Fayette Road along the Brotherton and Dyer Fields. If the Confederates manage to secure this short road they can divide Thomas’s flank from the rest of Rosecrans’s army and force them to make a wide march in order to reinforce Thomas or bypass the Dyer Road [The Dyer Road is marked by a bold red line – the Dry Valley Road by a purple line – and the next available north-south road available to Rosecrans – if the Dyer Road is secured – is marked in Orange].
Fixed Units in the Scenario
The scenario seeks to stay true to the actual release times of the various units and both sides start with a large number of their men fixed in position. The map below shows the relative positions of these fixed units for both sides and the approximate release times (or the starting release time) of the larger units. Those units circled without a release time will remain fixed throughout the first day.
Large Scale Union and Confederate Options Applicable in Most Games Played
This section will cover just three of the early possible mistakes/scenarios/movements that may occur in any given game. I can only predict what will occur given the tendencies of commanders to follow the historical patters at the start of a battle or from what I have personally experienced in playing this scenario. These options will be towards the beginning of the scenario as most battles can be determined by who makes the fewest mistakes at the start.
The First Union Reinforcements Movements
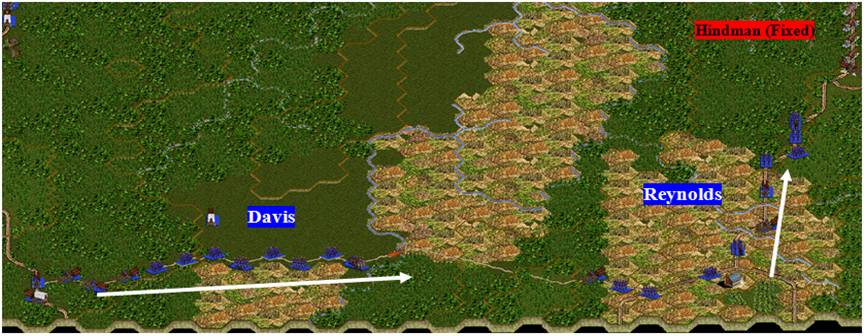
The first Union reinforcements arrive on the first turn of the game at Hex (93, 249). These forces will move in one of two directions: either northward along the road to Crawfish Springs and the Dry Valley Road or they will turn eastward and head for the bridge across the Chickamauga Creek beneath Lee and Gordon’s Mill. The first of these options is the proper move to make and should be chosen by the Union commander in most cases. But let’s assume he has chosen the second option in a bold attempt to strike Hindman’s flank. If he makes this move you can be assured of one thing – he did not study the arrival times and locations of the Confederate Army before the game.
Reynolds and Davis Head for the Creek!!!
The movement of the roughly 7,000 men of Reynolds’s and Davis’s Divisions should place the Confederate Army into an immediate crisis as the Union commander has forced Hindman’s Division into battle while it is still unprepared and fixed. The Confederates will have only a single turn or two to move their men (once the Union units move into their protective range they will become unfixed) before they are struck by Reynolds’s lead units under King and Turchin. The earliest that the Union regiments will begin to make contact with the left flank of Hindman will be 10:20 AM. For the Union commander to form up both brigades of Reynolds’s Division and advance en masse would take up more time but expect them to hit about Noon if they decide to concentrate first. For both Reynolds and Davis to form into a battle line abreast would take another hour and they would strike Hindman about 1 PM. But Hindman is about to get a lot of help! As a sidenote the direction of the Union reinforcements can be determined on the very first turn as the path heading to the Creek is visible by Strahl’s Brigade at hex (139, 206).
Reynolds and Davis Head for Hindman’s Division
Into the Trap
Many players in the Club do not properly look at the reinforcement schedule of the opposing army at the start of the scenario and this may easily occur in this battle. What the Union player has thought was a brilliant flanking maneuver will suddenly turn into a nearly inescapable trap for Reynolds and Davis. Hill’s Corps – with the crack divisions of Breckinridge and Cleburne – will begin to arrive at 12:20 PM. Breckinridge will arrive behind the line of the Union divisions and Cleburne on the road leading to Hindman’s rear and the Union right flank. If your opponent is fool enough to be caught in this trap be sure to bag as many of the Yankees as you can as they will be stuck with the Creek to their backs. Be sure to also watch out for Union reinforcements trying to rescue them from Lee and Gordon’s Mill.
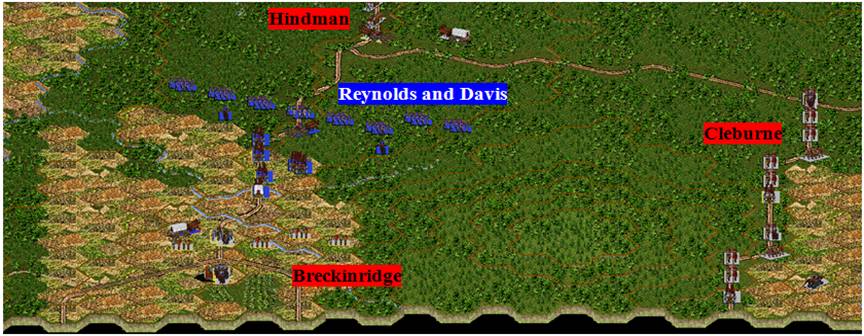
The Trap Closing Around Wood and Davis at 12:20 PM
A Better Union Option
Instead of advancing to attack Hindman it is better to instead draw up Reynolds’s Division around the hexes (110, 246 – 248) and train your cannon on the entry hexes of Breckinridge’s Division. By doing this you will greatly annoy your Confederate opponent and force him to sidetrack one of his best divisions in order to drive off a small division of Yankees with artillery support atop a wooded ridge. Be sure to keep your line of retreat clear though and know when to fall back over the Creek or you may soon regret bothering Breckinridge!
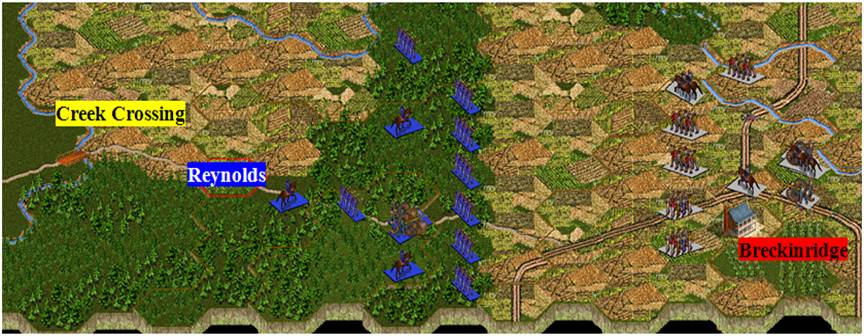
Reynolds’s Division Opposing Breckinridge’s Division
The Placement of Baird’s Division
One of the first decisions the Union commander will have to make is what to do with Baird’s Division in Kelly Field. Historically, Thomas moved the division forward to aid Brannan’s Division in their “skirmish” with the Confederate Cavalry. Baird moved his division blindly through the thick woods and soon many units were lost and isolated. It was at this moment that the Reserve Confederate Corps struck Baird and drove his division back through Winfrey Field in disorder. For the Union commander in this scenario he must decide whether to move Baird through the woods to come in on Brannan’s right flank, to move his division down the Alexander’s Bridge Road in column for quicker movement to Brannan’s right, or to stay in place and guard the Union rear and the La Fayette Road.
Moving Baird to aid Brannan is likely the option that will benefit the Union player the most. By forcing Walker’s Reserve Corps to battle farther away from their ultimate objective (the La Fayette Road) they will help stall the tide of Confederate divisions westward. Baird’s Division will be defeated and thrown back eventually but they can give-as-good-as-they-get in this battle and damage Walker’s men greatly in the process. The movement forward by Baird will also make force the Confederate player to seek reinforcements elsewhere for Forrest’s outnumbered cavalry on the far right flank. If Walker is occupied with Baird then Brannan may move forward with superior numbers and engage Forrest’s Cavalry (with the high cavalry VP bonus this would be ideal for the Union player). If the cavalry is withdrawn then Walker’s flank will be left unprotected.
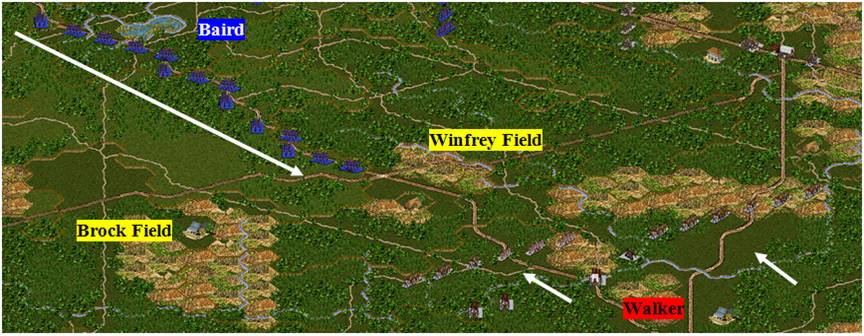

Baird Using the Alexander’s Bridge Road to Advance on Walker
The Confederate Cavalry Options
The right flank of the Confederate Army will be held by Forrest’s men at the start of the battle. These are high quality troopers who can easily match the Union infantry in any fight. But their high victory point losses will make them costly to use in a prolonged fight with Brannan’s Division. It is hard to even consider the idea of Forrest ever running from a fight, I know trust me, but in this battle there is little to be gained by rushing Forrest’s men into Brannan. The Confederate commander should try to use them to guard Walker’s right flank and to scout ahead to be sure Brannan is unable to ignore the threat of Forrest and reinforce Baird. Armstrong’s Brigade is the wildcard in this scenario. They begin beyond the Union left and along a road leading to the La Fayette Road north of Thomas’s position. These 1,500 men may not be able to crush the flank of the Union Army, but they can sure annoy the Union commander and force him to divert men to guard the road and the wagons from the roving bands of Rebel cavalry. Do not withdraw your cavalry as the Confederate commander though! They will need to hold their ground to protect the flank of Walker on the first day. There is little else for them to do on such a wooded battlefield anyways.
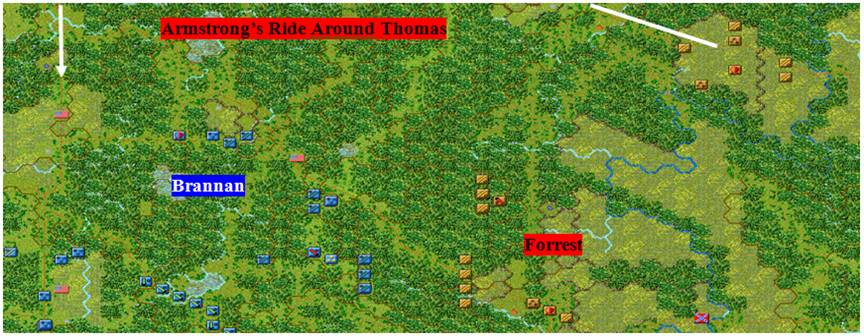
Forrest’s Starting Location and the Suggested Raid by Armstrong
![]()
General Notes on the Confederate Forces:
57,983 – Confederate Force AQ 3.76
Combined the Confederates field 140 cannon in 58 sections with 3,500 artillerymen, 6,041 cavalrymen, and 48,352 infantrymen.
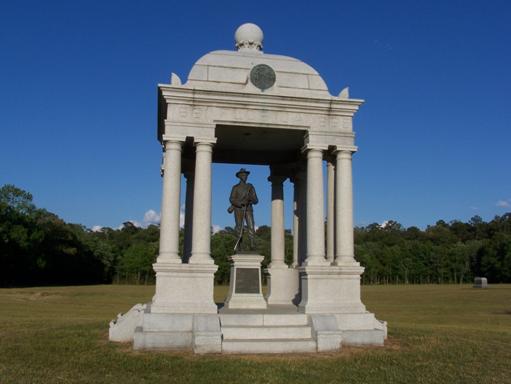
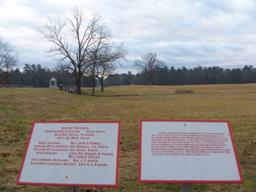
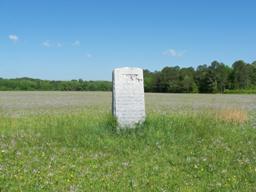
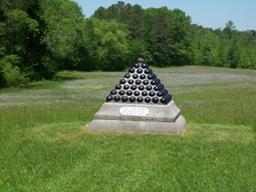
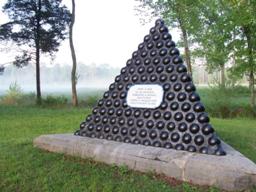
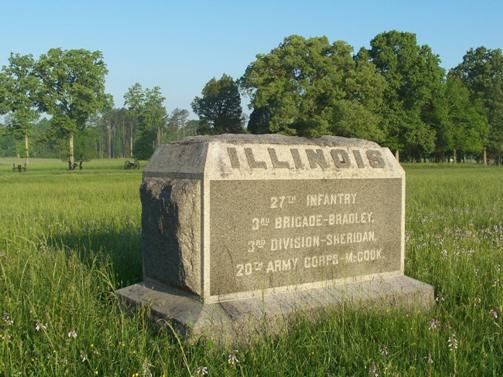
The Florida Monument at Hex (123, 164) – This monument marks the place where Floridians under Stovall turned southward to flank the Union line in the Kelly Field on the second day of battle. Notice an Illinois Monument to the back and right marking where a Union regiment had been placed but forced back.
There are two Confederate Armies in this scenario under Bragg and Longstreet. Historically they were all under Bragg and so I am unsure why this game designates “Longstreet’s Wing” as a separate entity. During the battle Bragg divided his army into two wings under Polk and Longstreet but all remained under his command. This guide will begin by looking at the forces under Bragg at the Battle of Chickamauga.
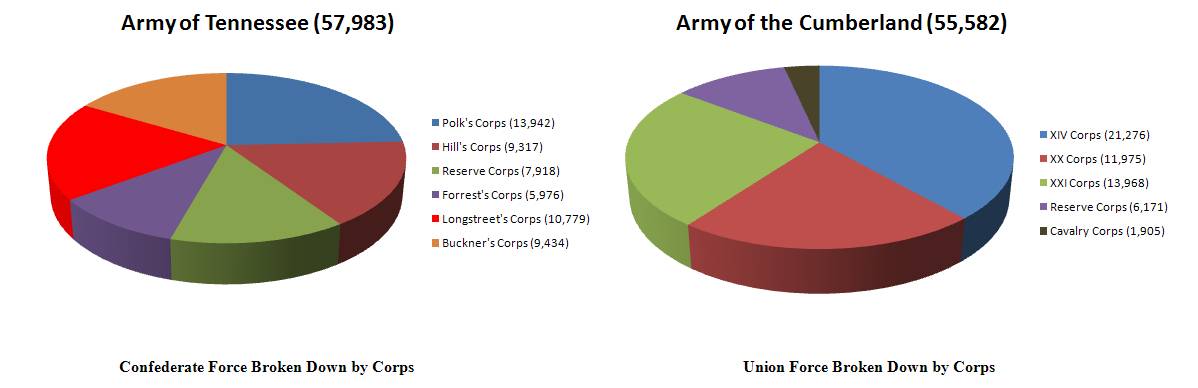
37,330 – Army of Tennessee (Gen. Braxton Bragg) AQ 3.87
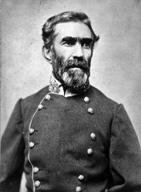
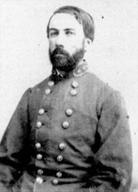
Gen. Braxton Bragg and the Georgia State Monument at Hex (121, 183) – notice the white tablets on the left side of the photograph marking the positions of Union brigades as the Georgians under William Bate charged out of the woods to the right into Poe Field. Also to the left of the picture is the La Fayette Road running northward toward Kelly Field in the distance beyond.
The army contains a total of 89 cannon in 36 sections with 2,225 artillerymen, 6,041 cavalrymen, 29,064 infantrymen. The army is divided into three infantry corps under Polk, Hill, and Walker and a cavalry corps under Forrest.
13,942 – Polk’s Corps (Lt. Gen. Leonidas Polk) AQ 3.70
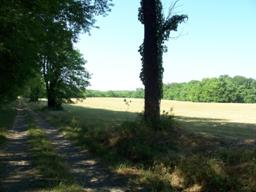
Lt. Gen. Leonidas Polk and Hunt Field Hex (135, 211) – the wagon trail running to Dalton Ford is still used today by the Park Service for maintenance vehicles
Polk’s Corps is comprised of two divisions under Cheatham and Hindman. Cheatham’s Division was known as the Tennessee Division in the army since all of its units hailed from the state of Tennessee. Overall the Corps is comprised of 850 artillerymen with 34 cannon in 13 sections, 230 cavalrymen, and 12,862 infantrymen.
7,422 – Cheatham’s Division (Maj. Gen. Benjamin Cheatham) AQ 3.75
1,411 – Jackson’s Brigade (Brig. Gen. John Jackson) AQ 3.6
1,742 – Smith’s Brigade (Brig. Gen. Preston Smith) AQ 3.8
1,393 – Maney’s Brigade (Brig. Gen. George Maney) AQ 3.75
1,463 – Wright’s Brigade (Brig. Gen. Marcus Wright) AQ 3.6
1,381 – Strahl’s Brigade (Brig. Gen. Otho Strahl) AQ 4
6,387 – Hindman’s Division (Maj. Gen. Thomas Hindman) AQ 3.63
1,915 – Anderson’s Brigade (Brig. Gen. James Anderson) AQ 3.83
2,282 – Dea’s Brigade (Brig. Gen. Zach Deas) AQ 3.83
2,125 – Manigault’s Brigade (Brig. Gen. Arthur Manigault) AQ 3
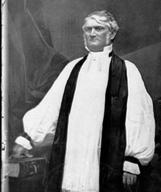
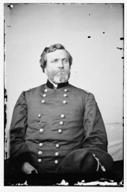
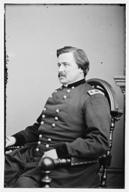
9,317 – Hill’s Corps (Lt. Gen. Daniel H. Hill) AQ 4.07
Lt. Gen. Daniel H. Hill and Adams’s Brigade Tablets Hex (121, 164) – this photograph shows the position that Adams’s Brigade was able to reach on the second day of battle before advancing south along the La Fayette Road to attack Thomas’s left flank in the Kelly Field (visible in the extreme distance).
Hill’s Corps is full of veterans and experienced commanders. The Corps contains 675 artillerymen with 27 cannon in 10 sections, it also has 55 cavalrymen and 8,587 infantrymen.
3,881 – Breckinridge’s Division (Maj. Gen. John Breckinridge) AQ 4.14
1,509 – Helm’s Brigade (Brig. Gen. Benjamin Helm) AQ 4.6
1,371 – Adams’s Brigade (Brig. Gen. Daniel Adams) AQ 3.8
997 – Stovall’s Brigade (Brig. Gen. Marcellus Stovall) AQ 4
5,436 – Cleburne’s Division (Maj. Gen. Patrick Cleburne) AQ 4
2,102 – Wood’s Brigade (Brig. Gen. S.A.M. Wood) AQ 3.83
1,490 – Polk’s Brigade (Brig. Gen. Lucius Polk) AQ 4.2
1,793 – Deshler’s Brigade (Brig. Gen. James Deshler) AQ 4
7,918 – Reserve Corps (Maj. Gen. William Walker) AQ 3.72
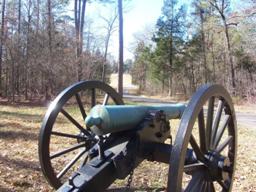
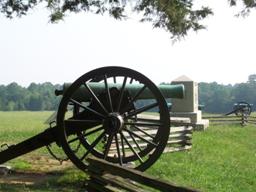
Maj. Gen. W.H.T. Walker and some of Walker’s Artillery at Hex (142, 180) – the cannon faces into the woods east of the Winfrey Field which is in the center of the photo in the distance.
This Corps contains another one of the more veteran divisions in the army under Liddell. The overall number of cannon in this Corps is 12 in 5 sections with 300 artillerymen. The corps also contains 7,618 infantrymen.
3,916 – Walker’s Division (Brig. Gen. States Rights Gist) AQ 3.53
1,400 – Gist’s Brigade (Col. Peyton Colquitt) AQ 3
1,317 – Wilson’s Brigade (Col. Claudus Wilson) AQ 3.4
1,199 – Ector’s Brigade (Brig. Gen. Matthew Ector) AQ 3.86
4,002 – Liddell’s Division (Brig. Gen. St. John Liddell) AQ 4
2,075 – Govan’s Brigade (Col. Daniel Govan) AQ 4
1,927 – Walthall’s Brigade (Brig. Gen. Edward Walthall) AQ 4
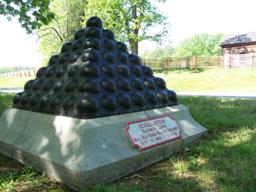
5,976 – Forrest’s Corps (Brig. Gen. Nathan B. Forrest) AQ 4.17
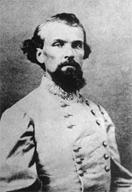
Brig. Gen. Nathan B. Forrest and the Tennessee Artillery Monument at Hex (139, 166) – the Tennessee Monument stands along the Reed’s Bridge Road where the battle began on September 19.
Forrest’s Cavalry Corps is an elite unit of cavalry to have in any situation. At Chickamauga though the heavy woods limit their capabilities and the higher VP loss for their casualties must be taken into consideration before sending them into any action. The Corps contains 16 cannon with 400 artillerymen in eight sections and 5,579 cavalrymen.
3,199 – Armstrong’s Division (Brig. Gen. Frank Armstrong) AQ 4.2
1,293 – Armstrong’s Brigade (Col. James Wheeler) AQ 4.25
1,906 – Dibrell’s Brigade (Col. George Dibrell) AQ 4.16
2,610 – Pegram’s Division (Brig. Gen. John Pegram) AQ 4.13
1,700 – Davidson’s Brigade (Brig. Gen. H.B. Davidson) AQ 4
910 – Scott’s Brigade (Col. John Scott) AQ 4.25
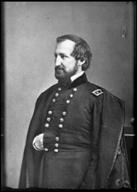
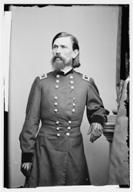
20,563 – Longstreet’s Wing (Lt. Gen. James Longstreet) AQ 3.58
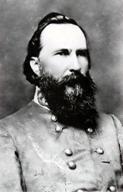
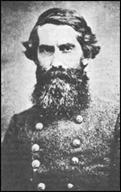
Lt. Gen. James Longstreet and the 39th North Carolina Monument at Hex (115, 197) – this marker sits alone in the middle of one of the largest fields I have ever hiked across on any National Battlefield. Through this field part of Buckner’s Corps advanced on the second day of battle towards Sheridan’s Division.
Longstreet’s Wing is the smaller of the two main Confederate forces at Chickamauga but contains some of Lee’s best troops. Combined Longstreet’s Wing fields 51 cannon with 1,275 artillerymen in 22 sections and 19,288 infantrymen.
10,779 – Longstreet’s Corps (Maj. Gen. John B. Hood) AQ 3.87
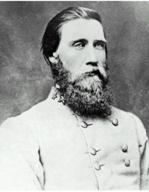
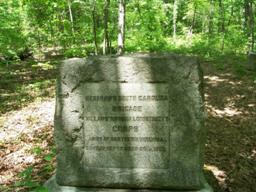
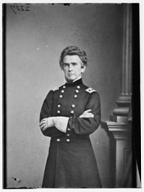
Maj. Gen. John B. Hood and Kershaw’s Brigade Monument at Hex (109, 178) – Kershaw’s Brigade Monument marks where the brigade made repeated charges up Snodgrass Hill into Thomas’s waiting line. The monument seems out of place in northern Georgia as it reads “Kershaw’s South Carolina Brigade – Army of Northern Virginia.”
Longstreet’s Corps is made up of mostly veterans from Lee’s army in Virginia. This corps has 12 cannon in 5 sections with 300 artillerymen and 10,479 infantrymen.
3,957 – Hood’s Division (Brig. Gen. Evander Law) AQ 3.92
1,300 – Robertson’s Brigade (Brig. Gen. Jerome Robertson) AQ 4.75
1,457 – Law’s Brigade (Col. James Sheffield) AQ 4
1,200 – Benning’s Brigade (Brig. Gen. Henry Benning) AQ 3
2,822 – McLaws’s Division (Maj. Gen. Lafayette McLaws) AQ 4
1,596 – Kershaw’s Brigade (Brig. Gen. Joseph Kershaw) AQ 4
1,226 – Humphreys’s Brigade (Brig. Gen. Benjamin Humphreys) AQ 4
4,000 – Johnson’s Division (Brig. Gen. Bushrod Johnson) AQ 3.75
1,619 – Gregg’s Brigade (Brig. Gen. John Gregg) AQ 4
1,407 – McNair’s Brigade (Brig. Gen. Evander McNair) AQ 3.6
974 – Johnson’s Brigade (Col. John Fulton) AQ 3.5
9,434 – Buckner’s Corps (Maj. Gen. Simon Buckner) AQ 3.15
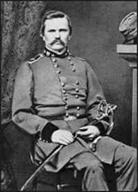
Maj. Gen. Simon Buckner and his Headquarters Monument at Hex (120, 187) – the La Fayette Road runs just beyond the monument and the Brotherton Field and cabin are seen on the opposite side of the road. It was here the Confederates struck the hole in the Union line on September 20.
This Corps contains the majority of Bragg’s Army that was attached to Longstreet’s Wing in this battle. It contains 25 cannon in 11 sections with 625 artillerymen and 8,809 infantrymen.
4,934 – Preston’s Division (Brig. Gen. William Preston) AQ 2.79
2,052 – Gracie’s Brigade (Brig. Gen. Archibald Gracie) AQ 2.83
1,636 – Trigg’s Brigade (Col. Robert Trigg) AQ 2.75
1,246 – Kelly’s Brigade (Col. John Kelly) AQ 2.75
4,303 – Stewart’s Division (Maj. Gen. Alexander Stewart) AQ 3.54
1,317 – Bate’s Brigade (Brig. Gen. William Bate) AQ 3.8
1,546 – Clayton’s Brigade (Brig. Gen. Henry Clayton) AQ 3.6
1,440 – Brown’s Brigade (Brig. Gen. John Brown) AQ 3
350 – Reserve Artillery
The Good and the Bad of it: (Infantry Only)
Top Rated Division: Breckinridge’s Division AQ 4.14
Lowest Rated Division: Preston’s Division AQ 2.79
Top Rated Three Brigades: Robertson’s Brigade AQ 4.75
Helm’s Brigade AQ 4.6
Polk’s Brigade AQ 4.2
Lowest Rated Brigade: Kelly’s Brigade AQ 2.75

General Notes on the Union Forces:
The Union Army is divided up into four infantry corps and a cavalry corps.
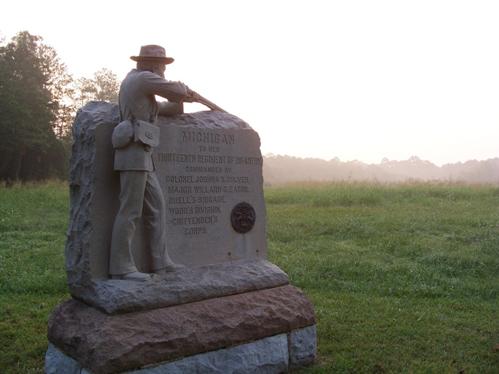
13th Michigan Monument at Hex (120, 200) – a beautiful photo of the dawn in Viniard Field. It was over this field that Hood’s men advanced on September 19 to strike Wood’s Division along the La Fayette Road.
55,582 – Army of the Cumberland (Maj. Gen. W. Rosecrans) AQ 3.32
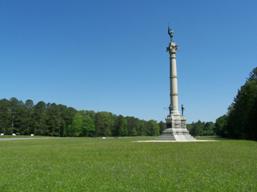
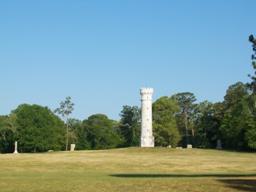
Maj. Gen. William Rosecrans and his Headquarters Monument and Guard Monument at Hex (109, 187) – it was from this position in Dyer Field on September 20 that Rosecrans and his staff were suddenly taken aback by the breakthrough of Longstreet’s men in the field before them. The general and his staff quickly departed to rally the army and begin the retreat back to Chattanooga.
The Army of the Cumberland is comprised of 192 cannon in 63 sections manned by 4,800 men, 4,618 cavalrymen, and 46,164 infantrymen.
21,276 – XIV Corps (Maj. Gen. George Thomas) AQ 3.46
Maj. Gen. George Thomas and his Headquarters Monument at Hex (113, 172) – From this position Thomas coordinated his defenses in the Kelly Field and Snodgrass Hill on the 20th.
The XIV Corps is the largest and best trained Corps in the Union army. It has many able leaders and strong units in this scenario. Wilder’s Lightning Brigade deserves special mention as they are equipped with repeating Spencer Rifles and have the highest possible rating of 5. Combined this Corps has 74 cannon in 24 sections manned by 1,850 artillerymen, 2,340 cavalrymen, and 17,086 infantrymen.
5,067 – 1st Division (Brig. Gen. Absalom Baird) AQ 2.86
1,880 – 1st Brigade (Col. Benjamin Scribner) AQ 3
1,662 – 2nd Brigade (Brig. Gen. John Starkweather) AQ 3
1,525 – 3rd Brigade (Brig. Gen. John King) AQ 2.6
4,688 – 2nd Division (Maj. Gen. James Negley) AQ 3.55
1,341 – 1st Brigade (Brig. Gen. John Beatty) AQ 3.75
1,468 – 2nd Brigade (Col. Timothy Stanley) AQ 3.33
1,879 – 3rd Brigade (Col. William Sirwell) AQ 3.5
5,137 – 3rd Division (Brig. Gen. John Brannan) AQ 3.50
1,254 – 1st Brigade (Col. John Connell) AQ 3.33
2,140 – 2nd Brigade (Col. John Croxton) AQ 3.6
1,743 – 3rd Brigade (Col. Ferdinand Van Derveer) AQ 3.75
3,410 – 4th Division (Maj. Gen. Joseph Reynolds) AQ 3.25
1,648 – 2nd Brigade (Col. Edward King) AQ 2.75
1,762 – 3rd Brigade (Brig. Gen. John Turchin) AQ 3.75
2,533 – Lightning Brigade (Col. John Wilder) AQ 5
11,975 – XX Corps (Maj. Gen. Alexander McCook) AQ 3.25
Maj. Gen. Alexander McCook and the Heg Death Site Monument at Hex (119, 199) – here Col. Hans Heg was killed leading his brigade on the first day of battle near the Viniard Field.
This Corps has 48 cannon in 16 sections with 1,200 artillerymen, 39 cavalrymen, and 10,736 infantrymen.
2,733 – 1st Division (Brig. Gen. Jefferson C. Davis) AQ 3
1,365 – 2nd Brigade (Brig. Gen. William Carlin) AQ 2.75
1,368 – 3rd Brigade (Col. Hans Heg) AQ 3.25
4,706 – 2nd Division (Brig. Gen. Richard Johnson) AQ 3.17
1,649 – 1st Brigade (Brig. Gen. August Willich) AQ 3.5
1,280 – 2nd Brigade (Col. Joseph Dodge) AQ 2.5
1,777 – 3rd Brigade (Col. Philemon Baldwin) AQ 3.5
4,497 – 3rd Division (Maj. Gen. Philip Sheridan) AQ 3.5
1,706 – 1st Brigade (Brig. Gen. William Lytle) AQ 3.75
1,250 – 2nd Brigade (Col. Bernard Laiboldt) AQ 3.25
1,541 – 3rd Brigade (Col. Luther Bradley) AQ 3.5
13,968 – XXI Corps (Maj. Gen. Thomas Crittenden) AQ 3.41
Maj. Gen. Thomas Crittenden and the Wilder Brigade Monument at Hex (107, 199) – this large monument (and observatory) marks the spot where Wilder’s men fought on the second day of battle to hold the right flank of Sheridan’s line.
This Corps contains 50 cannon in 16 sections manned by 1,250 artillerymen, 97 cavalrymen, and 12,621 infantrymen.
4,567 – 1st Division (Brig. Gen. Thomas Wood) AQ 3.33
1,483 – 1st Brigade (Col. George Buell) AQ 3.25
1,588 – 2nd Brigade (Brig. Gen. George Wagner) AQ 3.25
1,496 – 3rd Brigade (Col. Charles Harker) AQ 3.5
4,854 – 2nd Division (Maj. Gen. John Palmer) AQ 3.70
1,430 – 1st Brigade (Brig. Gen. Charles Cruft) AQ 3.5
1,593 – 2nd Brigade (Brig. Gen. William Hazen) AQ 4
1,831 – 3rd Brigade (Col. William Grose) AQ 3.6
4,450 – 3rd Division (Brig. Gen. Horatio Van Cleve) AQ 3.17
1,564 – 1st Brigade (Brig. Gen. Samuel Beatty) AQ 3.5
1,234 – 2nd Brigade (Col. George Dick) AQ 2.75
1,652 – 3rd Brigade (Col. Sidney Barnes) AQ 3.25
6,171 – Reserve Corps (Maj. Gen. Gordon Granger) AQ 2.8
Maj. Gen. Gordon Granger and the Horseshoe Ridge Line at Hex (114, 174) – from this position Granger’s and Thomas’s men were able to hold back the Confederates long enough for the bulk of the army to begin its retreat back to Chattanooga.
The Reserve Corps is the smallest of the Union infantry Corps in this battle. It contains 18 cannon in 6 sections with 450 artillerymen along with 5,721 infantrymen.
4,024 – 1st Division (Brig. Gen. James Steedman) AQ 2.70
2,750 – 1st Brigade (Brig. Gen. Walter Whitaker) AQ 2.83
1,274 – 2nd Brigade (Col. John Mitchell) AQ 2.5
2,147 – 2nd Division (Brig. Gen. John Morgan) AQ 3
2,147 – 2nd Brigade (Col. Daniel McCook) AQ 3
1,905 – Cavalry Corps (Brig. Gen. Robert Mitchell) AQ 3.2
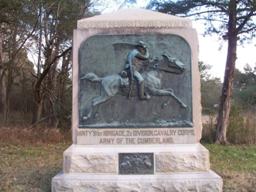
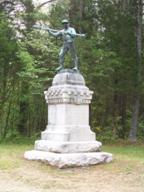
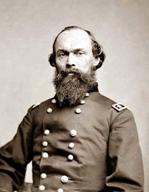
Brig. Gen. Robert Mitchell and the 7th Pennsylvania Monument at Hex (150, 173) – this monument stands where some of the first shots were fired on September 18 and 19 between Union cavalry of Minty’s Brigade and Forrest’s men.
The Cavalry Corps in this scenario has only a single brigade of cavalry along with 2 guns in a single section.
1,905 – 2nd Division (Brig. Gen. George Crook) AQ 3.2
1,905 – 1st Brigade (Col. Robert Minty) AQ 3.2
The Good and the Bad of it:
Top Rated Division: Palmer’s Division AQ 3.70
Lowest Rated Division: Steedman’s Division AQ 2.70
Top Rated Three Brigades: Hazen’s Brigade AQ 4
Turchin’s Brigade AQ 3.75
Van Derveer’s Brigade AQ 3.75
Lowest Rated Brigade: Mitchell’s Brigade AQ 2.5
Comparing the Forces:
The armies are generally well matched here at Chickamauga. The Confederates do have an advantage in numbers and quality but the Federals have superior weaponry and cannon.
Missing Objectives?
The original goal of Bragg’s attack was to interpose his own army between Rosecrans and Chattanooga – cutting him off from his source of supplies. Unfortunately, this scenario does not reward the Confederate player for any such action. There are no VP hexes in Chattanooga, or even north of the McDonald Farm, and so the Confederates can gain nothing by following Bragg’s strategy. For that matter, the Union player does not need to worry about protecting Chattanooga. It would have been much better if the designers had added a large VP hex in Chattanooga. Maybe a House Rule that added such a hex around Chattanooga would make this scenario much more interesting.
Other Useful Information:
This scenario is very accurate with its placement of units and its release and arrival times. The battle is meant to begin on the northern flank of the armies and slowly roll southward as the Rebels move for the La Fayette Road. The Confederates must drive forward and attempt to defeat the Union army before it can unite and prepare its defenses. The Dyer Road is the key to the entire battle in my opinion. If the Rebels can take and hold it then they can secure their interior lines and split the Union army. The Union player should use the ground to his advantage and play to buy time for the army to build up. By fighting and falling back you can inflict heavier casualties on the Confederates while forcing them to elongate their own lines while yours are consolidated. Much like the historical battle – this will be a bloody two-day brawl.
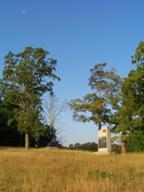
Viniard Field in Spring (Hex 122, 201) – The La Fayette Road is running left to right in the background just in front of the cannons in the distance. And for those of you never fortunate enough to live in Georgia/Tennessee… it really is that green every spring!
Technical Assistance and Special Thanks to:
Hampus Drott
Army of the Mississippi
Kennon Whitehead
Army of the Mississippi
Created and Written By:
Blake Strickler
Army of the Mississippi
Questions or Comments?