(c)2007
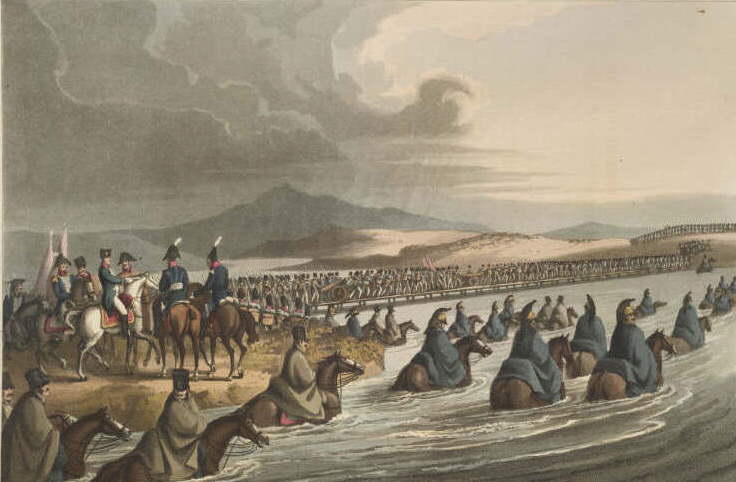
Polish lancers before Wagram
Dedicated to Barry Maunsell, who
instructed many NWC (French) cadets years ago.
CONTENTS
|
1 - INTRODUCTION
2 - THEORY
2.1 The Principles of War
2.2 Troop Density
2.3 The Decisive Time and Place
2.4 Hard and Soft Points
2.5 Coup d'Oeil
3 - AGGRESSIVE BATTLE TEMPLATES
3.1 Single Envelopment
3.2 Double Envelopment
3.3
Detached Wide Envelopment
|
3.4
Oblique Approach
3.5
Breakthrough and Fragmentation
3.6 Dislocation
4 - REACTIVE BATTLE TEMPLATES
4.1 Interior Lines
4.2 Counterpunch
4.3 Fighting Withdrawal
5 - STATIC BATTLE TEMPLATES
6 - CONCLUSION
FOOTNOTES
REFERENCES
|
|
1 -
INTRODUCTION
|
We must never lack calmness and firmness,
which are so hard to preserve in time of war. Without them the most
brilliant qualities of mind are wasted. We must therefore familiarize
ourselves with the thought of an honorable defeat. We must always
nourish this thought within ourselves, and we must get completely used
to it. Be convinced, Most Gracious Master, that without this firm
resolution no great results can be achieved in the most successful war,
let alone in the most unsuccessful.
|
|
The aim of this article is to help
Napoleonic wargamers win more
victories or at least play to a draw a veteran opponent. The
typical reader is assumed to be a member of an on-line wargame club
like
Napoleonic
Wargame Club or
International
Napoleonic Wargame Club. The reader is also assumed to have
available at least one of the Napoleonic game titles from Talonsoft
(soon to be re-released by Matrix Games) or
HPS Simulations. [
TS,
MG,
HPS]
Since this article covers advanced topics, it assumes the reader has
mastered the basics of game play. For articles covering basics
see
Napoleonic Archive
Articles. This article covers a fair amount of
tactics and strategy related to warfare and not just wargaming.
If the cited wargames are reasonably accurate models of
warfare, then learning tactics and strategy of warfare should directly
influence a player's wargaming ability.
The battle templates presented in this article are built up from
accepted military theory. All have been used in historical
battles. These templates should prove useful to
Napoleonic wargamers. The templates are: (1)
Single Envelopment -- a standard,
viable attack, (2)
Double
Envelopment -- used by Hannibal at Cannae, (3)
Detached Wide Envelopment --
Napoleon's favorite maneuver,
(4)
Oblique Approach --
used by Frederick the Great at Leuthen, (5)
Breakthrough and Fragmentation --
the simplest in design and also known as a frontal assault, (6)
Dislocation
-- B H Liddell Hart's maneuver without necessarily a pitched battle,
(7)
Interior Lines -- another
of
Napoleon's favorites, (8)
Counterpunch
-- used by Wellington in the Peninsula and again at Waterloo, and
lastly (9)
Fighting Withdrawal
-- used so
effectively by Perponcher at Quatre Bras. These templates were
also
used
in many other historical battles than mentioned here.
How to attain victory? As the introductory quote by Clauswitz
suggests, experienced gamers have found that starting each new battle
against an opponent
with the
attitude "OK, I'm going to play this guy to a tie" often nets a
victory. Partly this is because by being initially conservative,
the
veteran gamer waits for
the opponent to make a mistake
or reveal his intentions and then capitalizes on it by a vigorous,
audacious attack. And, partly because the veteran gamer remains calm
and has
mentally already
accepted a tie or like Clauswitz suggests a minor defeat. One
never knows until playing the scenario if the scenario is unbalanced to
disfavor. Or perhaps the luck of the dice is just not with a
gamer that day. Clauswitz lumped such "bad luck" along with
fog of war into the
meaning of the term
friction
and said it was a dominant force in war. [
CLA32]
There are usually three scales of warfare discussed: strategic,
grand tactics, and tactics. Napoleon wrote, "Strategy is the art
of making use of time and space." [
CHA63:161]
Tactics
traditionally mean anything within firing range of the enemy.
Grand tactics (or operations) is a bit more nebulous but can be thought
of the movement of units at a scale larger than the range of a single
weapon but not at the strategic level; perhaps a working definition is
that grand tactics or operations is the art of
bringing men to the battle. The theory and battle plans discussed
in this article
are mostly at the grand tactical or operational scale. However,
these templates can probably -- for the most part -- be extended up to
the strategic and down to the tactical scale. For
discussions on Napoleonic wargame tactics see several other analysis
titles by the author
"Defensive Tactics" and "Offensive Tactics".
2 -
THEORY
|
The principles of war are the same as
those of a siege. Fire must be concentrated on a single point (or
hinge or joint), and as soon as the breach is made the equilibrium is
broken and the rest in nothing -- the place is taken.
|
|
2.1
Principles of War
One of the best writings on napoleonic warfare
for the wargamer is the earlier,
more tactical work by Clauswitz,
The
Principles of War. [
CLA12]
There are other classic writings on the theory and art of napoleonic
war by contemporaries or near contemporaries of Napoleon. [
FRE47,
NAP21,
CLA32,
JOM38] There are other
more ancient tracts on the art of war which can be profitably read by a
napoleonic
wargamer. [
TZU,
FRO,
VEG,
MAC21,
MON70,
SAX57]
There is a surfeit of
writings in the 20th Century on the topic of warfare and strategy;
three good
ones are for example
Strategy,
by B
H Liddel Hart,
Maneuver Warfare
Handbook, by William S. Lind, and the
USMC
Warfighting Manual. [
HAR67,
LIN85,
USMC89] As for histories of Napoleon's
campaigns, there is no
better than the massive tome
The
Campaigns of Napoleon by David Chandler. [
CHA63]
Additional on-line readings are also of interest. [
MUR,
ROG57,
SHE12]
The principles of war have been discussed for centuries. However
it wasn't until the early 20th Century that a self consistent,
well articulated,
concise set
of principles was written down by J F C Fuller in England. [
DUP87:16,
DUP90:251]
These are listed in order of importance, though the principles listed
after fourth
are all of near equal importance. Of course, this order is
subject to disagreement depending on sources. However, the order
listed here is justified in the following text.
1.
Unity of
Command.
Unity of command ensures all parts of the military organization are
working toward a common objective. Napoleon stated unequivocally
this was the
most important of all principles. For wargamers, this principle
is
automatically fulfilled since the player is the only one controlling
the pieces of
the game. However, an exception is multi-player games, which can
present the same problems to gamers as does split command in real
life.
2.
Security.
Without a
secure base and flanks, and without
reasonable
knowledge of the enemy position and strength, it is difficult to
successfully implement the
other principles of war. Security insures freedom of
action. Security guards against surprise. This also implies
a defensive posture if your forces are outnumbered such that you do not
risk a pitched battle. Why is security more important than, say,
objective? Since intelligence is part of security, without
intelligence (or knowledge) of the enemy how can one possibly expect
to formulate a meaningful objective? Further, without sufficient
security
from harassment, it is difficult to set up for an offensive. For
wargamers, this essentially means to watch your flanks and rear; often
this can be done artificially by using the mapboard edge as an
impassable morass, which protects at least that one flank or both if
your army is situated in the mapboard corner.
3.
Mass.
Maximum
available combat power must be applied at the point of decision.
Do not separate forces without extremely good cause! Napoleon
stated that no detachment should be made on the eve of battle. (Maxim
XXIX) Without mass, even with a well-chosen objective you will
most
likely be
defeated in detail, hence mass is more important than
objective. Before deciding on an objective first
obtain a critical mass
sufficient to give reasonable options and chance of victory. How
much is critical mass? That is situation dependent.
4.
Objective.
Every
military operation must be directed toward a decisive, obtainable
objective. Without an objective, fighting often degenerates into
uncoordinated attacks committed piecemeal. This sin has occurred
so many times in history (and in wargames) that it is near laughable
because it is so easily avoided. Patience and
self-discipline are called for in the commander.
5.
Offense.
Only
offensive action achieves decisive results.
6.
Simplicity.
Simple
plans expressed in clear orders promote effective execution. Even
a simple plan is difficult to implement in the disorder and confusion
that reigns in combat.
7.
Economy of
Force.
Minimum essential means must be employed at points other than that of
decision. This rule is the inverse of mass.
8.
Surprise.
Surprise
may decisively shift the balance of combat power in favor of the
commander who achieves it.
9.
Maneuver.
Maneuver
must be used to alter the relative combat power of military
forces. Napoleon stated that the strength of an army, like the
power in mechanics, is estimated by multiplying the mass by rapidity; a
rapid march augments the moral of an army and increases its means of
victory. (Maxim IX)
10.
Organization.
Organization is a huge force multiplier. For example, compare the
relative combat effectiveness of a 5000 man Roman legion (in era of the
later Roman Republic) to tens of
thousands of disorganized Gauls or Germans. Later as the
tribes on the empire's periphery (i.e., Huns, Goths, etc) learned to
fight in the same
style as Rome, the relative higher combat effectiveness enjoyed by the
Roman
Empire decreased.
The principles just described in this section will be used to buttress
construction of battle
templates in the remainder of this article.
2.2 Troop Density
In attack keep a close eye on the density of forces.
This is
The Principle of Mass
by another name. It is discussed in more detail here since it is
very easy to begin an engagement without having sufficient troop
density. By density, it is meant how many troops there are per
linear yard of battle front. An example from a wargame is shown
in Figure
1.
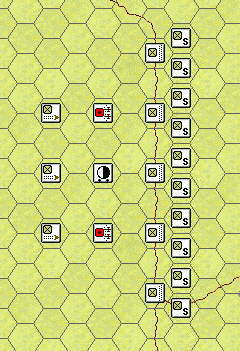
Figure
1. Typical defensive troop density ~4 men/yd in Napoleonic wargame
Let's say each of the 8 infantry
battalions in Figure 1 contain 500
men. Since each hex
is 100 meters, and the front covered from top to bottom is 10 hexes,
then (8 x 500 men) / (10 x 100 meters) = 4.0 men/meter. For
a comparison to historical troop density during the Napoleonic period,
look at the values shown in Table 1.
Table
1. Troop density in Napoleonic battles [
WIL39:54]
|
Year
|
Battle
|
Nation
|
men
per yard
Density
|
|
|
1805
|
Austerlitz
|
French
Allies
|
7.1
6.1
|
|
|
1807
|
Friedland
|
French
|
9.5
|
|
|
1807
|
Wagram
|
French
|
7.7
|
|
|
1809
|
Bautzen
|
French
Allies
|
9.5
5.5
|
|
|
1815
|
Waterloo
|
French
Allies
|
10.8
9.0
|
|
Keep in mind the numbers in Table 1 are averages
across the entire battlefield. The values in Table 1 are
totals of infantry, cavalry, and artillery, though the great majority
will of course be infantry. Artillery or cavalry are not included
in calculations regarding Figure 1, but can be calculated
separately.
The idea is the same though. In any case stack
up as much as possible in the locale that the decisive
attack will be made and use as little as dared in other
areas. The place of attack should be concentrated, say 20% or
less of the total battlefield width. So in the area of attack,
it's recommended to have 3X or more of the densities
shown in Figure 1. Aim for something like 15 or more men per
yard, all stacked in depth of course!
Figure
2. Typical offensive troop density 15 men or more per yard in Napoleonic wargame
In Figure 2, the density for attack
at
the decisive point is much higher. If we assume each of
the 33 infantry battalions is 500 men, this time including reserve
(held back behind the river), the total is (33 x 500 men) / (10 x 100
m) = 16.5 men/meter. Note this value doesn't include artillery
and cavalry. However, the artillery and cavalry density at the
point of attack should be much higher than elsewhere since cavalry is
such a great offensive
instrument.
In
Napoleonic warfare*,
frontage
and combat density are near direct expressions of combat strength;
maximize them at the decisive point of attack and minimize them
elsewhere!
The trick is to build up this attack concentration without enemy
knowledge of it. That is the essence of maneuver in war, and that
is what the following battle templates in Chapter 3 are all
about. Read on!
2.3 The Decisive Time and Place
There is in every battle a
decisive
time and place -- a moment when the balance swings decidedly to
one side. This is an experience of fact both in actual battles
and in wargame simulations of battles. Since there is a decisive
time and place in a battle, there are possibilities of creating
tactical conditions, through maneuver, that may shape themselves into a
crisis, creating a general setting that eventually produces a decisive
action. Recogonizing the decisive moment in a battle is difficult
to teach; perhaps only experience can teach it. However, by
understanding the existence of a decisive moment and studying the
templates that are presented in this article, the veteran wargamer can
shape a battle's events
to fit his plan for victory.
One last thing about the decisive time and place. When it comes,
don't hold back; throw the entire kitchen sink in, even the reserve if
necessary. Usually this refers to the attacker, but the defender
might have to use his reserve too. This doesn't mean to use all
your forces in a single turn, but over 2 or 3 turns or so, you might
have to use nearly ALL your forces to break the opponent. If you
only drive him back a bit, the effect is dramatically lessened.
Experience will teach this best. Doing otherwise is committing
the cardinal sin: committing troops piecemeal. That is intuitive
to a rookie and feels like the most efficient way, but experience will
teach that it is not the most effective why to conclusively
finalize the battle's
outcome. By "use all your forces", it is meant using them in an
attack or counterattack such that their fatigue level goes up several
notches or they become disorganized or the activity causes them large
casualties or to be routed. Remember what Clauswitz says about
battle: it is really like two 500 lb gorillas trying to scare each
other. That's what you're trying to do to win: break and
rout the enemy,
and that really
means your opponent's (i.e., opposing commander's) confidence
not just his troop strength, fatigue, or order in game mechanics.
2.4 Hard and Soft Points
Don't forget to account for the arrangement of the
enemy. He usually will have heavily defended and weakily defended
points. Some theory texts suggest attacking the weak points,
which they call soft points or gaps, while bypassing the hard points.
[
HAR67,
LIN89] An
example of this is the island hopping by US
Marines in the Pacific in WW2. They only attacked several key
islands and skipped many others. This was an exercise in
economy of force as well.
Another example is the German attack at the Battle of the Bulge in WW2;
the Germans
en masse hit the
Americans through the dense Ardennes Forest, which the U.S. forces had
assumed protected them to some extent from armor. Achieving
complete surprise, the German forces overwhelmed the few American
infantry divisions in the area, most freshly created and recently
arrived from the States. [
BRA99]
2.5 Coup
d'Oeil
Frederick the Great mentions in his book the importance of a commander
possessing
coup d'oeil.
This French phrase literally translates into English as "striking eye",
though the military meaning is probably better stated as "correctly
appraising the lay of the land with regard to the enemy and battle".
|
Knowledge of the country is to a
general what a rifle is to an infantryman and what the rules of
arithmetic are to a mathmatician. ... The coup d'oeil of a general is the
talent which great men have of conceiving in a moment all the
advantages of the terrain and the use that they can make of it with
their army. [FRE47:27-31] |
|
He recognizes three kinds of
coup
d'oeil: (1) instantly perceiving advantages of terrain during a
meeting engagement, (2) when attacking an enemy in their defensive
position being able to perceive at first glance the weak spot of the
enemy, and (3) correctly judging the capacity of the enemy at the
commencement of a battle. It is on exact knowledge of the terrain
that is regulated the dispositions of the troops and the order of
battle of the army. As a wargamer, you have near perfect
knowledge of the terrain via the mapboard -- use it by studying the
terrain. For example, is there a stream running parallel to the
direction of advance which can be uses to stop cavalry charges to the
flank? When making a defensive stand, are there two seperated
copses of woods on to which to anchor each end of the defensive
line? Is there a depression running parallel to the proposed
defensive line in which can be positioned an infantry line with
artillery firing above from the ridge behind it? And so on.
3 -
AGGRESSIVE BATTLE TEMPLATES
|
In our plan of battle we must set this
great aim: the attack on a large enemy column and its complete
destruction.
-- Clauswitz [ CLA12]
The art of generalship consists
in, when actually inferior in numbers to the enemy, being superior to
him on the battlefield.
|
|
Note that the two quotes opening this
section have the same
intent. From the principles of war, we realize that only
offensive action can
attain ultimate victory. A draw may be obtained by defensive
action. Thus since we aim to win a battle, we will need to employ
offensive action.
Importantly, don't underestimate the power of reconnaissance in
wargaming,
particularly when your opponent is a stranger and new to you. By
creating a small opening general action between say a brigade or
division of mixed forces, you can get a feel for how your opponent
fights. Is he overly aggressive? Overly timid? Does
he take risks unnecessarily? Has he mastered the basics of
tactics? All these can assist you in settling on a final approach
to defeating him.
If one side has a 6 to 1 advantage in forces, a straight ahead direct
attack will certainly carry the battle often even if the enemy is
entrenched or fortified. However, the overwhelming direct attack
is so boring
as to rarely be found in a wargame or battle simulation.
Typically the forces in a wargame are more closely matched or victory
conditions are such that even if one side has a large force relative to
the other the large force can not afford to lose large numbers of
troops and still win. Thus, artifice or stratagem is required to
attain victory. In this section and the next, we'll study several
stratagems. Many of these seemed favored by Frederick the Great,
Napoleon, and Wellington, among other great captains of war.
Frederick the Great said a battle no matter how complicated can always
be broken into a right flank, a center, and a left flank. [
FRE47] B H Liddell Hart's basic premise was
that it is not so much to seek battle
as to seek a strategic situation so advantageous that, if it does not
of itself produce the decision, continuation by battle is sure to
achieve this. [
HAR67] Clauswitz recommended
choosing as the object of the offensive that section of the enemy's
army
whose defeat will give decisive advantages. [
CLA12]
There are an
infinite number of ways to conduct a battle.
However, such anecdotes as these indicate that perhaps there are a
few general ideas which can be
molded into several distinct battle templates. By template it is
meant a plan
general enough to be applied to many different battle situations while
yet remaining specific enough to be useful in an actual battle.
Perhaps a better word than
template
is 'idiom' though 'template' gives the distinct impression of forming a
specific battle plan from a master archetype and therefore is retained.
A study of battles, both real and simulated, reveals successful
recurring templates. These are discussed in the following.
The battle
templates explained are not
worth much if one remains ignorant in how to implement certain tactics
at
crucial places and times. Note that each of these templates rely
heavily on
movement and maneuver as much as firepower or melee, with intent of
producing the greatest number of men at the location of the decisive
attack which has been chosen in advance as much as possible.
Finally, notice that every one of the battle templates shows a
reserve. This is not incidental nor an accident. As Helmuth
von Moltke said, "He who
commits his reserve last wins the battle." [
MOL93]
3.1 Single Envelopment
In essence the single envelopment is piling up all possible forces into
either flank
and attacking, trying to turn the opponent's flank, and ideally
attacking
him from his rear. This battle template is illustrated in Figure
3. Either the right or left flank is made very
strong (mass) while the opposite flank and center of the line are very
weak (economy of force).
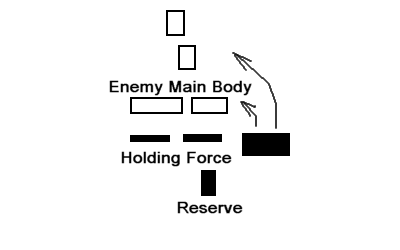 Figure 3. Single Envelopment is probably the
most oft used battle template
Figure 3. Single Envelopment is probably the
most oft used battle template
This template requires distributing your
order of battle into the
following
forces:
- Holding Force
- Flanking Force
- Reserve
This is a simple battle plan and should be able to be employed in
almost any situation. It is recommended for wargame scenarios in
which the battle lines are already or nearly engaged without sufficient
time to employ one of the other more complicated templates.
The single envelopment was used repeatedly by Grant and Lee in the
later stages of the Civil War as each tried to turn the other's
flank.
**
3.2 Double Envelopment
The double envelopment has a great military history. Examples of
battles in which it was used are Cannae, Cowpens, and Isandlwana.
This battle template is shown illustrated in Figure 4.
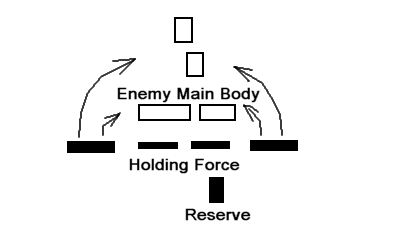 Figure 4. Double Envelopment was used by
Hannibal to annihilate an entire Roman army at Cannae
Figure 4. Double Envelopment was used by
Hannibal to annihilate an entire Roman army at Cannae
This template requires distributing your
order of battle into the
following
forces:
- Holding Force (Center)
- Right Flanking Force
- Left Flanking Force
- Reserve
At The Battle of Cannae (2 August 216 BC), Hannibal placed his Gaul and
Spaniard allies in the center
and his Carthaginian troops to the outside. During the battle
these highly trained flank troops slowly enveloped the Roman
mass. What is
amazing at Cannae is that the Roman Army at around 90000 men
outnumbered Hannibal's force
nearly 2 to 1. However due to its inexperience and bickering
between proconsuls it had difficulty
maneuvering to stop the double envelopment during the battle. At
The Battle of Cowpens (17 January 1781) during the American Revolution,
the plan was not initially to
use a double envelopment, but after the forward, first line formed of
militia fell back and
regrouped, it charged around the flank of the friendly second line
formed of continentals,
who were depoyed in the center, and opposite to the other flank from
which colonial cavalry was charging, effectively making the
battle one of double envelopment. The result was a near complete
wipe out of the British force, all either killed or captured. As
a third example, this
template was used by the Zulus of South Africa to completely wipe out
the British 1st
Battalion, 24th Foot at The Battle of Isandlwana (22 January
1879). The Zulu's favored battle method was the "chest" and two
"horns" of a bull, supposedly championed by King Shaka; this method is
none other than the double envelopment.
The weakness of this method is that the weaker center can be
smashed, breaking the line into disjointed pieces which can be defeated
in detail (see battle template Breakthrough and Fragmentation).
3.3 Detached Wide Envelopment
This differs from a Single Envelopment in that the flanking attack
is made by units which completely detach from contact with the friendly
main
body.
This was Napoleon's
favorite stratagem, termed
La
Manoeuvre sur les Derrieres (maneuver on the rear). It is said
that Napoleon used this stratagem no less than thirty times between
1796 and 1815. [
CHA63:163] Given that he
directly commanded in
some 60 or more battles, this amounts to his employed method about 50%
of the time. Look at Figure 5 for a summary description.
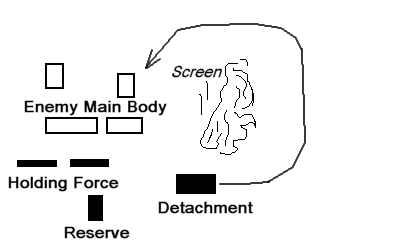 Figure 5. Detached Wide Envelopment was
Napoleon's favorite
Figure 5. Detached Wide Envelopment was
Napoleon's favorite
This template requires distributing your
order of battle into the
following
forces:
- Holding Force (center and flank opposite detachment)
- Flank Detachment
- Reserve
A critical feature present in this template is a screening of the
detachment. This can be by natural obstacles like a forest, large
city, elevated terrain, or artificial like light cavalry. The
main thing is that the detachment is not observed by the enemy. A
real strength of this stratagem is its potential for complete
surprise. One of the strongest weapons of offensive warfare is
surprise. The unexpected element which the defender creates
through secret preparations and through the concealed disposition of
his troops can be counterbalanced on the part of the aggressor only by
a surprise attack. Against an opponent who remains in static
defense waiting for you to attack, this wide envelopment can be a
useful maneuver. David Chandler's book
[
CHA63] says
Napoleon typically
detached about 1/3 or more of his force to come wide around to the
flank or
rear of his opponent. Napoleon said later at St. Helena he had
wanted
to use this maneuver more.
The weakness of this method is that the two forces can be confronted
separately and
defeated in detail (see battle template Interior Lines).
3.4
Oblique Approach
This is Frederick the Great's favored maneuver, which he called
Schiefe Schlachtordnung (oblique
formation). [
FRE47] He used something akin
to this
successfully at the Battle of
Luethen,
1757. Look at Figure 6
for a graphical description.

Figure 6. Oblique Approach was Frederick the
Great's favorite
This template requires distributing your
order of battle into the
following
forces:
- Refused Weak Flank
- Center
- Assault Flank
- Reserve
The great advantage of this approach is that poor quality troops are
kept out of the engagement and on the defensive. Ideally, the
poor quality flank and center is posted on a village or other natural
obstacle favoring the defensive. Further, to engage these poorer
quality troops, the enemy has to advance which further weakens his
ability to defend the assault on the opposite flank. If one can
get this angled alignment against your opponent, this template has a
lot going for it.
3.5 Breakthrough and Fragmentation
Some military texts call this Penetration and Exploitation. This
is also known by another name as a frontal assault. In general,
it is
not
recommended for use in Napoleonic warfare, at least by this
author. Even with 6:1 odds, the
casualties incurred by attacker are often very large. Napoleon
used this template when necessary, for example at The Battle of Lutzen
(2 May 1813). Proceeded by a terrific discharge of a
grande batterie, near the end of
the battle the Imperial Guard charged headlong into the Prussian
center. However the French lost 20,000 to 30,000 men, a similar
number as
their opponents, and the net result was that the allies were simply
driven backwards and no penetration was obtained. France suffered
more the losses, being greatly outnumbered by all the nations allied
against her at that time. At Waterloo, where the frontal assault
was employed
again against the reknown British infantry firing rate, d'Erlon's Corps
suffered 35% casualties in 1 hour. See
Figure 7 for a picture of this template.
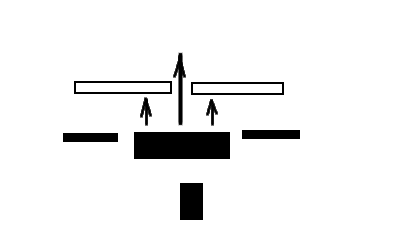 Figure 7. Breakthrough and Fragmentation can
allow destruction of enemy fragments
Figure 7. Breakthrough and Fragmentation can
allow destruction of enemy fragments
This template requires distributing your
order of battle into the
following
forces:
- Weaker Left Flank
- Assault Center (including grand battery)
- Weaker Right Flank
- Reserve
Note that in the Napoleonic era often this template is accompanied by a
grand battery which prepares the way prior to the main assault.
The advantage of this maneuver is that if a breakthrough does occur,
the opponent is fragmented and can be defeated in detail. It is
also
extremely simple to execute. As such it was nearly the only
method used
by the ancients, for example at The Battle of Gaugamela (331 BC) where
Alexander the Great drove straight up the middle at Darius the Persian
King. It is somewhat ironic that the Persians attempted to use
their numerous cavalry in a double envelopment in this battle; however,
Alexander's audacity straight up the gut broke that maneuver.
This is illustrated in Figure7B.
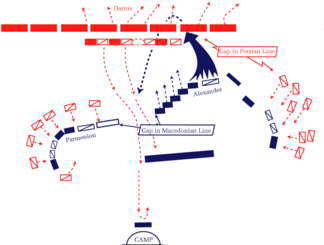 Figure 7B. Final stages of The Battle
of Gaugamela
Figure 7B. Final stages of The Battle
of Gaugamela
Recently there has been support offered for this frontal movement. [
LUT01] This is in stark
contrast to the negative image imparted it by Prussian staff
(Clauswitz, et. al.), their intellectual decendents (WW1 and WW2
Germany), and English theorists (J F C Fuller and B H L Hart). [
CLA32,
MEL56,
HAR67]
Basically the idea is that flank and other more complicated manuevers
are more difficult to implement and therefore have inherent
organizational friction.
(Here
friction is the term
coined by Clauswitz. "Everything in war is very simple, but the
simplest is difficult. The difficulties accumulate and end by
producing a kind of friction that is unconceivable unless one has
experienced war." [
CLA32] ) The frontal
assault is simple and direct and therefore has less inherent friction,
which increases its chance of success. For example a Detached
Wide Flank manuever may be detected by the enemy, which means that now
the forces are split (violating the principle of mass) and have lost
the element of surprise (violating the principle of security).
The latter two negative consequences are inherent in the Detached Wide
Flank manuever.
Keep in mind that with armored forces this is the
key maneuver. Hating to
encourage ahistorical behavior in Napoleonic warfare, still it would be
remiss to not disclose the following method or "trick of the
trade". Akin to armored warfare, if one masses all the horse
artillery batteries of an army with elite light infantry and lots of
heavy cavalry, this mass can act similar to an armored fist in
WW2. Since the horse artillery can move
and shoot in the same wargame turn,
it has much of the same game aspects as does a tank in more modern
wargame simulations. Stacking each battery for protection with a
formed light infantry battalion or two along with multiple companies of
skirmishers in the same hex for additional firepower and with heavy
cavalry as a threat just behind, this creates a pseudo-tank. With
each stack separated by a single open hex in a checkerboard fashion,
the entire formation can move forward with relative immunity and shoot
point-blank at nearby enemy targets.
Very, very nasty. In
some aspects, this tactic is historical, since Napoleon used something
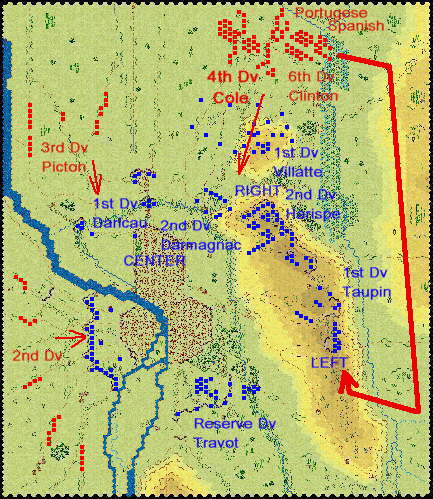
similar at Wagram (5-6 July 1809), advancing along a river to protect
one flank and using a huge amount of horse artillery and cavalry to
protect the other. [
CLA12]
3.6 Dislocation
Via maneuver, this template seeks to create an untenable defensive
position which makes the
enemy either dislocate or fight a battle at a severe
disadvantage. This was the paragon preached by B H Liddell Hart
in the book
Strategy. [
HAR67] Often this battle template is simply
the intent of exploiting a gap in the enemy's main line. Or it
can be threatening an enemy asset (such as a supply depot or national
capital), which causes the enemy to withdraw from carefully prepared
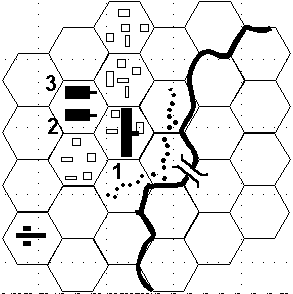
positions. An example of this template is shown in Figure 8.
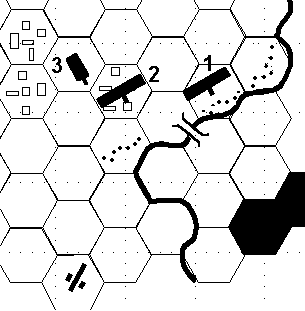
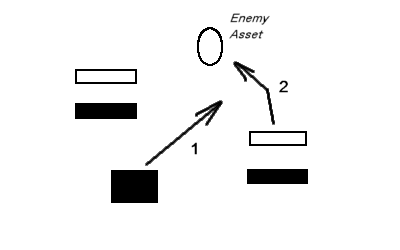 Figure 8. Dislocation uses maneuver to create
an untenable defensive position
Figure 8. Dislocation uses maneuver to create
an untenable defensive position
Here, denoted by "1", the friendly force
seeks to exploit a gap and threaten an enemy asset, which causes the
enemy "2" to withdraw and defend his threatened asset, thereby fighting
in the location of the attacker's choosing. This was employed by
General Lee, CSA, prior to The Battle of Gettysburg; the south invaded
the north to cause the Army of the Potomac to leave its heavily
entrenched positions south of the capital and move west into
Pennsylvania. This template is such that the order of battle must
be uniquely
determined for each situation for which it is employed.
The classic counter to this ploy is to launch your own dislocation
attack on an enemy asset. This was done by Scipio the Younger
when he crossed the Mediterrean Sea near Sicily and fell upon the
Carthaginian capital, causing Hannibal to give up his (now seven year
old!) dislocation attack on the Roman hinterland.
Another dislocation campaign was Sherman's march to the sea where he
dislodged from a conventional train-based supply and lived off the land
as did armies of old. By threatening the deep south where the
confederacy was born, he caused tremendous desertion in Lee's Army of
Northern Virginia, whose southern troops raced back home to protect
their individual homesteads. This ended in Appomatox Court House.
4 -
REACTIVE BATTLE TEMPLATES
|
Once
having engaged the units nearest to the enemy, you have to let them go
without worrying too much about their good or bad fortune. Only
you must be careful not to yield too easily to requests for help.
|
|
The battle templates shown above are
more aggressive in nature with the attacker trying to force the
opponent's actions to fit into his plan. Sometimes, due to
inferiority in numbers, quality, or position, a belligerent is forced
to use more reactive battle templates. In this section, three of
these are shown, (1) Interior Lines, (2) Counterpunch, and (3) Fighting
Withdrawal.
4.1 Interior Lines
This was another stratagem oft used by Napoleon, called Centres des Operations (center of
operations). An example of this is the battles at
Ligny against
the Prussians and Quatre Bras against the Anglo-Allied. Here,
Napoleon split the opposing forces in two and defeated each in
detail. However, he was soon after defeated because his
lieutenants (Grouchy) did not prevent the Prussian Army from
re-uniting with the Anglo-Allied Army at Waterloo. It was a very
close run, however, and given that he was greatly outnumbered it showed
that Napoleon still retained great military prowess contrary to some
horse-hooey bandied about his mental abilities dramatically diminishing
in his later years. (Even as late as 1814, the stated Allied
strategy was to always avoid
a direct engagement with Napoleon himself and instead attack forces
commanded by his
lieutenants. Is that diminished ability?) As shown in
Figure 9, the main army is placed between two opposing armies, and then
in (1) it marches to defeat one and then in (2) it marches to defeat
the other.
Figure
9. Interior Lines was another
of Napoleon's favorites
This template requires distributing your
order of battle into the
following
forces:
- Weaker Left Holding Force
- Strong Centralized Attack Force
- Weaker Right Holding Force
Interior lines is used most often when an army inferior in numbers is
opposed by multiple armies greatly superior. By attacking each
army in turn, the numerically weaker belligerent can master another
much greater in numbers. Military textbooks state that great
strength of character is necessary in a general if he is to employ this
desperate template because friendly forces are setup in a way that
easily could allow a converging, overwhelming attack by a combined
opponent.
4.2 Counterpunch
The Counterpunch is a one-two sequence of events. It is
useful when the enemy is superior in numbers and over-confident.
First the enemy
attacks, and when the attacker begins to lose impetus through disorder,
fatigue, or other, then a well placed counterattack is delivered (i.e.,
"The
Hammer" strikes). It could also be termed "Parry and
Counterattack". This is
illustrated in Figure 10.
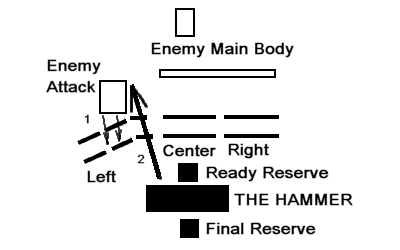
Figure
10. The Counterpunch was
probably
Wellington's most often employed template
This ploy has a bit of subtlety, and can
be
very devastating. "At first exhibit the coyness of a maiden, until the
enemy gives you an opening; afterward emulate the rapidity of a running
hare, and it will be too late for the enemy to oppose you." [
TZU] At the tactical scale, this maneuver would
be termed an
ambush. This template seems to have been employed by
Wellington, who was often numerically inferior to his foes. The
opponent is allowed or even encouraged to attack,
which is absorbed, and then when his attack has spent itself -- which
always at some point naturally occurs to an attack
against a defense in depth -- a
decisive, concentrated
counterattack is launched at a critical point in the attacker's line
using a
centralized defending force which has been saved and hidden from enemy
view.
Personally, the author favors this absorb and counterattack stratagem
above the others for wargames. Though this template to some
extent waits for
the opponent to commit himself, the counterattack should be swift when
it becomes apparent where the enemy's main attack has fallen. It
has an element of ju-jitsu (throwing the other guy with his weight) in
it. The key to this stratagem is to remain concentrated
behind the lightly defended main battle
line,
defend in depth that area of the line to dilute the attacker's impetus
-- refusing a flank if necessary as shown in Figure 10 (dashed lines),
and then
counterattacking at the right
moment when the opponent is unbalanced and disorganized and at the
right place where he is drawn out (not concentrated). Take
special note that this template's success is highly dependent upon
properly implementing a
"defense in depth" and upon recognizing the decisive moment to
counterattack. As such it is probably not well-suited to rookies.
This template requires distributing your order of battle into the
following
forces:
- Right Flank (sparsely manned, defense in depth)
- Center (sparsely manned, defense in depth)
- Left Flank (sparsely manned, defense in depth)
- The Hammer
- Ready Reserve - crucial to parry attacker's initial blow, since
you are
ceding initial initiative to
opponent
- Battle Reserve
Ideally the counterattack by the hammer destroys a sizable chunk of
forces netting a
decisive victory. However, several steps must precede that
decisive counterattack. These are: (i) set up a secure
order of battle, (ii) recon in force to gain
information about the opponent's abilities and force distribution,
(iii) adjust forces to match opponent's maneuver, (iv) allow opponent
to mount attack, (v) absorb it with solid defensive tactics and use of
ready reserve if necessary, (vi) counterattack at a single concentrated
location of the opponent's line using "The Hammer" to punch a hole in
it and destroy a large-sized force, and finally (vii) deliver coup
d'grace to the entire battle line with final reserve.
The key danger in this template is that if the opponent's initial
attack is never stopped, or sufficiently slowed, or deflected, he will
permanently gain -- probably decisively -- the initiative, which goes a
long
way in attaining victory as he sets the tone and development of
battle. The way to prevent this is with a defense in depth which
thwarts him from connecting with your main body and causing it mischief
before the impetus of his attack degrades and disorganizes.
4.3 Fighting Withdrawal
Sometimes this is the only option available. It is not
technically an attack, though since the force is not entrenched this
template still qualifies as a maneuver and so is discussed here.
Usually in situations where employed, there is not
time to setup a Counterpunch. Or there are insufficient forces to
create the decisive counterattack force. For example, the
Anglo-Allied at Quatre Bras or the French initially at Marengo or
Saltnovka, the only thing early in those battles was to maintain a
viable
defensive line. There were barely enough troops to do that.
For this template, the idea is to disengage where ever possible and
slowly withdraw
while maintaining unit cohesion,
watching
flanks, and awaiting friendly reinforcements to gather
sufficient
mass before taking the offensive or risking a pitched, head-to-head
battle.
5 -
STATIC BATTLE TEMPLATES
|
All
quiet on the Western Front.
-- Ernest Remarque
|
|
A static battle template is another name for a siege. Vauban is
the name to start with regarding siegeworks in the 17th and 18th
centuries. [
VAU] Sieges did
happen in the Napoleonic era. However, static defense in that era
was often
unsuccessful. (Or in modern combat for that matter because the
advent of heavy caliber weapons -- i.e., artillery and more recently
aircraft and combustion powered missiles -- and mobile armored forces
have doomed static fortifications.) Therefore, we won't discuss
these templates in this article. A more recommended defense
template is an active in-depth approach which seeks opportunities to
counterattack (see Counterpunch maneuver). And more importantly
since our emphasis in this article is simulations, being time dependent
(i.e., starve or bomb out your opponent) sieges make for boring
wargaming.
6 -
CONCLUSION


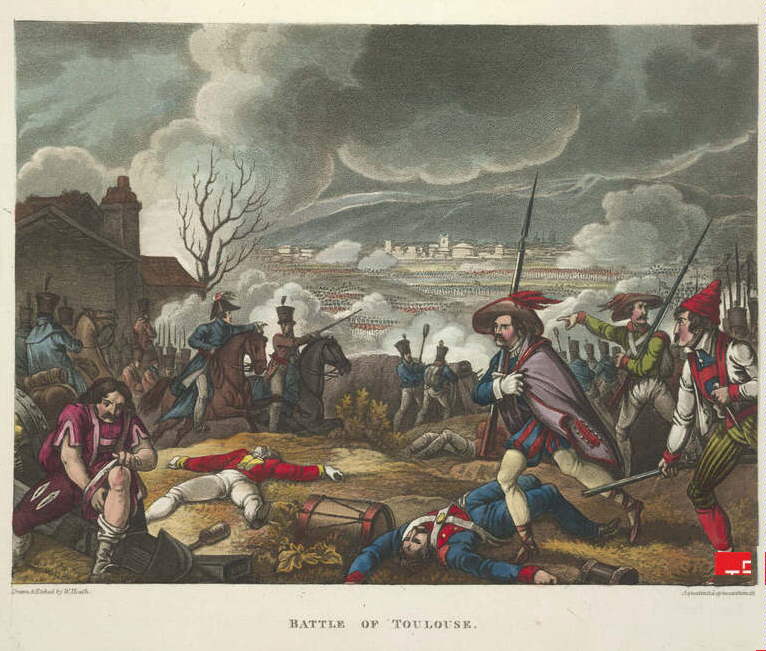
 Anglo-Allied