|
The NWC
Newsletter
The official quarterly publication
of the Napoleonic Wargaming Club
|
|
Contents
1. Editorial
2. Featured Article
---
3. News & Dispatches
Anglo-Allied
Austrian
Dutch
French
Prussian
Russian
Spanish
Club
4. Analysis
HPS Salta-novka
5. Commentary
6. Letters to Editor
|
|
No.
26 JULY 2007
Dirk Smith, Editor
Okay. We're on to the 25th publication of the NWC
newsletter. Thanks for the positive comments about the previous
publication. You'll note that this letter is much shorter than
the previous. Part of that is due to me having less time this summer to
work on the letter (wife is expecting fourth son on August 31, 2007 --
and my other three sons are all under 12). The other part is due
to having no submissions except one for the 'Analysis' section. This
brings me to the next topic: Authors! At least we should have the
army commanders submit information about their commands for the
'Dispatches' section.
WANTED! NWC
Newsletter
Authors
This publication is for all the
club members. However, it really is only as robust as the contributions
from club members. Got any ideas or articles for next quarter? If
so, polish it up in the next three months and submit to Dragoon@phxsim.com before October
1, 2007.
Dirk Smith, 30 July 2007
---
The following news items were the only ones received by the newsletter
for this publication. Hopefully next quarter more feedback will
be obtained.
 Anglo-Allied
NWC Newsletter did not receive information from Anglo-Allied Army
Commander.
Dutch
NWC Newsletter did not receive information from Dutch Army Commander.
Austrian
NWC Newsletter did not receive information from Austrian Army Commander.
French
Here is the latest batch of information for the July 2007 NWC
Newsletter from Monsieur le Marechal Baron John Corbin.
Promotions
Lieutenant Colonel Patric Strijbis of VII Corps promoted to Colonel
Captain Jose Fornos of VI Corps is promoted to Chef de Battalion
Captain Mike Bangert of V Corps is promoted to Chef de Battalion
Colonel Paul Ayers of VII Corps is promoted to General de Brigade
Chef de Battalion Pierre Desruisseaux of VII Corps is Promoted to Lt.
Colonel
Medals awarded
Monsieur le Marechal John Corbin and Lt. Colonel Pierre Desruisseaux
are awarded the
Médaille Militaire for their multiplayer victory over allied
opponents on the field of Waterloo.
New Officers
Lieutenant Armando Russo assigned to Armee du Rhin - VII Corps,
21ème
Division, 2ème Brigade, 1ère Leichte Regiment
Lieutenant Rafal vel Vertigus assigned to Armee du Rhin - VI Corps,
19ème
Division, 1ère Brigade, 1ère Liebregiment
From the Armee du
Nord
The following report is a compilation of news as reported by corps for
the months of April, May and June, 2007 for Armee du Nord. This
includes point awards that are shown cumulative for the period.
I Corps Commanded by Marechal Doug
Fuller
Lt. Thomas Moore graduated from Ecole Militaire and was assigned to 23e
Chasseurs a Cheval of 1st Light Cavalry Division of I Corps.
III Corps Commanded by General de
Division Greg Morgan
Cadet Fagnand completed his initial training in Ecole Militaire and was
promoted to Lieutenant and assigned to 34e Regiment de Ligne of 1st
Brigade of 10th Division.
General de Brigade Christian Rizo has been activated from reserve to
resume his command of 1st Brigade of 11th Division.
I Reserve Cavalry Corps
Commanded by Marechal Bill Peterson
Lt. Col. Al Amos is awarded the Ordre de la Couronne de Fer in
recognition of his lifetime contributions to strategic simulation
gaming.
Ecole Militaire
Cadet Jeffery John Wong has recently been assigned to Ecole Militaire
and designated to be assigned to AdN upon completion of his initial
training.
Prussian
NWC Newsletter did not receive information from Prussian Army Commander.
Russian
NWC Newsletter did not receive information from Russian Army Commander.
Club Miscellaneous
NWC Newsletter did not receive any relevant information.
Salta-Novka
HPS Simulations' Napoleon's
Russian
Campaign
Gerald J. Nivison, PhD
gjnivison@yahoo.com
(c)2007
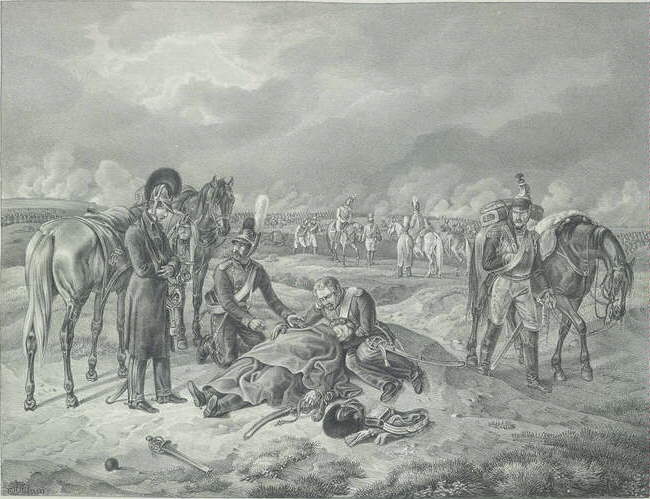
Death of a cuirassier officer
|
SCENARIO DESCRIPTION:
[FILENAME: SB_Saltanovka.scn]
Single Battle - The
Battle of
Salta-Novka (36 turns, Small) - 23 July 1812 - [Historical] Bagration and his
Second Army of the West are moving north in an attempt to join with
Barclay and the First Army. Davout has positioned himself at
Salta-Novka in an attempt to block Bagration. A successful French
operation keeps alive the possibility that Napoleon may still be able
to bring the First Army to battle without the reinforcement of
Bagration.
|
|
CONTENTS
|
1 - INTRODUCTION
1.1 Audience
1.2 Mapboard
1.3 Order of Battle
1.4 Objectives
1.5 Optional and House Rules
2 - FRENCH DEFENSE
2.1 General Strategy
2.2 Force Distribution
2.3 Defensive Stage 1
2.4 Defensive Stage 2
|
2.5
Defensive Stage 3
2.6 Later Defensive Stages
2.7 French Counterattack
3 - RUSSIAN ATTACK
3.1 Initial Encirclement
3.2 Left Flank Attack
3.3 Rough Slog
4 - CONCLUSION
FOOTNOTES
REFERENCES
|
|
1 -
INTRODUCTION
|
A
perfect general, like Plato's Republic, is a figment of the imagination.
|
|
Before playing a wargame scenario for the first time, it pays to
analyze it in depth. In the first part of this article, The Battle of Saltnovka is analyzed
first from the side of the French, the natural
defenders in this scenario.
In the latter section of this article, it is shown how best to crack
the French defenses
when playing Russian attacker. This analysis is not the end-all
in how to play this scenario. It is one way though and should at
least give you food for thought for other ways. When the author
first played this scenario, his oppenent had already played it twice
(once as each belligerent) and said "the Russians will be a
steamroller". Futher analysis, given in this article, left some
doubt on that assessment since the French have near parity in forces
(see
Table
1 below) and have a nicely defendable region with both flanks
secured by forests or impassable creek. With competent play on
both
sides, this scenario
should result in a draw, which implies a good design. A nice
feature of this scenario is its compactness; it's about a corps or so
for
both sides and fits into a nicely sized board. One's mind
naturally handles this sized game quite naturally, whereas I often feel
it's more work -- though still fun -- to comprehend "the big picture"
in
larger scenarios.
1.1 Audience
The intended audience for this article is intermediate to advanced
level gamers. A beginner can benefit from reading this article
but will have to work hard at understanding some of the concepts
involved. A solid understanding of basics, for example like
Command and Control or all the myriad modifiers that affect game
tactical decisions, is expected of the reader. Further, basics
of how to construct a defensive line using infantry battalions in line
formation with skirmisher companies stacked for protection and backed
up by close-support
artillery and cavalry is assumed. For articles covering basics
see Napoleonic Archive
Articles.
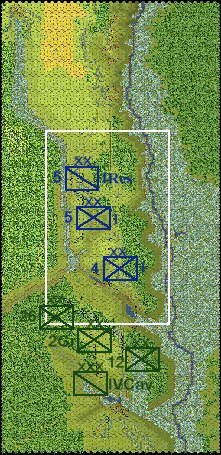
1.2 Mapboard
As an introduction to this
scenario, familiarize yourself with the map in Figure 1.
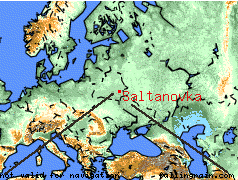
Saltanovka is located in modern day Belaruss. The image shown in
the figure is
the entire mapboard. The top direction of the map is toward
north. The map is 66 hexes
wide and 119 tall (6.6 x 11.9 km or approximately 4 x 7 miles).
Because of locations of
objective hexes and
bounding forests, rivers, and marshes, the battle most likely will be
played
inside the white boxed area, which is approximately 1/4 of the total
map area.
Figure
1. Geographic location and battle map (25%
scale of 2D zoom-out view) with initial setup
1.3 Order of Battle
In Figure 1, the initial Russian units positions are shown in green and
French in
blue. Forces should be understood in terms of groups that can
operate independently with regards to the game engine
C&C. The French have three groups of forces: 4th Inf Dv
(Dessaix) / I Corps, 5th Inf Dv (Compans) / I Corps,
and 5th Cuirasser Hv Cav Dv (Valence) / I Cav Res Corps. The
remainder of the 5th Inf Dv is
released at 8:30 AM (Turn 5), and the 5th Hv Cav Dv is released at 9:30
AM (Turn 9). The two French 12-lb batteries arrive as
reinforcements at
9:30 AM. The Russians have four
groups of forces: 12th Inf Dv (Vasilchikov), 26th Inf Dv
(Paskevch), 2nd Gr Dv (Vorontsov), and IV Cav Corps (Sievers).
There are approximately 23000 French and 22000 Russians, though about
half of the French are fixed for the first 4 to 8 game turns. A
detailed comparison of these forces is shown in Table 1.
Table
1. Order of Battle Comparison
|
Description
|
French
|
Russian
|
|
|
Line Infantry (men / battalions)
|
19650 / 25
|
13350 / 26*
|
|
|
Light Infantry (men / battalions) |
0 / 0
|
3600 / 6 |
|
|
Horse Artillery (guns /
batteries)
|
24 / 4
|
12 / 1 |
|
|
6 lb Artillery (guns / batteries)
|
16 / 2
|
48 / 8
|
|
|
12 lb Artillery (guns /
batteries) |
16 / 2
|
24 / 2 |
|
|
Light Cavalry (troopers /
regiments) |
1050 / 2
|
2675 / 6** |
|
|
Heavy Cavalry (troopers /
regiments) |
2275 / 3
|
2100 / 4
|
|
|
--------------------------------------------------
|
------------------
|
------------------ |
|
|
Infantrymen (Bns) / Guns /
Cavalrymen
|
19650(25) /
56 / 3325
|
16950(32) /
84 / 4775 |
|
|
* 16 Russian line battalions are
restricted and may not form
skirmisher companies.
** 3 Russian light cavalry regiments are cossacks,
which receive
a lesser charge bonus. |
|
 Russian grenadiers
The number of infantrymen indicate the amount of firepower a side can
absorb, while the number of battalions indicate the
amount of fatigue (how long it can remain in battle against an
equivalent or reasonably larger force). The number of artillery
and
cavalry indicate the amount of damage a side can deliver. With
these four numbers, a rough comparison to the orders of battles can
quickly be made. The forces roughly seem about equal, but about
half of
the French units are fixed the first 4 to 8 turns of the game.
Even though the Russian has 84 guns to French 56, the number of
batteries (and thus shots per game turn) is much closer at 11 to
8.
Further, the French have 4 batteries of horse; it may be worthwhile to
mass these batteries for counterattack opportunities, particularly to
punish ill-conceived, poorly placed cavalry charges. However, all
Russian infantry is fanatical, which gives them a +2
morale modifier on many morale checks. Also keep in mind that
Davout commands only the 4th and 5th Dv, but not the 5th Heavy Cav Dv,
whereas the Russian leader Bagration commands the entire Russian
force. (Is it historical that Davout does not have command over
detached 5th Cav Dv? Probably not, but that is the way this
game simulates it, so be aware.)
1.4 Objectives
An old adage among veteran wargamers is: "Ignore objectives and
instead
kill enemy forces." This is true most of the time, because by
killing forces, the objectives become easy to occupy or defend.
The
French start with 7 objective hexes worth 550 points. The Russian
needs to gain a net of 550 points to get to a minor victory and 50
points to get to a draw. To
keep the value of objectives in perspective with units, recall that an
infantry brigade of 4000 men is worth 160 points, whereas a cavalry
regiment of 1000 troopers is worth 240 points. (Take this as a
hint on the relative worth of cavalry.)
Take note that there are two exit hexes in this scenario, one at the
northern end for the Russian to exit units and one at the southern end
for the French to exit units. It is doubtful under typical game
conditions that either will be used.
1.5 Optional and House Rules
The recommended optional rules to use for this scenario are MOE3 and
definitely no multiple infantry melees and no line movement
restrictions.
2 -
FRENCH DEFENSE
|
An army ... [ideally] has its two wings
resting ... upon natural barriers. Where both wings are
protected, a general has only to guard against being penetrated in
front. ... He should never allow the different corps
of his command to depart [from the central position] for if it be
difficult to contend with the disadvantage of having two flanks
exposed, the inconvenience is doubled by having four, tripled if there
be six; that is to say, if the army is divided into two or three
seperated corps.
|
|
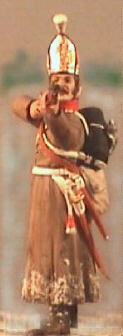
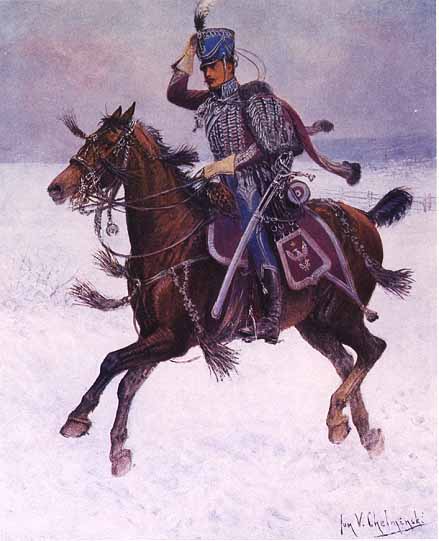 French chasseur
2.1 General Strategy
So, how to defeat the Russian? Strategy depends upon the
natures of the players facing each other. If you face an
aggressive
Russian, he'll come after you and try to take the objective
hexes. The
way to defeat him is to grudgingly give ground (and objective hexes)
but make him
pay heavily in destroyed units (via disorder and fatigue!). Since
cavalry counts 6
times
infantry, always go after it with ranged fire whenever possible.
If the Russian is passive (it is NOT in Russian interest in this
scenario to be), the best way is again to destroy his units, but wait
until all French order of battle is released before being
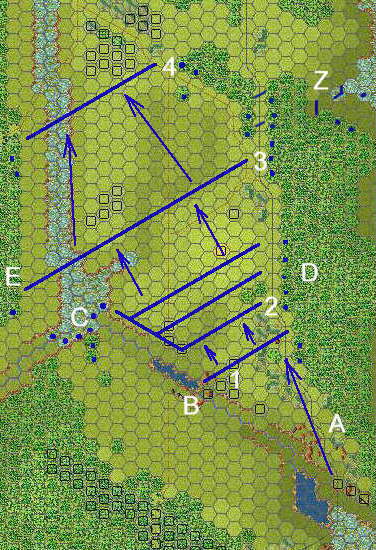
aggressive. Figure 2 is the area with which we as defenders are
concerned. There are 5 objective hexes worth a total of 250
objective points located in the
area shown in Figure 2. So if you allow the Russian no further
than this
area and
inflict damage equal to what is sustained, a draw will result.
However, if you inflict a net of damage on the Russian of 250 points or
more, you will obtain a Minor Victory.
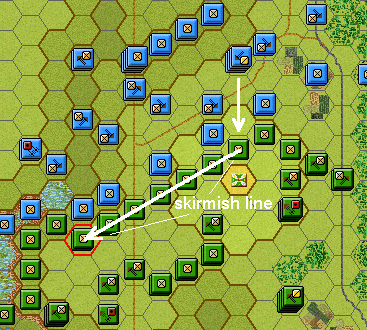
Figure
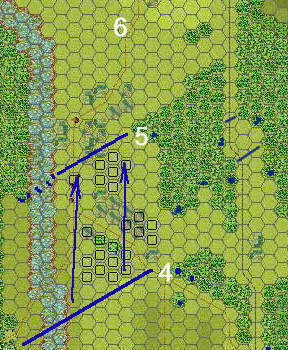
2. Early defensive positions in battle area
Refering to Figure 2, realize that this scenario is a defense of a
peninsula of clear hexes bounded by forests (labels "D" and "E")
running north and
south.
The forests are your friends as a defender; use them to protect your
flank from enfilade fire or cavalry charge. Infantry can still
penetrate through
forest,
but at a very slow rate of advance. Conceivably cavalry and
artillery could penetrate through the forest, but given the length of
this scenario and forces involved, it has less value. The defense
advocated here is divided into stages, each represented
in Figure 2 by a single digit labeled 1 through 5. In this
article each defensive
stage is
described in turn.
Send a skirmisher through the woods at "D" to keep an eye on the narrow
corridor on the east. If the Russian sends cavalry or infantry,
be prepared to counter it. The best place to do this is at "Z",
since horse artillery (usually from the IV Corp Cav Res, which should
be released by this time) can be placed up on the hill and a stack of
two infantry battalions can be placed in the swamp as shown with a
third backing them up to block ZOC movement. Skirmishers can be
placed in the woods and swamps to shoot at the cavalry.
This scenario has the same flavor as Marengo, 1800. See
that scenario at NiR Project. [NiRP]
At
Marengo, the French start with few units and at poor odds must blunt a
ferocious attack by Austrians. Later in the same day, the tide
turns as the French receive fresh troops. This Saltnovka scenario
is similar to Marengo in the buildup except the units are fixed rather
than arrive from off-board.
In summary, ironically (because this was the Russian grand strategy in
1812) the French battle strategy here is to give ground early until all
forces are released and then counterattack if opportunity arises.
Under no circumstances allow any non-skirmisher unit to be cut-off and
destroyed by
the initial Russian assault. Play for a draw and sieze a minor
victory if the Russian hands one to you. Play defensive tactics
keeping a solid zone of control across the entire corridor east to west
from the forest on the Dnieper River side to the forest on the western
side of the map. Be on guard for sneak attacks through the
western forest road or the eastern corridor between the Dnieper River
and the eastern forest; use skirmishers to plug forest roads and watch
for such tactics. Keep a sizeable reserve for a counterattack or
to handle unforseen events.
2.2 Force Distribution
Because the initial setup for the French is flawed -- it violates the the principle of mass and the principle of security in J F C
Fuller's list [DUP87:17,
DUP90:250]
(see also U.S. Army Field Manual 100-1), the 85th Rg / 4th
Dv immediately withdraws north along the pike to reduce chance of
encirclement. The optimal strategy is to collect ALL of the
French forces and establish a secure defensive line before seriously
engaging the Russian forces. Trying to confront the Russian
before 8:30 AM makes the French outnumbered at least 2:1 in infantry
and much greater in artillery and cavalry. Even the odds by
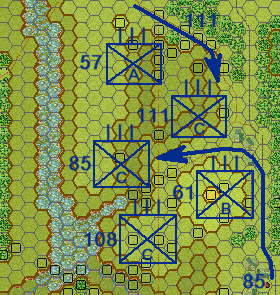
giving ground for time as shown in Figure 3. The 108th Rg / 4th
Dv defends the
eastern corridor as
shown in Figure 3; this is simple because these are that unit's
starting positions.
Figure
3. French force distribution
The 61st Rg / 5th Dv is employed defending the western end. It
must be moved up from the rear; do so quickly. These
force distributions are shown in Figure 3. All three of these
regiments (15 infantry battalions plus skirmishers and 2 artillery
batteries) are released at game start. As more of the 5th Dv
(111th Rg, 57th Rg, and two batteries at 8:30 AM, Turn 5) and 3rd Chas
a Cheval Rg cavalary is
released, these units are moved up
into the defense line to relieve pressure if
some battalions have routed to the rear. Bring the 3rd Chas a
Cheval Rg up in close support, probably on the road in the lowest point
of the valley just behind the 85th and 111th. Note the placement
of regiments allows proper command and control for the brigade
and division commanders. The 4th Dv is on the west and the 5th Dv
is on the east. The quality of the battalions in the
regiment is shown by the letter in the lower half of the NATO infantry
symbols in
Figure 3. Quality 'A' in reserve and quality 'B' to protect
the
pike is optimal.
The 5th
Cuir. Hv Cav Dv (not shown in figure) and 57th Rg / 5
Dv are in reserve. Retaining
these two
units creates a force for later counterattack if that opportunity
arises. The 4 horse batteries might be collected with this
reserve later for a nasty surprise.
2.3 Defensive Stage 1 (Turns 1-2,
maybe 3)
The label "A" in Figure 2
corresponds to the village of Saltnovka.
Forces in that narrow peninsula scream to be surrounded and destroyed
by advancing Russian forces. So
first thing is to delay Russian road advance (if any) in that area with
skirmishers in marsh and road hexes and
IMMEDIATELY withdraw back to the first line of defense labeled "1" in
Figure 2 with right flank protected by the lake near Fatova labeled "B". It will
take the Russian at least 3 turns to advance to assault that first
position and probably longer, allowing the remainder of the 5th Dv to
be released and join the battle. One possible positioning of
units to delay Russian
advance through the pike at Salta-novka
is shown in Figure 4. The positions in Figure 4 are at the end
of French Turn 2 (remember that there is no French Turn 1).
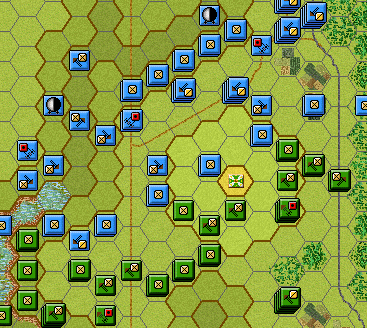
Figure
4. Positioning of French units for delay of Russian advance at
Salta-novka
A skirmisher should be placed out in the marsh to the east to raise
alarm against any sneak attack along the eastern band of clear hexes
between the marsh and forest. Two possible locations for this
scout are either hexes (52, 63) or (44, 59).
A skirmisher or two to watch for any flank advance MUST be placed in
the forest road on the far west end of the mapboard (road not visible
in Figure 2). These skirmishers can also block movement on that
road for at least 2 or 3 turns, which is long enough to allow a
defensive maneuver to thwart it.
2.4 Defensive Stage 2 (Turns 3-8 or so)
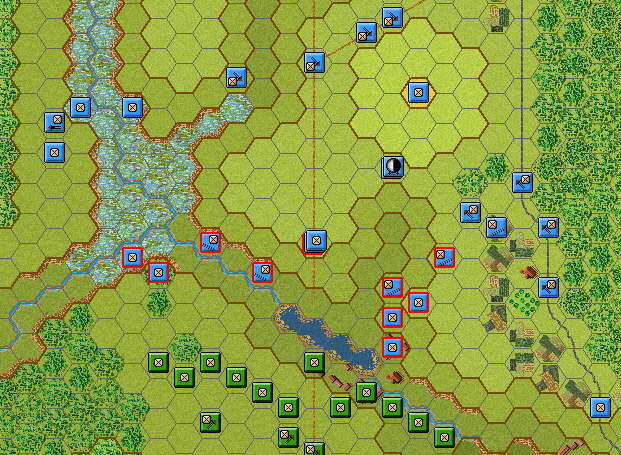
Once sufficient Russian units reach or threaten the Stage 1 line,
withdraw to the series of defensive positions indicated on
Figure 2 with "2". Take care to prevent penetration behind Line 2
through the
marshy area labeled "C" in Figure 2. Such a defense can be done
by using
skirmishers in the swamp and wooded area, as shown in Figure 2 by the
dots, supported by an infantry battalion or two properly placed.
If the Russian does successfully penetrate while the French has
substantial forces in Line 2, another encirclement (like the initial
setup near Saltnovka) could
occur. The French must take great care to ensure this does not
happen.
The author assumes the reader is proficient in setting up a defensive
line. However, a brief summary is shown in Figure 5.
Figure
5. Basic defensive position of a three brigade infantry division
Such a defense as shown in Figure 5 maintains a large unbroken zone of control while
keeping command and control at both brigade and division levels.
The alternating front line battalions ensures that a rout does not
spread to adjacent front line units and allows cavalry counter-charges
through if needed. It also prevents successful melees on either
side of a defending hex from cutting off retreat. Make sure sufficient
battalions are present behind
the main battle line to repair holes created by routing units.
Usually it is best to keep the second and third lines a mixture of
column and line formations. The disadvantage of line is that
these become disordered when non-skirmisher units rout through
them. The disadvantage of column is that if disordered it can not
form into line and engage in the classic backup while facing forward
defensive maneuver. The advantage of column is better movement;
the advantage of line is less effect to artillery shot and more
firepower. Skirmishers should be in the same hex as their parent
infantry battalion; remember that a skirmisher is protected by an
infantry square and does not nullify its effects as does
artillery. Cavalry should be a few hexes behind the second line
of infantry to threaten charges. Artillery should be setup on a
hill and be protected by preferably stacking with infantry
battalions. In Figure 5, 1st Bg has five battalions, 2nd Bg has
six, and 3rd Bg has four; this shows how C&C is maintained for
varying sized brigades. For the French with a 6 hex divisional
C&C
rating, the division commander can be placed in the same hex as the 3rd
Bg commander if wanted; also the French with a 3 hex brigade C&C
rating, the brigade commander can be placed in the second row of column
battalions for better protection against fire. Cavalry, if
available, can be placed on
the flanks of the division in the second or third row back.
Obviously the layout shown in Figure 5 is idealized as terrain has a
way of messing up the symmetric alignment. Nevertheless, the
corridor between forests should allow a defensive line similar to
that shown in Figure 6, which is taken from an actual game.
Figure
6. Example defense early in Stage 2 (French Turn 3)
In Figure 2c, the outline units in red are from the 4th Dv / 1st
Bg. The units in column at the top of the figure are from 5th Dv
and preparing to form line and move up the hill to their
southwest. At this point, keeping them in column and on a road
increases
their mobility, which is a very important force multiplier for
defense. The units on the right in column facing north (away from
the enemy) are 4th Dv / 2nd Bg still scampering back from the Russian
onslaught at Saltnovka.
The stack on the road just north of the lake is artillery (unlimbered),
infantry (column), and skirmisher. Note the unbroken array of
zone of controls exerted by the infantry battalions in line
formation. With the skirmisher in the village hex at the lower
part of the Figure and the column formation infantry battalion on the
pike on the right of the Figure, there is an unbroken ZOC from the
marsh in the west to the forest in the east. Skirmishers are not
in same hex as parent battalion since they are protected by distance to
and stream in between enemy.
In Figure 7, a late Stage 2 defense is shown from an actual
game. The units outlined in red are disordered. Note that
in the figure, the infantry battalions are all moved to the top of the
stack for illustrative purposes; you should not do this in the actual
game, and instead place your skirmisher companies on the top --
otherwise they can not fire when behind an infantry battalion in
line. And, you know why you place them on top rather than in
front like the Russian is doing, don't you? If not, read on ...
Figure
7. Example defense late in Stage 2 (French Turn 8)
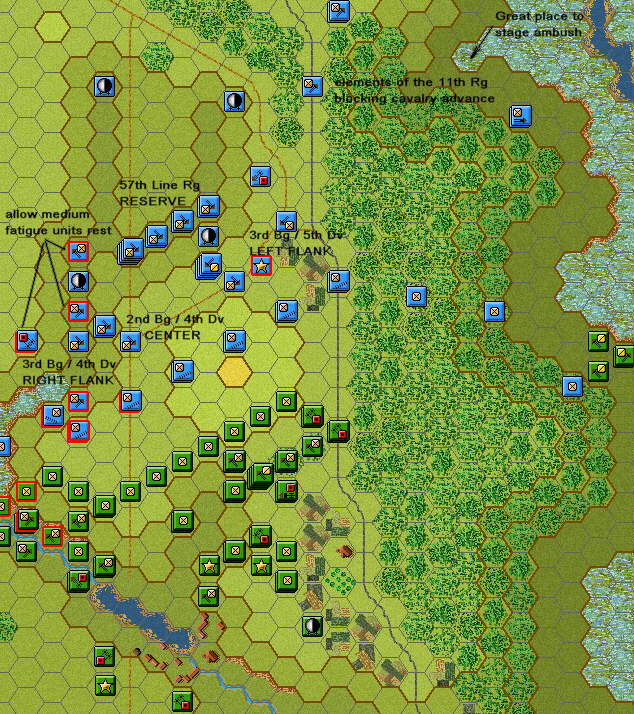
2.5 Defensive Stage 3 (Turns 9+)
If the Russian begins to penetrate the marsh near "C" in Figure, BEFORE
he gets behind you, begin
withdrawing to line
"3". This is the widest defensive line during the battle; at 19
hexes, it will require at most 9 battalions of infantry or so to place
zone of
control (ZOC) on the entire width. Here you are helped in that by
this time,
most
of the French order of battle should be released. However if the
Russian does not penetrate the marsh and ridge to the west, only 13 to
15 clear hexes in width need be defended, reducing the number of
infantry battalions in the line to around 7 or so. Make sure to
keep
plenty of battalions in mixed d'order
(both column and line) behind the main battle line to fill in when
units rout away. Also the columns threaten counterattack should
the Russian do anything foolhardy.
After giving up Objective Hex (32,65), the point tally should be around
a near draw with the French having about 250 points mid-way between a
Minor Defeat at 0 VP and a Minor Victory at 550 VP (relative to points
at scenario start). Once the
defending line reaches the valley near or before hex (28,61), the
defense must stiffen. Understand that the line at hex (28,61)
implies the entire line along the southwest to northeast hex grain
including the aforementioned hex. A concerted effort to no longer
withdraw unless necessary must now be made. By the time the
defending line reaches hex (28,59) the potential for counterattack must
be explored. See Section 2.8 for example. By this time the
French heavy
cavalry and 12 lb batteries coming from off-board as reinforcements are
in the order of battle to assist.
Also, try very hard to hold on to ridge line formed by hexes (24,62) to
(24,63) as this allows artillery to counter by threat of enfilade fire
the Russian placing artillery on the ridge line (30,64) to
(32,63), which can fire into the depression protecting our defendind
line from artillery fire. The 85th and 111th should set up a line
in the valley
about 3 hexes or
so northwest of the marsh extension on the southwest, and the line in
front consisting of the 108th and 61st Rg will back through it and
reorganize and reform. Artillery
should
be withdrawn from forward positions and set up on the ridge behind;
there should be 4 artillery batteries by 8:30 AM. Possible
locations
are hexes (24,63), (24,62), (25,60), (25,54), and (30,55). An
artillery brigade
might be setup on the east in the pike surrounded by forests, but the
field of view is quite limited which reduces the value of that
option.
2.6
Later Defensive Stages
The nice thing is that as you withdraw backward from "3", the defensive
width shrinks to
the line indicated in Figure 2 by "4", which is 11 hexes wide, only
requiring 5 infantry battalions at most to properly defend. Just
keep
backing
up, maintaining line integrity, with flanks butted up against the
forests on each end, and causing decent losses in Russian units to
somewhat compensate for the lost objective hexes. Also take care
to plug the three narrow corridors on the far east, the far west, and
up the pike.
Ideally the French defensive
line will not fall back much beyond Stage
4,
because the amount of damage and fatigue
inflicted
on the Russian should be sufficient to halt his advance before he
reaches it. However, Figure 9 shows the latter stages of
defense if needed. There are an additional 100 objective points
in the area shown in Figure 9, so even if this area is lost, the
Russian has only gained 350 objective points (which includes those
gained
earlier), which is insufficient for victory (recall he needs 550 at
scenario start). Thus, to keep the Russian from winning, give
ground
up to defensive line "5" and not lose more than 100 point
differential in units destroyed. As French defender, do not allow
the Russian to push past "5"; if they get substantial forces into
defensive area "6" (see Figure 9), the Russian will most likely gain a
victory!
Figure
9. Later defensive battle area
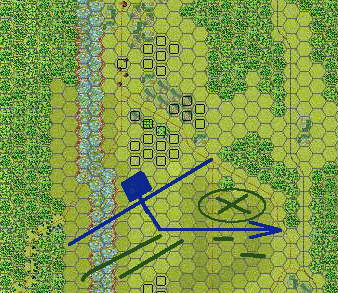
2.7 French Counteroffensive
At some point the Russian attack will peter out either by excess
fatigue, losses, and disorder, or player incompetence. When this
happens, the French player must realize it. Realizing this often
is a "gut level" type of thing, but it should be obvious to an
experienced gamer. When that moment arrives, the units saved in
Reserve must be used to counterattack and destroy sufficient
Russian units for a French victory. Since the French setup as
described
in this article refuses their left flank, an attack toward the east by
the center later in the game might cut off Russian forces
allowing their destruction. The general idea is shown in Figure
10.
Figure
10. Possible counterattack on extended Russian eastern flank later in
scenario.
If the French player is fortunate, the Russian player will commit some
bigger mistake allowing a sizeable Russian force to be destroyed.
That is the surest way to victory. However, against a competent
Russian player, the best the French can hope for is probably a
draw. Work toward that end by slowly withdrawing through each of
the defensive stages and making the Russian pay dearly in lost units
for each objective hex gained. Its always more expensive to
attack than defend because the defender has terrain benefits and can
put distance between him and the enemy while the attacker has to move
forward which decreases amount of time available to apply firepower to
the defender while allowing the defender to remain stationary and
perform reaction fire on the moving attacker. The defender can
also choose the terrain in which the attacker confronts him, which is
an advantage as shown for example by placing his infantry line in a
depression out of attacker artillery fire and allowing friendly
artillery fire over the top.
In a somewhat reversal of roles, the Russian player has more skirmish
companies relative to the French in this scenario. If a Russian
player leaves his skirmish line out of the ZOC of his formed infantry
battalions, use a single squadron of cavalry to mow the entire line
down given you can protect the squadron in its final charge hex.
An example of this is shown in Figure 5b. Here a single squadron
has eliminated or meleed 9 different skirmisher companies of around 75
to 100 men each.
-----
Figure
11. French cavalry squadron before (top) and after (bottom) mowing
down a skirmisher line.
In bottom Figure 11, note that after the cavalry charge, the infantry
battle line has advanced one hex forward to better secure the final
position of the cavalry squadron. Several additional melees by
infantry battalions against skirmisher companies were required to do
this, which is okay as formed infantry battalions do not incur fatigue
when meleeing skirmishers.
3 -
RUSSIAN ATTACK
|
An army ought only to have one line of
operation. This should be preserved with care, and never
abondoned but in the last extremity.
|
|
Several possible attacks are discussed in this section. However
one central idea should be selected and put into practice. Do not
try to perform several unrelated attacks at different points of the
line as this will dilute your attack. As Erich von Manstein said
regarding WW2 armored attacks, "boot 'em, don't splatter 'em!" [MAN55]
One thing to keep in mind during play of this scenario (and this
includes the French player too) is that fanatic quality of the Russian
infantry. They are not going to rout. The skirmisher
companies might occasionally, but the infantry battalions are going to
keep on coming no matter what the French player dishes out. Even
fatigue won't bother them too much with exception of combinations of
many factors like high fatigue (-2), disorder (-1), lost melee (-2),
and enfilade fire (-2) which would add up to affect even the most
stalwart unit.
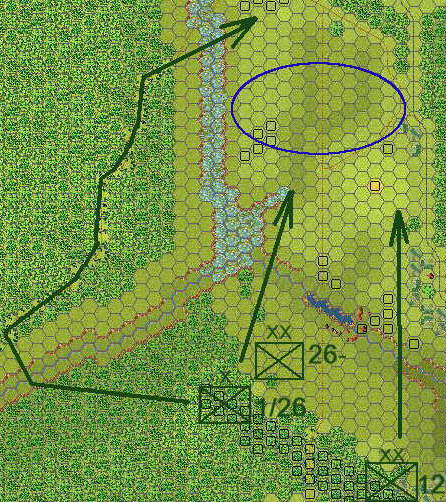
3.1 Initial Encirclement
It should be obvious after reading Part 2 of this article that the
first thing to do is try to cut off the opponent's forces in the
Saltnovka area. This can be done by aggressively assaulting the
Saltnovka
area with the 12th Inf Dv, and simultaneously pushing through the
marshy area with the 26th Dv. The 2nd Gren Dv should be kept in
reserve along with the IV Cav Corps to be used to exploit opportunities
made possible by French player mistakes; this is very important to
winning a victory so don't neglect it. The cossack cavalry can be
used in duty support of either assault. The general idea of this
initial encirclement is shown
in Figure 12.
Figure
12. Encirclement and destruction of French 2nd Bg / 4th Inf Dv.
This initial attack is the best chance for a victory, so push hard
early while a sizeable portion of the French forces are fixed.
When assaulting Saltnovka, remember Napoleon's dictum "One must break
a few eggs to have an omelet." Don't hold back; go right at hex
(41, 81) and
melee it to try to cut of the line battalions from escape. That
is
approximately 2500 men, which translates to about 100 victory
points. Also, engage the forces to the east of the lake and try
to penetrate behind and trap a large size of French battalions agains
the wooded peninsula.
3.2 Wide Flank Attack
Optionally, a wide flank attack using the forest road can be
attempted. Against a competent French player, this is probably a
poor selection for an attack, but might yield dramatic results if
weakly countered. The general idea is shown in Figure 13.
Figure
13. Left flank forest sneak attack
1 Bg / 26th Inf Dv makes for the forest road to the west.
Additionally some of the Jager infantry from the 3 Bg / 26th Inf Dv
might accompany it. The remainder of the 26th Inf Dv attacks
through the marsh as shown in Figure 13 along with a concerted attack
by
12th Inf Dv through Saltnovka. Ideally the 1 Bg flank attack is
not noticed and comes out of the forest unnoticed by the French,
cutting his force in half and ideally seperating the French in two
isolated groups. The southern French group can than be destroyed
by attack from two directions, which should win a decisive victory.
Similarly a sneak attack up the corridor on the far east can be
attempted. Against a competent opponent this is probably dubious,
however as it can be easily parried by a one or two infantry battalions
and their skirmisher companies on the flanks in forest and marsh.
However, if you think your opponent is a dupe, try it.
3.3 Rough Slog
If the French player has parried the initial encirclement and flank
attack options and successfully withdrawn to a defensive line a few
hexes south of the village Selets,
you are in for a rough slog
up the middle. This is now a knock-down drag-out
punch-counterpunch affair. In this case, select a single place in
the French defense and continually attack it until that part of the
line caves in, using firepower
of the Russian12-lb 12-gun batteries. If
neither player makes a mistake, the
game probably will
end in a draw. Play for a draw waiting for any opportunity
presented by a French defensive mistake that allows for destruction of
substantial units.
4 -
CONCLUSION
This is an interesting scenario, and if played properly by both sides,
probably will result in a draw. The French player must, however,
play flawless otherwise the Russian will steamroll him. In
particular he must pull back and collect his forces while performing a
fighting withdrawal until his forces have grown sufficiently large to
attempt a full defense or counterattack.
FOOTNOTES
REFERENCES
[DUP87] Trevor N.
Dupoy, Understanding War,
Paragon House, 1987. ISBN 1-55778-099-4
[DUP90] Trevor N.
Dupoy, Understanding Defeat,
Paragon House, 1990. ISBN 0-913729-57-4
[FRE47] Frederick the
Great, The Instructions of Frederick
the Great for His Generals, 1747,
reprinted Military Book Club, 2000. ISBN 0-7394-1044-X
on-line
on-line
[HPSNRC] The reader can obtain this game and
scenario
at: http://www.hpssims.com
;
within the HPS Napoleon in Russia game CD look for filename: SB_Saltanovka.scn. The
analysis in this article is primarily of the HPS version, though this
game may also be played instead using the NiR Project Add-ons.
See for example http://nap.phxsim.com/downloads/.
[NiRP]
[NiRP] Jean-Marie
Barbie, http://www.nir-project.com
.
[MAN55] Erich von
Manstein, Lost Victories,
originally published 1955, reprinted Zenith Press, 2004. ISBN
0-7603-2054-3
[NAP31] Napoleon
Bonaparte, The Military Maxims of
Napoleon,
originally published 1831, reprinted Da Capo Press, David G. Chandler,
editor, 1995. ISBN 0-306-80618-5
Do you have a commentary on a battle
between you and your foe in a NWC game which you'd
like to see printed here? Contact us
Dragoon@phxsim.com
Comments? Send your letters or articles to the
editor. We may include them in a future edition.