

A Wagram Campaign:
Napoleon Outmaneuvers the Archduke
Austrian Commander: FM Sir Ken "Muddy" Jones,
Anglo-Allied Cavalry Corps Commander and
Allied Commander-in-Chief
French Commander: Lieutenant-Colonel Neville Worland,
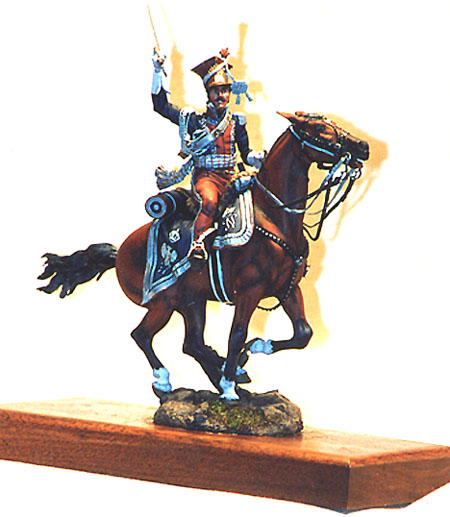
I Reserve Cavalry Corps, Armée du Nord
November 2004-January 2005
Situation at the Opening of the Wagram Campaign
April/May 1809 - The Austrian army is divided into two
parts after heavy fighting in Bavaria.
The main army under Charles retires through Bohemia. The southern forces under Hiller retire
through Austria south of the Danube. Will Napoleon follow Charles through Bohemia
and deny the Austrians the river as a defensive boundary or will he follow in behind
Bessières who is pursuing after an elusive Hiller? He must consider the consequences of
either choice. Moving north puts him further from Eugene and Massena and opens either up to
attack but gives him the advantage of not having to cross the Danube in the face of a
desperate defense. Charles on the other hand must decide whether to rest near Brunn or
immediately retire on Vienna. Whatever the choice the forces are ready to march!
The Austrians' Opening Strategy
My strategy at the opening of the campaign was to attempt to draw Napoleon on to a
field favorable to a defender. Both the fields of Znaim or Ebelsburg offer significant
advantages to the Austrians and so my strategic decisions at the opening had the intent
of luring the French to one of those fields. When given a choice, I opted to have Charles
avoid a full battle and retreat to Znaim.
Description of Austrian Strategic Choice
24 April 1809 - Charles will fall back to Znaim
and then fall back on Vienna after
resting his army and recouping their losses. Hiller is to fall back to Vienna,
destroy the bridges there, and cross to the north bank and link up with Charles.
John is ordered to fall back from Eugene and cross the Danube near Pressburg after
destroying the bridge.
Fortunately, the French chose to pursue the Austrians north of the Danube
(no doubt hoping to avoid the river crossing at Ebelsberg) and their lead elements
found the Archduke’s army drawn up for battle around the town of Znaim.
I had succeeded in reaching a preferred field.
Result of Strategic Choice
12 May 1809 - (Campaign) - Charles has
pulled his army back to the vicinity of
Znaim in Bohemia and is going to steal a page out of Napoleon's book by making his
position appear weaker than it really is. The French are pursuing at a rapid pace and
their corps have become strung out. A report reaches the Austrian HQ that a force of
Frenchmen has been sighted to the southwest. Is Napoleon turning your flank or is this
a cavalry screen? Should you keep to your plan or be outflanked and have your line turned?
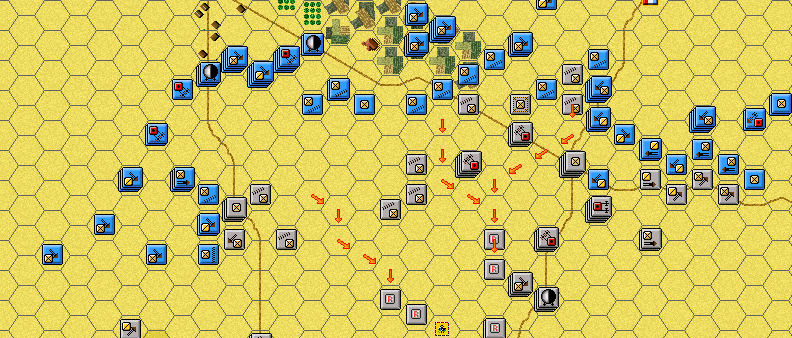
The Battle of Znaim:
The Austrian View
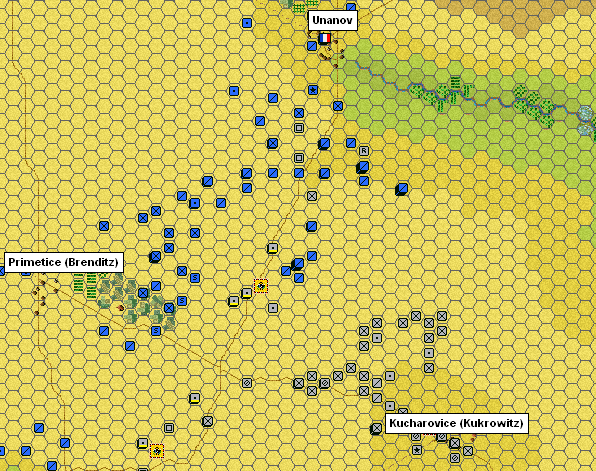
At the outset the bulk of the Austrian army is hidden from view—only the 3rd Korps
 is visible to the French as they arrive. Basically, the 3rd Korps is spread across
the front to shield the major towns and objectives from the French. On the left,
the 1st Division is in position in front of Znaim. In the center, the 2nd Division
screens the town of Kakrowitz and the Austrian 1st Korps that is hidden there.
On the right, the 3rd division holds the village of Unanov. They are supported by
1000 cavalry (Hussar #4).
At full strength, the 3rd Korps has about 17,500 men that are
almost equally divided among the three divisions.
is visible to the French as they arrive. Basically, the 3rd Korps is spread across
the front to shield the major towns and objectives from the French. On the left,
the 1st Division is in position in front of Znaim. In the center, the 2nd Division
screens the town of Kakrowitz and the Austrian 1st Korps that is hidden there.
On the right, the 3rd division holds the village of Unanov. They are supported by
1000 cavalry (Hussar #4).
At full strength, the 3rd Korps has about 17,500 men that are
almost equally divided among the three divisions.
The French advance is strung out and their lead elements are almost all cavalry.
I preferred to keep the bulk of the Austrian army hidden as long as possible,
so I left the 3rd Korps in place to screen Charles’ main force. Facing cavalry
in the center, the 2nd Division formed square and placed their guns within.
On the right, the 3rd Division formed a defensive position in and around Unanov.
As the French advanced, they largely ignored the approach to Znaim and concentrated in
the center and on Unanov. The Austrian artillery in the center was successful in keeping
the French cavalry away from their lines, but the combination of French infantry and
cavalry made short work of the defenders around Unanov. For the most part,
the Austrian 3rd Division was destroyed as were some elements of the 2nd Division that
tried to extend assistance. My strategy of using squares with artillery was actually
quite successful against cavalry but were susceptible to isolation and elimination
once a large enough force of infantry reached the combat zone.
I was too slow in pulling the 2nd and 3rd Division units back and lost heavily in men,
guns, and officers. The Hussars #4 were also
lost in the defense of Unanov.
I had committed them to a charge against two French horse batteries during the defense
of the town. They were only partly successful (capturing one battery) due to a
misjudgment on my part about how far they could advance after their initial attack.
The destruction of the Austrian right was complete by about 9 am.
THE FRENCH HAVE TAKEN UNANOV AND THE ARCHDUKE ORDERS THE 1ST KORPS TO
THE RELIEF OF THE CENTER – 0745 HRS.
The Austrians Are Reinforced
As the French gained strength, they concentrated in the center and the Austrian right.
Too late, I ordered the Austrian 1st Korps to the relief of the beleaguered 3rd Korps.
While they were able to stabilize the center and reconstruct the right, most of the
remaining elements of the 2nd and 3rd Divisions were destroyed.
With the addition of the 1st Korps, the front stabilized along the line of the most
forward objective hexes. The Austrian battalions formed line and began to take quite
a toll on the French infantry and skirmishers arrayed against them.
I formed several batteries of guns slightly behind my front line. These guns worked energetically
on the French infantry and cavalry through the first 20 turns of the game.
batteries of guns slightly behind my front line. These guns worked energetically
on the French infantry and cavalry through the first 20 turns of the game.
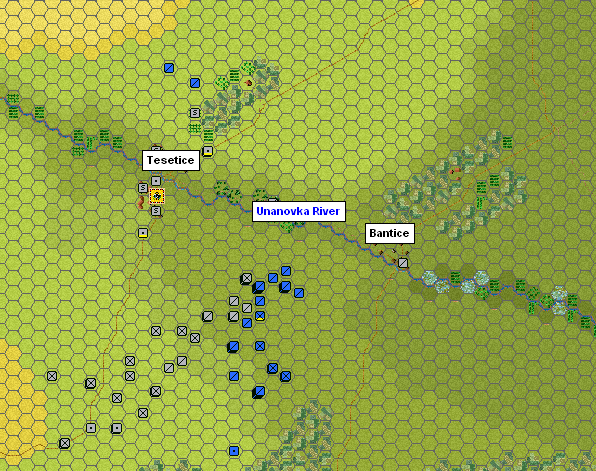
After the fall of Unanov, the French commander extended his left flank in an
attempt to envelop the Austrian right. To do this, the French extended along the
south side of the Unanovka River. This was a sizable force—perhaps 1250 cavalry
and at least a brigade of infantry with one battery in tow.
While the French were maneuvering around the Austrian right, the Austrian 4th Korps
had been advancing across the high northern plateau and arrived behind the French
flanking force. The 4th Korps was unopposed as they recaptured Unanov.
Continuing their movement south, they severed the connections between the French
flanking force and Napoleon’s main body of troops. Unfortunately, several
battalions of the 4th Korps were unable to clear Unanov before French reinforcements
arrived. The French cavalry charged and cut off their escape route and the Austrians
were destroyed by infantry within a few turns. The rest of the 4th Korps formed a
solid defensive line anchored on the right by the Unanovka River and easily repulsed
the latest French advance. This left the French flanking force in the Austrian rear.
Rather than attempting to rejoin the main army, the French commander ordered his
isolated flanking force to undertake a deep penetration—objective Tesetice (1,000 pts.)
on the Unanovka River. Since the French force was too large to ignore,
Charles was forced to detach units from the 1st and 4th Korps to pursue the French.
But the French had almost an hour head start. Fortunately, Charles had earlier sent the
Chevaulegers #5 3/2/2 and the
Cuirassier #2 1Cav/RD/RK across the Austrian rear through
Zuckenhandl. Elements of these units occupied Tesetice before the French arrived.
Other elements of the 3rd Division/4th Korps were also moving towards Tesetice
along the north side of the Unanovka River. The plan was to eventually trap the
French force and destroy it in detail. The destruction of this force would go a long way
towards rebalancing the score, which had begun to favor the Emperor of France.
At turn 26/60, the casualties were as follows:
French losses: 5,216 infantry, 3,056 cavalry,
8 guns, and 1 officer;
Austrian losses: 10,234 infantry, 2,137 cavalry,
27 guns, and 9 officers.
Most of the Austrian guns and officers lost were from the 3rd Korps.
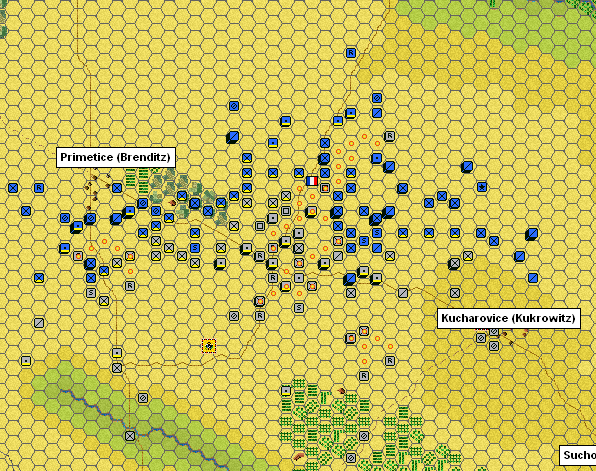
The French Ford the Unanovka River and Turn the Austrian Right
Having dispatched a considerable force to pursue the French penetration towards Tesetice,
the Austrians found themselves outnumbered along the right front behind the Unanovka River.
French reinforcements eventually allowed Napoleon to ford the river and curl around the
Austrian right. Having to keep up a defense in front, the Austrians were unable to pull
back their right. By turn 37 (1400 hrs) the Austrian right was enveloped and Kukrowitz
(a major objective) was threatened. The Archduke was very concerned that he would not be
able to extricate his 3rd and 4th Korps troops from the French envelopment.
THE FRENCH ENVELOPMENT OF THE AUSTRIAN RIGHT FLANK – 1430 HRS.
Near Tesetice, the Austrians had successfully fended off the rogue French force and had
been able to inflict significant casualties. The Austrians were not able to trap the
French, however, and they moved off toward the river crossing at the village of Bantice.
Still, it remained imperative for the Austrians to destroy this force both to end the
threat and to make up for losses on the main front.
French reinforcements began to arrive on the field from the southwest. The Archduke had
left most of the 2nd Korps in place to defend the river behind Novy-Saldorf but there was
a question of whether they would be sufficient.
LANNES’ PENETRATION MOVES TOWARDS BANTICE – 1400 HRS.
The French Roll Up the Austrian Right
By 1600 hours (turn 41/60), the Austrian right had been destroyed and many Austrian
battalions had been lost. Much of the French success during this phase of the battle
was due to good use of French cavalry and infantry in combination. With cavalry superiority,
the French were able to charge repeatedly and isolate small elements of the retreating
Austrians. French infantry would then move in and finish the job. There really was
little that the Austrians could do but try to save as many men and guns as possible while
sacrificing as little as possible.
By now, the French were poised to assault Kurkrowitz. The defensive forces there were
capable of offering only a token resistance.
THE COLLAPSE OF THE AUSTRIAN RIGHT – 1530 HRS.
THE AUSTRIAN RIGHT FLANK HAS BEEN DESTROYED
AND THE CENTER IS THREATENED – 1600 HRS.
To the rear, along the Unanovka River, the French had run past Bantice and headed
towards Prace. It appeared that they had escaped the Austrian pursuit… at least for
the time being.
In the southwest, the French had taken Novy-Saldorf without a fight and had decided to
range further south rather than assaulting the heavily defended river line.
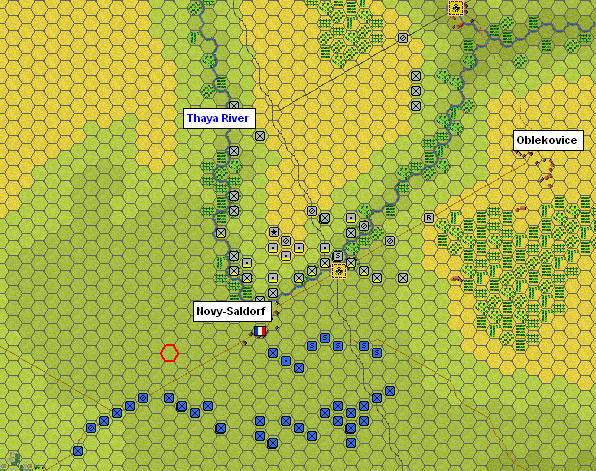
DAVOUT TAKES NOVY-SALDORF AND
MARCHES TOWARDS THE AUSTRIAN REAR – 1600 HRS.
The Archduke Doesn’t Like What He Sees
At this point, Archduke Charles took a moment to assess the battlefield situation.
The French had shattered the Austrian right and were poised to capture Kurkowitz.
And while the city of Znaim was safe, the French force in the south were threatening
another deep penetration towards the Austrian objectives in the rear areas.
Casualties had been heavy; the Austrians had lost over 37,000 infantry, 7,900 cavalry,
78 guns, and 28 senior officers, compared to French losses of 20,000 infantry,
9,100 cavalry, 28 guns, and 10 officers. The score (1865 points) indicated a French
minor defeat only because Napoleon’s forces had not yet taken any major objectives—but
this was only a matter of time.
In the center, the situation was becoming desperate for the Austrians. It was imperative
that they withdraw to Znaim before much more of their strength was eroded.
Hence, the Archduke decided to offer the French a minor victory even though the score
still indicated a French minor defeat.
The French commander accepted the Austrian offer and the armies marched off to another
field closer to Vienna.
THE BATTLE OF ZNAIM:
The French Tale
General opening comments (These were completed after
the battle, the comments below were
done at the time):
The French strategy was simple, chase the Austrians and bring them to battle.
With no real knowledge of the strategic choices, I followed Charles, expecting that
would bring about the major battle against the strongest Austrian forces for which I
was searching. That brought us to Znaim.
The situation at the outset was very obscure. Only a few Austrians were visible,
but their dispositions (they were very boldly standing their ground within easy range
of large areas of dead ground) suggested a considerable force was within supporting
distance. With no means of telling where those supports were and not keen on falling
into a trap, I was content to probe and let him reveal his intentions, particularly
as some of my forces were still several hours march away from the battlefield.
This wait was not unfruitful, as the bait dangled to try and lead me on was a bit too
eager and I managed to roughly handle a couple of divisions without too great a
loss on my side.
Turn 15 of 60
General situation
The Austrians are present in considerable force, with several corps evident, spread
across the map, together with a significant amount of hidden movement. (I think this
is coming from his far left, as major formations have come from every other part of the
field and one cavalry unit has been visible coming from that area.)
As ever in this campaign, the Austrians are strong in artillery but weak in cavalry.
The French Army is slowly coming onto the field, also from widely separated points
across the map.
General strategy
The Austrians need to defend a widely?spaced set of VP locations, against a French
force with higher mobility, due to its superiority in cavalry. In these circumstances,
a set piece battle – well in advance of the VP locations - would suit the Austrians,
particularly with their greater number and calibre of guns. This is consistent with
Charles’ approach so far, with three corps converging on the centre.
Assume from the hidden movement there is a corps in reserve, probably in the Austrian
deep left flank. As he probably knows Davout is coming from the west, Charles will
want to keep that corps in reserve, to protect the VP locations from that direction.
My intention is to keep the Austrians as widely dispersed as possible, by French corps
advancing to threaten VP locations from where they arrive, rather than gathering at some
central point. This will allow cheap captures of VP locations, by staging raids between
the Austrian formations, and/or concentrating against isolated Austrian formations,
using distance and my superior cavalry to cordon off an area selected for attack.
If the Austrians attack where they have local superiority, the French to their front
will retire, as this will tend to increase the Austrian dispersion across the battlefield:
a strategy inspired by the Allies' Trachenberg Plan of August 1813 against Napoleon,
and the Fabian
strategy that defeated Hannibal.
Directions for commanders
Centre
The objective of Lannes' command (less the forces discussed below) is to court attack
from the Austrians, to allow other corps freedom to move. This force will face
considerable pressure in coming turns, facing one strong Austrian corps with another
corps approaching from each flank. The Guard and reserve cavalry will support this front,
but will try to avoid combat. The intention here is to draw the Austrian centre
into a battle, tying them down and drawing them out, but not accepting
any full-scale action.
If the Austrian pressure on this front is not maintained, the French centre will advance,
to maintain the pressure on the Austrians.
4 Division of Lannes' command plus
1 Heavy Division of the Reserve Cavalry will raid
into the Austrian rear. They will avoid combat with any significant Austrian force,
but will destroy any delaying force (such as a cavalry cordon).
(Having divisional command structures plus Lannes himself should enable rapid recovery
from disorder after combat.) Having caused Austrian dispersion, this force will be
available to support any attack by other French forces. Alternatively, it could
capture and hold important VP locations.
Left
The Württemberg (VIII - Vandamme) and Saxon (IX - Bernadotte) corps will arrive over
the next few hours, in a position to turn the Austrian right flank. As they arrive,
they will advance to threaten that flank, dispersing the Austrians and reducing the
pressure on the French centre. They will not take part in the centre battle,
unless Lannes is in serious trouble. When fully deployed they will attack the
Austrian right flank, with the aim of isolating and destroying the corps on this flank.
Right
III Corps (Davout) will arrive relatively late in the day, in a position to turn the
Austrian left flank. While conditions at the time may dictate otherwise,
the intention is for this corps to advance directly on the major VP locations to the
rear of the Austrian left, assisted by an advance (if possible) by the centre.
Contingencies
The strategy outlined above is to attack from the left and right flanks, with a raid
behind the Austrian centre right, and to retire if pressed in the centre.
How will the Austrians react to this?
- Suppose he thins his centre to pursue the raid. Depending on the strength of this
pursuing force, the raid will fight or flee. Weakening his centre too much would be
risky for the Austrians, as the French centre, supported by the Württembergers,
can always attack.
- Suppose he ignores the raid and attacks Lannes’ command, which is of course weakened
by the forces in the raid. There is nothing to stop the French centre from retreating;
in fact, such an attack would be a welcome development, as it would increase the Austrians’
dispersal. Without cavalry superiority, the Austrians will have a hard time forcing
a "fight to the death" at unequal odds (although some disordered infantry units might
have to be abandoned in the retreat). The movement behind the Austrian right flank of
the Württembergers and Saxons will also reduce his enthusiasm to pursue the French
centre too far.
- Suppose he dispatches his reserve corps to pursue the raid. That leaves the door
open for Davout. That corps also would have the longest chase, meaning it would also
have to recapture a large number of VP locations.
- Suppose he retires en-masse to defend the VP locations. This is his best chance of
forcing the set piece battle. But he can’t defend all the major VPs and be compact
(that is, with his formations able to support each other) at the same time,
so trading space for time won’t make his problem go away. Using widely dispersed
corps to harass his movement and threaten VP locations, I just start the process
again.
Turn 26 of 60
General situation
The attempt to gain the initiative has been largely successful;
the Austrians appear to be reacting to French moves rather than moving to any
particular plan. The raid by Lannes with the heavy cavalry plus a division of
infantry has penetrated the Austrian position, forcing Austrian dispersion and
creating the conditions for achieving local superiority.
(Charles appears to have taken Option 1 of the set I identified previously,
or defending an increasing perimeter. In particular, the Austrian right is in
danger of being fatally compromised. At this stage the strategy appears to be
working so I will continue with it.)
Orders
Left. The Württembergers will continue to skirt the
right flank of the main Austrian
force, at worst tying them down and providing opportunities for a turning move across
the rear of the Austrian centre. The Saxons will reinforce this sector,
increasing those opportunities.
Centre. With the arrival of the final
division, this force can now get more aggressive.
The Austrians appear a bit more circumspect in this area than before, because of both
this addition to French strength and the subtraction of large forces to pursue Lannes.
If the Austrians in the centre start to retreat, the French will pursue, snapping up
any disordered infantry units left behind (and perhaps even trying to cause this situation,
with "forlorn hope" type attacks).
Right. I think the Austrian final
reserve is still in place on this flank.
Davout is scheduled to appear in the next couple of hours, so we will find out.
Lannes' raid. The Austrians have reacted strongly to this raid,
detaching large forces to pursue. (This has implications for the battle in the
French centre and left, as noted above.) Lannes will therefore continue to move away,
avoiding combat with significant Austrian forces but killing any light forces that
attempt to get in the way. If the Austrian pursuit turns away to support the
Austrian main body, this force will harass that effort.
Turn 35 of 60
General situation
The right flank of the Austrians has been shunted aside by the Württembergers, with
the loss of several thousand (Austrian) men. However, the total strength of the two
sides is about even in this area and I have no intention of bashing against those big
Austrian battalions. Instead, the road is clear for the Württembergers to follow Lannes’
raid and destroy the Austrians attacking that raid – capturing a big VP location at
the same time. The raid has met heavier weather than I had intended, but will escape
over the next few turns, doubtless losing a few squadrons and battalions in the process,
but still maintaining a threat to the Austrian communications (VP locations).
As this is a battle in a bigger campaign, killing Austrians needs to be the priority,
rather than VPs, but I need to aim at least at a draw, while making the casualty
differential as big as possible.
Orders
Left. The Württembergers
will follow the stream and attack the rear of the Austrians
facing Lannes’ raid. The Saxons as they arrive will maintain the pressure on the
Austrian right, but not seriously attack.
Centre. Keep the weight on the Austrians,
so as to prevent them moving from this area,
but no attack. If the Austrians in the centre start to retreat, the French will pursue,
snapping up any disordered infantry units left behind (and perhaps even trying to cause
this situation, with "forlorn hope" type attacks).
Right. Davout will move
around to the south of the VP locations, seeking to smoke out
any Austrian ambush. No serious action unless a favourable opportunity presents itself.
Lannes' raid. The
Württembergers will arrive in the rear of the Austrians in this sector.
Once the Austrians react to this move, this force will attack the Austrians.
The decision to accept an armistice
With the Austrians in danger of complete destruction, Charles offered an armistice.
While I was under no obligation to accept, I decided to do so. What was I to gain
from destroying the Austrian Army? Who then would (albeit mostly theoretically)
keep the Russians and Prussians in check in the east, while I dealt with Spain?
I have no fundamental disagreements with the Hapsburgs (although I accept they may
have some with me) and a complete victory would not increase my security.
My objective in this war - which I did not start - is simply a return to the
situation before it started, with the Austrian Army still in being.
What I want then is a major victory without killing too many Austrians, requiring a
subtle touch which obviously has eluded me in this instance. Oh well, on to Vienna
and another field.
Next Page
Return to Index